一、水平自动扩容和缩容HPA(K8S 版本>=1.23.x)
HPA全称Horizontal Pod Autoscaler,Pod水平自动伸缩,HPA可以基于CPU利用率replication controller、deployment和replicaset中的pod数量进行自动扩缩容。pod自动缩放对象适用于无法缩放的对象,比如DaemonSet
HPA由KubernetesAPI 资源和控制器实现。资源决定了控制器的行为。控制器会周期性获取目标资源指标,并与目标值相比较后来调整Pod副本数量。
1.1 创建Deployment
vim php-apache.yaml
apiVersion: apps/v1
kind: Deployment
metadata:
  name: php-apache
spec:
  selector:
    matchLabels:
      run: php-apache
  replicas: 1
  template:
    metadata:
      labels:
        run: php-apache
    spec:
      containers:
      - name: php-apache
        image: aminglinux/hpa-example
        ports:
        - containerPort: 80
        resources:
          limits:
            cpu: 500m  ##限制Pod CPU资源最多使用500m
          requests:
            cpu: 200m  ##K8s要保证Pod使用的最小cpu资源为200m
---
apiVersion: v1
kind: Service
metadata:
  name: php-apache
  labels:
    run: php-apache
spec:
  ports:
  - port: 80
  selector:
    run: php-apache
应用YAML文件
# kubectl  apply -f php-apache.yaml
deployment.apps/php-apache created

# kubectl  get pod -o wide |grep php
php-apache-6bb98d64f7-q6zfg   1/1     Running     0              2m15s   10.244.154.44    node-1-233     <none>           <none>
# kubectl  get svc |grep php
php-apache       ClusterIP   10.111.164.252   <none>        80/TCP         119s
1.2 安装merics-server(可以获取具体资源使用情况)
下载YAML文件
wget https://github.com/kubernetes-sigs/metrics-server/releases/latest/download/high-availability-1.21+.yaml禁用证书验证
- --kubelet-insecure-tls #禁用证书验证修改metrics-server镜像地址
vim high-availability-1.21+.yaml
将image: k8s.gcr.io/metrics-server/metrics-server:v0.6.2 修改为 image: registry.cn-shenzhen.aliyuncs.com/ikubernetesi/metrics-server:v0.6.4
应用YAML文件
# kubectl  apply  -f high-availability-1.21+.yaml
serviceaccount/metrics-server created
clusterrole.rbac.authorization.k8s.io/system:aggregated-metrics-reader created
clusterrole.rbac.authorization.k8s.io/system:metrics-server created
rolebinding.rbac.authorization.k8s.io/metrics-server-auth-reader created
clusterrolebinding.rbac.authorization.k8s.io/metrics-server:system:auth-delegator created
clusterrolebinding.rbac.authorization.k8s.io/system:metrics-server created
service/metrics-server created
deployment.apps/metrics-server created
poddisruptionbudget.policy/metrics-server created
apiservice.apiregistration.k8s.io/v1beta1.metrics.k8s.io created

# kubectl  get pod -n kube-system |grep metrics
metrics-server-566c5cb466-bnj2m            1/1     Running   0               68s
metrics-server-566c5cb466-v4d2t            1/1     Running   0               68s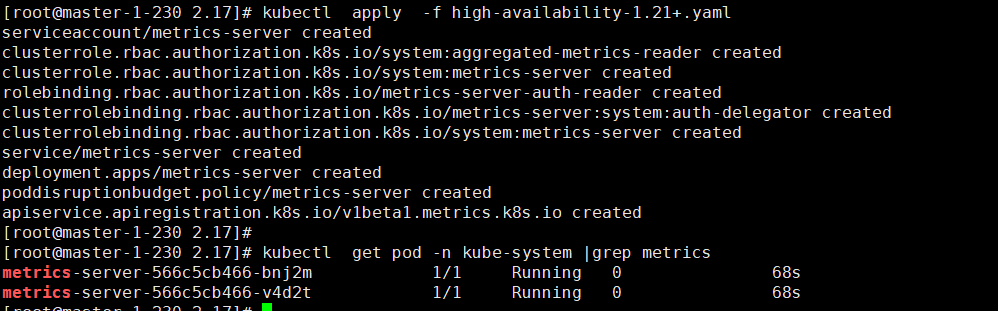
创建HPA
vim hpa-php-apache.yaml
apiVersion: autoscaling/v2
kind: HorizontalPodAutoscaler
metadata:
  name: php-apache
spec:
  scaleTargetRef:
    apiVersion: apps/v1
    kind: Deployment
    name: php-apache
  minReplicas: 1  ##最小Pod数为1
  maxReplicas: 10  ##最大Pod数为10
  metrics:
  - type: Resource
    resource:
      name: cpu
      target:
        type: Utilization
averageUtilization: 50 ##当Pod的CPU使用率超过50%时,需要自动扩容# kubectl apply -f hpa-php-apache.yaml
horizontalpodautoscaler.autoscaling/php-apache created
# kubectl get pod|grep php
php-apache-6bb98d64f7-q6zfg 1/1 Running 0模拟php-apache Pod CPU实用率增加
kubectl get deployment,po,hpa |egrep 'NAME|php-apache'

#php-apache Pod副本会逐渐增加,hpa的TARGETS列CPU使用率会越来越高,当超过50%就会自动生成新的Pod副本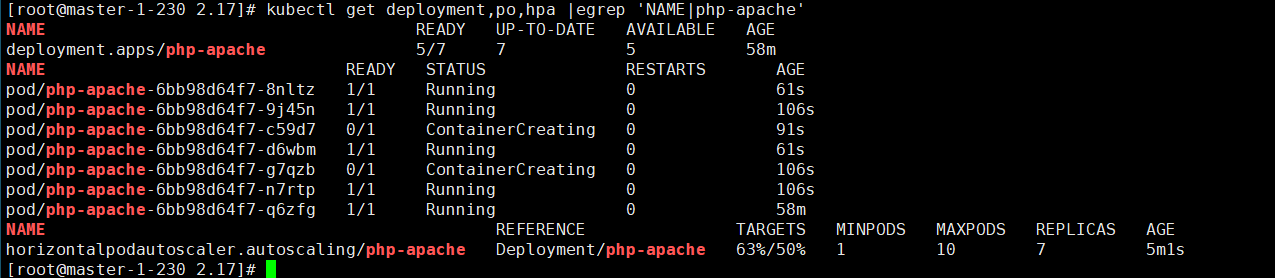
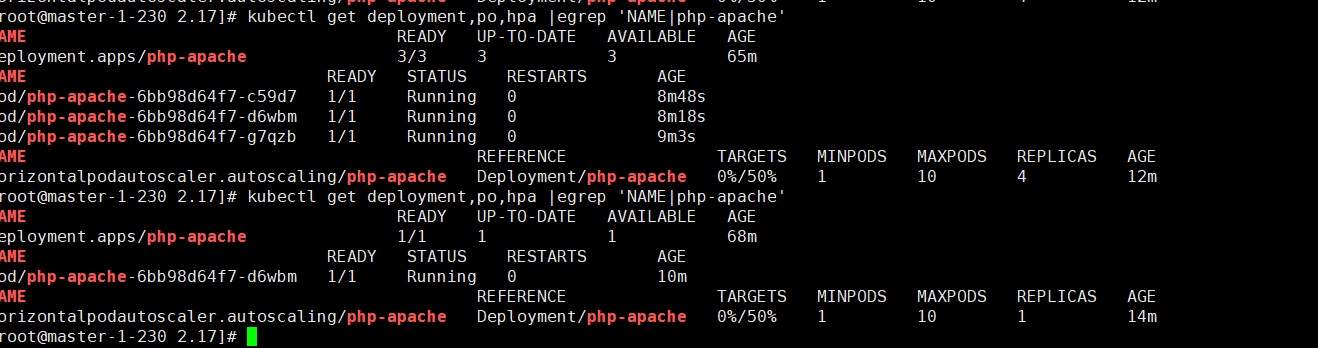
取消压测脚本,等待几分钟后,检查Pod数量。

二、NetworkPolicy
2.1 NetworkPolicy 使用场景
NetworkPolicy 用来控制Pod和Pod之间的网络通信,它支持对Namespace进行现在。基于白名单模式,符合规则的对象通过,不符合的拒绝。
应用场景:
- PodA不能访问Pod B
- 开发环境所有Pod不能访问生产环境命名空间
- 提供对外访问时,现在外部IP
NetworkPolicy YAML示例:
apiVersion: networking.k8s.io/v1
kind: NetworkPolicy
metadata:
  name: test-network-policy
  namespace: default
spec:
  podSelector:
    matchLabels:
      role: db
  policyTypes:
    - Ingress
    - Egress
  ingress:
    - from:
        - ipBlock:
            cidr: 172.17.0.0/16
            except:
              - 172.17.1.0/24
        - namespaceSelector:
            matchLabels:
              project: myproject
        - podSelector:
            matchLabels:
              role: frontend
      ports:
        - protocol: TCP
          port: 6379
  egress:
    - to:
        - ipBlock:
            cidr: 10.0.0.0/24
      ports:
        - protocol: TCP
          port: 5978
说明:apiVersion、kind和metadata为必选字段
- podSelector:定义目标Pod的匹配标签。
- policyTypes:表示给定的策略是应用于目标Pod的入站流量(Ingress)还是出站流量(Egress),或两者都有。如果NetworkPolicy没有指定policyTypes则默认情况下始终设置Ingress。
- ingress:定义入站流量限制规则,from用来定义白名单对象,比如网段、命名空间、Pod标签,Ports定义目标端口。
- egress:定义出站流量限制规则,定义可以访问那些IP和端口。
2.2 案例一
需求:prod命名空间下所有Pod可以互相访问,也可以访问其他命名空间Pod,但是其他命名空间不能访问prod命名空间Pod。
2.2.1 创建几个Pod:
kubectl create ns prod
kubectl run busybox --image=busybox -- sleep 36000  #在default 命名空间创建busybox Pod
# kubectl  get pod busybox -o wide
NAME      READY   STATUS    RESTARTS   AGE    IP              NODE         NOMINATED NODE   READINESS GATES
busybox   1/1     Running   0          4m7s   10.244.154.49   node-1-233   <none>           <none>

kubectl run busybox --image=busybox -n prod -- sleep 36000 #在prod 命名空间创建busybox Pod
# kubectl  get pod busybox  -n prod -o wide
NAME      READY   STATUS    RESTARTS   AGE    IP               NODE         NOMINATED NODE   READINESS GATES
busybox   1/1     Running   0          4m2s   10.244.167.185   node-1-231   <none>           <none>

kubectl run web01 --image=nginx:1.25.2 -n prod #在prod命名空间创建web Pod
# kubectl  get pod web01 -n prod -o wide
NAME    READY   STATUS    RESTARTS   AGE   IP             NODE         NOMINATED NODE   READINESS GATES
web01   1/1     Running   0          72s   10.244.29.56   node-1-232   <none>           <none>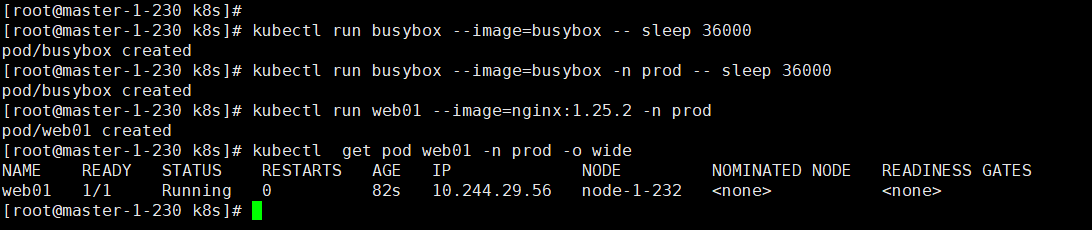
在没有创建NetworkPolicy的情况下测试
prod命名空间的busybox ping default命名空间的busybox IP
kubectl exec busybox -n prod -- ping 10.244.154.49 
prod命名空间的busybox ping prod命名空间的web IP
kubectl exec busybox -n prod -- ping 10.244.29.56 
default 命名空间的busybox ping prod命名空间的web IP
kubectl exec busybox -- ping 10.244.29.56 
创建networkpolicy的YAML
vim deny-all-namespaces.yaml
apiVersion: networking.k8s.io/v1
kind: NetworkPolicy
metadata:
  name: deny-all-namespaces
  namespace: prod
spec:
  podSelector: {} # 为空,表示匹配本命名空间所有Pod
  policyTypes:
  - Ingress
  ingress:
    - from:
      - podSelector: {} # 为空,表示匹配该命名空间所有Pod,即允许该命名空间所有Pod访问,没有定义namespaceSelector,也就是说不允许其它namespace的Pod访问。
应用YAML
# kubectl  apply -f deny-all-namespaces.yaml
networkpolicy.networking.k8s.io/deny-all-namespaces created
# kubectl  get NetworkPolicy  -A
NAMESPACE   NAME                  POD-SELECTOR   AGE
prod        deny-all-namespaces   <none>         75s
测试:
prod命名空间的busybox ping default命名空间的busybox IP
kubectl exec busybox -n prod -- ping 10.244.154.49 
prod命名空间的busybox ping prod命名空间的web IP
kubectl  exec busybox -n prod -- ping  10.244.29.56
default 命名空间的busybox ping prod命名空间的web IP
kubectl  exec busybox  -n default -- ping  10.244.29.56
验证结果与预期一致。删除上面测试资源
# kubectl delete   -f deny-all-namespaces.yaml
networkpolicy.networking.k8s.io "deny-all-namespaces" deleted
# kubectl delete po busybox  --force
Warning: Immediate deletion does not wait for confirmation that the running resource has been terminated. The resource may continue to run on the cluster indefinitely.
pod "busybox" force deleted
# kubectl delete po busybox -n prod --force
Warning: Immediate deletion does not wait for confirmation that the running resource has been terminated. The resource may continue to run on the cluster indefinitely.
pod "busybox" force deleted
# kubectl delete po web01 -n prod
pod "web01" deleted
2.2.2 通过Podselector限制
vim pod-selector.yaml
apiVersion: networking.k8s.io/v1
kind: NetworkPolicy
metadata:
  name: app-to-app
  namespace: prod
spec:
  podSelector:
    matchLabels:
      app: test
  policyTypes:
    - Ingress
  ingress:
    - from:
        - podSelector:
            matchLabels:
              app: prod
      ports:
        - protocol: TCP
          port: 80
应用YAML
# kubectl  apply -f pod-selector.yaml
networkpolicy.networking.k8s.io/app-to-app created
创建测试pod
kubectl run web01 --image=nginx:1.25.2 -n prod -l 'app=test'  #创建Pod时,指定label
kubectl get pod web01 -n prod --show-labels # 查看label
# 如果label创建错了,也可以修改
# kubectl label pod busybox app=test123 --overwrite
kubectl run app01 --image=nginx:1.25.2 -n prod -l 'app=prod'
kubectl run app02 --image=nginx:1.25.2 -n prod 
查看web01的IP
# kubectl describe po web01 -n prod |grep -i ip
                  cni.projectcalico.org/podIP: 10.244.154.50/32
                  cni.projectcalico.org/podIPs: 10.244.154.50/32
IP:               10.244.154.50
IPs:
  IP:  10.244.154.50
    Type:                    Projected (a volume that contains injected data from multiple sources)
测试
kubectl exec -n prod app01 -- curl 10.244.154.50
kubectl exec -n prod app02 -- curl 10.244.154.50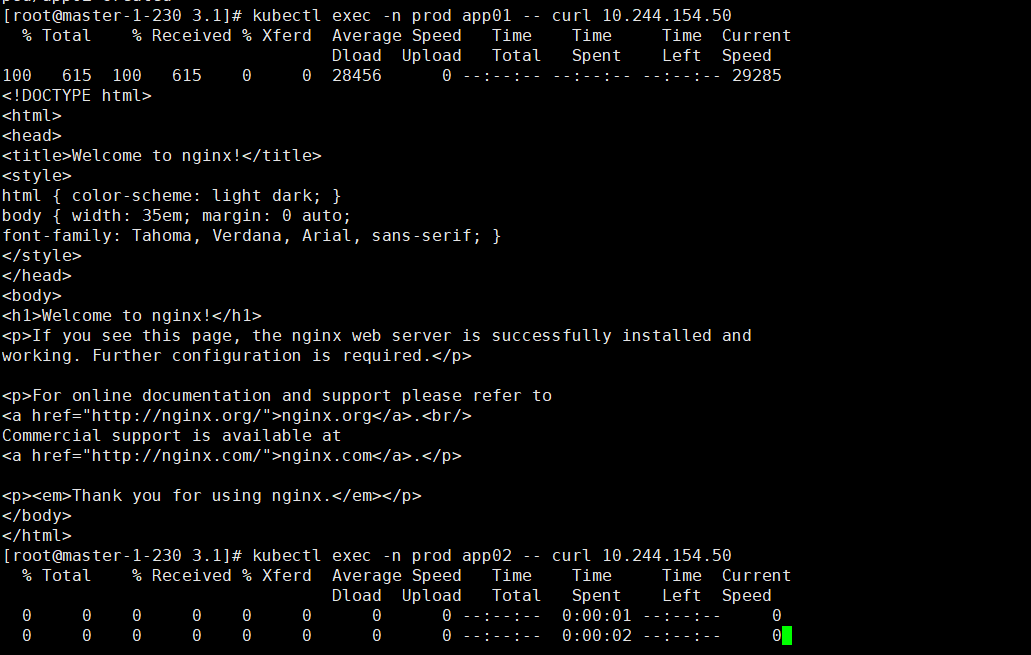
验证结果与预期一致。删除上面测试资源
kubectl delete po app01 -n prod
kubectl delete po app02 -n prod
kubectl delete po web01 -n prod
kubectl delete -f pod-selector.yaml
2.2.3 限制namespace
vi allow-ns.yaml
apiVersion: networking.k8s.io/v1
kind: NetworkPolicy
metadata:
  name: allow-ns
  namespace: prod
spec:
  podSelector: {}
  policyTypes:
    - Ingress
  ingress:
    - from:
        - namespaceSelector:
            matchLabels:
              name: test
      ports:
        - protocol: TCP
          port: 80
应用YAML
# kubectl  apply -f allow-ns.yaml
networkpolicy.networking.k8s.io/allow-ns created
创建测试ns
# kubectl create ns test
namespace/test created
创建测试pod
kubectl run web01 --image=nginx:1.25.2 -n prod
kubectl run web02 --image=nginx:1.25.2 -n test
kubectl run web03 --image=nginx:1.25.2
kubectl run web04 --image=nginx:1.25.2 -n prod
查看web01的IP
# kubectl describe po web01 -n prod |grep -i ip
                  cni.projectcalico.org/podIP: 10.244.154.51/32
                  cni.projectcalico.org/podIPs: 10.244.154.51/32
IP:               10.244.154.51
IPs:
  IP:  10.244.154.51
    Type:                    Projected (a volume that contains injected data from multiple sources)
查看ns label
# kubectl get ns --show-labels
NAME                   STATUS   AGE     LABELS
default                Active   21d     kubernetes.io/metadata.name=default
kube-node-lease        Active   21d     kubernetes.io/metadata.name=kube-node-lease
kube-public            Active   21d     kubernetes.io/metadata.name=kube-public
kube-system            Active   21d     kubernetes.io/metadata.name=kube-system
kubernetes-dashboard   Active   6d2h    kubernetes.io/metadata.name=kubernetes-dashboard
prod                   Active   79m     kubernetes.io/metadata.name=prod
test                   Active   4m5s    kubernetes.io/metadata.name=test
zhan                   Active   4d13h   kubernetes.io/metadata.name=zhan
给ns设置标签
# kubectl label namespace test name=test
namespace/test labeled
测试
1 # kubectl -n test exec web02 -- curl 10.244.154.51     #可以访问
  % Total    % Received % Xferd  Average Speed   Time    Time     Time  Current
                                 Dload  Upload   Total   Spent    Left  Speed
100   615  100   615    0     0   336k      0 --:--:-- --:--:-- --:--:--  600k
<!DOCTYPE html>
<html>
<head>
<title>Welcome to nginx!</title>
<style>
html { color-scheme: light dark; }
body { width: 35em; margin: 0 auto;
font-family: Tahoma, Verdana, Arial, sans-serif; }
</style>
</head>
<body>
<h1>Welcome to nginx!</h1>
<p>If you see this page, the nginx web server is successfully installed and
working. Further configuration is required.</p>

<p>For online documentation and support please refer to
<a href="http://nginx.org/">nginx.org</a>.<br/>
Commercial support is available at
<a href="http://nginx.com/">nginx.com</a>.</p>

<p><em>Thank you for using nginx.</em></p>
</body>
</html>
# kubectl exec web03 -- curl 10.244.154.51   #不可以访问
  % Total    % Received % Xferd  Average Speed   Time    Time     Time  Current
                                 Dload  Upload   Total   Spent    Left  Speed
  0     0    0     0    0     0      0      0 --:--:-- --:--:-- --:--:--     0

  0     0    0     0    0     0      0      0 --:--:--  0:00:01 --:--:--     0^C
# kubectl -n prod  exec web04 -- curl 10.244.154.51  #不可以访问,即使同一个命名空间也无法访问
  % Total    % Received % Xferd  Average Speed   Time    Time     Time  Current
                                 Dload  Upload   Total   Spent    Left  Speed
  0     0    0     0    0     0      0      0 --:--:--  0:00:05 --:--:--     0
  0     0    0     0    0     0      0      0 --:--:--  0:00:06 --:--:--     0
验证结果与预期一致。删除上面测试资源
# kubectl delete po web01 -n prod
pod "web01" deleted
# kubectl delete po web02 -n test
pod "web02" deleted
# kubectl delete po web03
pod "web03" deleted
# kubectl delete po web04 -n prod
pod "web04" deleted
# kubectl delete -f allow-ns.yaml
networkpolicy.networking.k8s.io "allow-ns" deleted
三、Kubernetes用户安全控制
3.2.1 安全控制三阶段
- 认证(Authentication):先验证用户的身份是否合法,比如证书是否合法有效,Token是否正确。
- 授权(Authorization):用户是否有权限访问或者操作k8s资源。
- 准入控制(Admission Control):检查对应客户端的请求是否符合对应请求或操作API规范,检查传递参数是否正确。

3.2.2 K8S认证
- Kubeconfig:基于https ca证书认证。
- Token:通过Token识别用户,比如访问dashboard时,创建一个serviceaccount,然后获取token
3.2.3 K8S 授权
授权模式:
- AlwaysDeny:表示拒绝所有的请求,一般用于测试。
- AlwayAllow:允许接收所有请求。
- ABAC(Attribute Based Access Control):基于属性的访问控制,表示使用用户配置的授权规则对用户请求进行匹配和控制。
- Webbook: 通过调用外部REST服务队用户进行授权
- RBAC(Role-Based Access Control):基于角色的访问控制,现行的默认规则(拥有角色就代表拥有访问资源权限)
查看k8s授权模式
cat /etc/kubernetes/manifests/kube-apiserver.yaml |grep authorization-mode
    - --authorization-mode=Node,RBAC
RBAC授权模式
RBAC(Role-Based Access Control)基于角色的访问控制,相对其他访问控制,拥有一下优势:
- 对集群中的资源和非资源均拥有完整的覆盖。
- 整个RBAC完全由几个API对象完成,可以使用kubectl 或API进行操作。
- 可以在运行时进行调整,无需重启API Server即可生效。
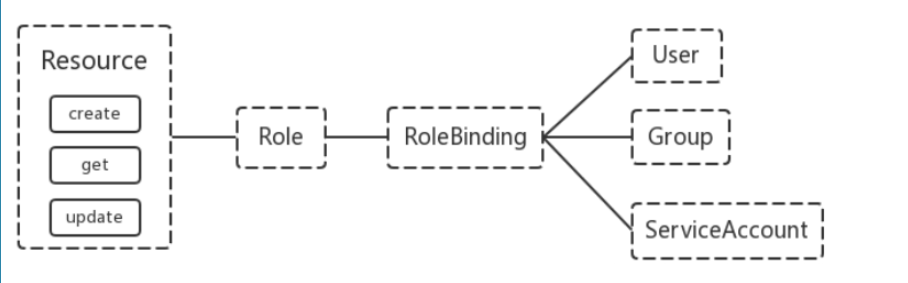
RBAC的API资源对象说明
RBAC资源对象:Subject(User,Group,ServiceAccount),Role(角色),ClusterRole(集群角色),RoleBinding(角色绑定),ClusterRoleBingding(集群角色绑定)
主体(subject):
- User:用户
- Group:用户组
- ServiceAccount:服务账号
角色:
- RoleBinging:将角色绑定到主体
- ClusterRoleBinding:将集群角色绑定到主体
3.2.3 k8s准入控制
Adminssion Control实际上是一个准入控制器插件列表,发送到API Server的请求都需要经过这个列表中的每个准入控制器插件的检查,检查不通过,则拒绝请求。
查看可以启用的准入控制器列表:
# kubectl exec kube-apiserver-master-1-230 -n kube-system -- kube-apiserver -h | grep '    --enable-admission-plugins'
      --enable-admission-plugins strings       admission plugins that should be enabled in addition to default enabled ones (NamespaceLifecycle, LimitRanger, ServiceAccount, TaintNodesByCondition, PodSecurity, Priority, DefaultTolerationSeconds, DefaultStorageClass, StorageObjectInUseProtection, PersistentVolumeClaimResize, RuntimeClass, CertificateApproval, CertificateSigning, ClusterTrustBundleAttest, CertificateSubjectRestriction, DefaultIngressClass, MutatingAdmissionWebhook, ValidatingAdmissionPolicy, ValidatingAdmissionWebhook, ResourceQuota). Comma-delimited list of admission plugins: AlwaysAdmit, AlwaysDeny, AlwaysPullImages, CertificateApproval, CertificateSigning, CertificateSubjectRestriction, ClusterTrustBundleAttest, DefaultIngressClass, DefaultStorageClass, DefaultTolerationSeconds, DenyServiceExternalIPs, EventRateLimit, ExtendedResourceToleration, ImagePolicyWebhook, LimitPodHardAntiAffinityTopology, LimitRanger, MutatingAdmissionWebhook, NamespaceAutoProvision, NamespaceExists, NamespaceLifecycle, NodeRestriction, OwnerReferencesPermissionEnforcement, PersistentVolumeClaimResize, PersistentVolumeLabel, PodNodeSelector, PodSecurity, PodTolerationRestriction, Priority, ResourceQuota, RuntimeClass, SecurityContextDeny, ServiceAccount, StorageObjectInUseProtection, TaintNodesByCondition, ValidatingAdmissionPolicy, ValidatingAdmissionWebhook. The order of plugins in this flag does not matter.
查看k8s启动的准入控制
# grep 'admission' /etc/kubernetes/manifests/kube-apiserver.yaml
    - --enable-admission-plugins=NodeRestriction
# ps aux|grep apiserver|grep admission
root      1705  5.6  9.5 1102256 367948 ?      Ssl  21:14   1:16 kube-apiserver --advertise-address=192.168.1.230 --allow-privileged=true --authorization-mode=Node,RBAC --client-ca-file=/etc/kubernetes/pki/ca.crt --enable-admission-plugins=NodeRestriction --enable-bootstrap-token-auth=true --etcd-cafile=/etc/kubernetes/pki/etcd/ca.crt --etcd-certfile=/etc/kubernetes/pki/apiserver-etcd-client.crt --etcd-keyfile=/etc/kubernetes/pki/apiserver-etcd-client.key --etcd-servers=https://127.0.0.1:2379 --kubelet-client-certificate=/etc/kubernetes/pki/apiserver-kubelet-client.crt --kubelet-client-key=/etc/kubernetes/pki/apiserver-kubelet-client.key --kubelet-preferred-address-types=InternalIP,ExternalIP,Hostname --proxy-client-cert-file=/etc/kubernetes/pki/front-proxy-client.crt --proxy-client-key-file=/etc/kubernetes/pki/front-proxy-client.key --requestheader-allowed-names=front-proxy-client --requestheader-client-ca-file=/etc/kubernetes/pki/front-proxy-ca.crt --requestheader-extra-headers-prefix=X-Remote-Extra- --requestheader-group-headers=X-Remote-Group --requestheader-username-headers=X-Remote-User --secure-port=6443 --service-account-issuer=https://kubernetes.default.svc.cluster.local --service-account-key-file=/etc/kubernetes/pki/sa.pub --service-account-signing-key-file=/etc/kubernetes/pki/sa.key --service-cluster-ip-range=10.96.0.0/12 --tls-cert-file=/etc/kubernetes/pki/apiserver.crt --tls-private-key-file=/etc/kubernetes/pki/apiserver.key
修改注入控制器:
vi /etc/kubernetes/manifests/kube-apiserver.yaml  #找到--enable-admission-plugins那一行,直接修改
--enable-admission-plugins=NodeRestriction,SecurityContextDeny
四、Kubernetes创建普通用户
4.1 需求1:创建一个Role和ServiceAccount并把它们绑定起来。ServiceAccount有get、list、watch的权限
创建YAML文件
cat  > testsa.yaml <<EOF
apiVersion: v1
kind: ServiceAccount
metadata:
  name: testsa

---
apiVersion: rbac.authorization.k8s.io/v1
kind: Role
metadata:
  name: testsa-role
rules:
- apiGroups:  # api组,例如apps组,空值表示是核心API组,像namespace、pod、service、pv、pvc都在里面
  - ""
  resources: #资源名称(复数),例如pods, deployments, services
  - pods
  verbs: # 允许的操作,这里允许get, list, watch
  - get
  - list
  - watch

---
apiVersion: rbac.authorization.k8s.io/v1
kind: RoleBinding
metadata:
  name: testsa-rolebinding
roleRef:
  apiGroup: rbac.authorization.k8s.io
  kind: Role
  name: testsa-role
subjects:
- kind: ServiceAccount
  name: testsa
EOF
应用YAML
# kubectl apply -f testsa.yaml
serviceaccount/testsa created
role.rbac.authorization.k8s.io/testsa-role created
rolebinding.rbac.authorization.k8s.io/testsa-rolebinding created
生成token
# kubectl create token testsa
eyJhbGciOiJSUzI1NiIsImtpZCI6IlhrXzBnUEFTWFRfQ2l5OHhqeVpqRllWcFNBenA2dWUxaWFKSHVYRGYxQ28ifQ.eyJhdWQiOlsiaHR0cHM6Ly9rdWJlcm5ldGVzLmRlZmF1bHQuc3ZjLmNsdXN0ZXIubG9jYWwiXSwiZXhwIjoxNjk3NzI2NjEyLCJpYXQiOjE2OTc3MjMwMTIsImlzcyI6Imh0dHBzOi8va3ViZXJuZXRlcy5kZWZhdWx0LnN2Yy5jbHVzdGVyLmxvY2FsIiwia3ViZXJuZXRlcy5pbyI6eyJuYW1lc3BhY2UiOiJkZWZhdWx0Iiwic2VydmljZWFjY291bnQiOnsibmFtZSI6InRlc3RzYSIsInVpZCI6IjFkMGY0M2ViLWIyMTItNDA2Yi04MTdmLTAxOGMwYTkwZTg0NiJ9fSwibmJmIjoxNjk3NzIzMDEyLCJzdWIiOiJzeXN0ZW06c2VydmljZWFjY291bnQ6ZGVmYXVsdDp0ZXN0c2EifQ.KDoByjzV6o2D2utjCxeHXVxJ_0bfcAotxoouIYpg6OS33wGYGaTRGpbBLGlaCxZaNvQn4w5Gj5o3MQcFzI0jSYmq5C4RMeGIDUD5XCl8SlPo-PL6FuotUwFhaioERKFmTc5AkM6e2EFkBiXywMifMyAicilUkGVvufcGPqCFEbMEDry6-2hdwsqzbcLN7dlH6EEf0Hk-UotWxW2dcYuWmNIpT_9qQ5QOyUAyt3ywo7hAJ9sM8WY_x5-hNJlzhHrlokKEOoFpAW6SpJVGMYyb7tixnnHQvvQA86h4dlRZDYBvm3nzfBIDxbflgF3HtRAmNpcCCNftoLJZ_HjrU35J6w
4.2 需求2:给user1 用户授权prod命名空间Pod的读取权限。
- 生成ca证书
# cd /etc/kubernetes/pki/ # openssl genrsa -out user1.key 2048 Generating RSA private key, 2048 bit long modulus ......+++ ..................................................................+++ e is 65537 (0x10001) # openssl req -new -key user1.key -out user1.csr -subj "/CN=user1" # openssl x509 -req -in user1.csr -CA ca.crt -CAkey ca.key -CAcreateserial -out user1.crt -days 3650 Signature ok subject=/CN=user1 Getting CA Private Key - 生成kubeconfig授权文件
# 设置集群 # kubectl config set-cluster myk8s \ > --certificate-authority=/etc/kubernetes/pki/ca.crt \ > --embed-certs=true \ > --server=https://192.168.1.230:6443 \ > --kubeconfig=/root/user1.kubecfg Cluster "myk8s" set. # 查看user1配置,users和context都为空 # kubectl config view --kubeconfig=/root/user1.kubecfg apiVersion: v1 clusters: - cluster: certificate-authority-data: DATA+OMITTED server: https://192.168.1.230:6443 name: myk8s contexts: null current-context: "" kind: Config preferences: {} users: null # 设置客户端认证 # kubectl config set-credentials user1 \ > --client-key=user1.key \ > --client-certificate=user1.crt \ > --embed-certs=true \ > --kubeconfig=/root/user1.kubecfg User "user1" set. # 查看user1配置,users有内容了 # kubectl config view --kubeconfig=/root/user1.kubecfg apiVersion: v1 clusters: - cluster: certificate-authority-data: DATA+OMITTED server: https://192.168.1.230:6443 name: myk8s contexts: null current-context: "" kind: Config preferences: {} users: - name: user1 user: client-certificate-data: DATA+OMITTED client-key-data: DATA+OMITTED # 设置context # kubectl config view --kubeconfig=/root/user1.kubecfg apiVersion: v1 clusters: - cluster: certificate-authority-data: DATA+OMITTED server: https://192.168.1.230:6443 name: myk8s contexts: null current-context: "" kind: Config preferences: {} users: - name: user1 user: client-certificate-data: DATA+OMITTED client-key-data: DATA+OMITTED [root@master-1-230 pki]# kubectl config set-context user1@myk8s \ > --cluster=myk8s \ > --user=user1 \ > --kubeconfig=/root/user1.kubecfg Context "user1@myk8s" created. # 查看user1配置,context已经有内容了 # kubectl config view --kubeconfig=/root/user1.kubecfg apiVersion: v1 clusters: - cluster: certificate-authority-data: DATA+OMITTED server: https://192.168.1.230:6443 name: myk8s contexts: - context: cluster: myk8s user: user1 name: user1@myk8s current-context: "" kind: Config preferences: {} users: - name: user1 user: client-certificate-data: DATA+OMITTED client-key-data: DATA+OMITTED # 切换context # kubectl config use-context user1@myk8s --kubeconfig=/root/user1.kubecfg Switched to context "user1@myk8s". - 创建角色
cat > user1-role.yaml <<EOF apiVersion: rbac.authorization.k8s.io/v1 kind: Role metadata: namespace: prod name: user1-role rules: - apiGroups: - "" resources: - pods verbs: - get - list - watch EOF # kubectl apply -f user1-role.yaml role.rbac.authorization.k8s.io/user1-role created - 将用户与角色绑定
cat > user1-rolebinding.yaml <<EOF apiVersion: rbac.authorization.k8s.io/v1 kind: RoleBinding metadata: name: user1-rolebinding namespace: prod roleRef: apiGroup: rbac.authorization.k8s.io kind: Role name: user1-role subjects: - kind: User name: user1 apiGroup: rbac.authorization.k8s.io EOF # kubectl apply -f user1-rolebinding.yaml rolebinding.rbac.authorization.k8s.io/user1-rolebinding created - 创建系统用户并使用user1的配置
useradd test mkdir /home/aming/.kube cp /root/user1.kubecfg /home/aming/.kube/config chown -R test.aming /home/test/.kube/ - 切换到普通用下并访问k8s
su - test
$ kubectl get po
$ kubectl get po -n prod
$ kubectl get deploy -n prod
