网络pxe启动安装Proxmox VE pve
这里给大家分享下一个网络安装pve的简单环境。新手轻松使用。
准备工作
1、必须参考一下此项目
morph027/pve-iso-2-pxe: Create PXE bootable Proxmox installation (github.com)
这个项目介绍了如何将iso转换成pxe启动镜像。需要使用工具去转换。如果没有工具,也没有关系,我已经做好了所有经过测试的镜像
2、Tiny PXE Server
3、hfs或者其他webserver
资源我已经上传到网盘,注意Tiny PXE Server我已经对配置进行了修改,不是原版。如果使用原版,需要修改下配置。

pvetools解压密码为foxi
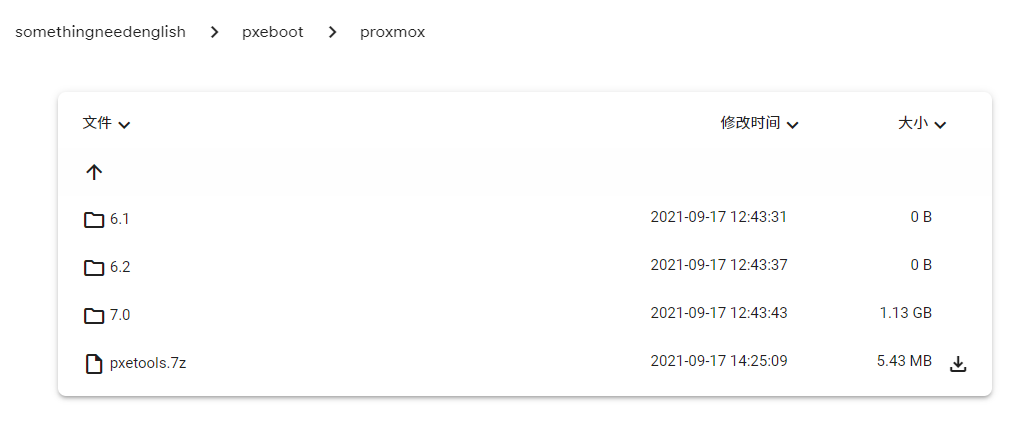
一:下载相应的文件
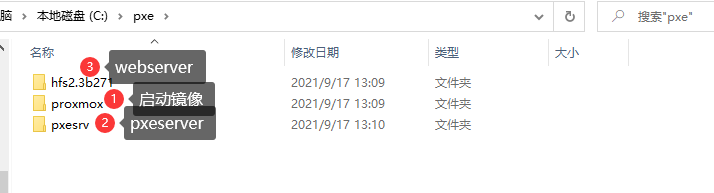
我在c盘建立了一个pxe文件夹,放着必要的东西。proxmox里就是启动的镜像。需要下载后,放进去。
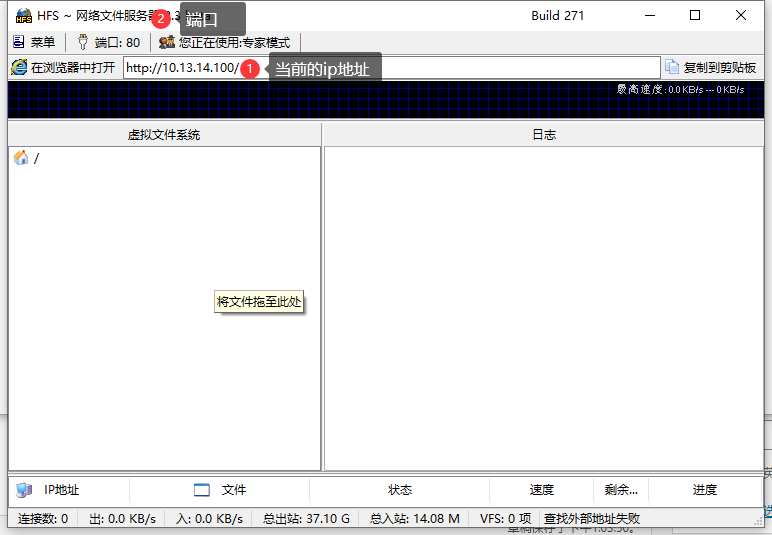
二、启动hfs web 服务
打开hfs文件,界面如下。注意下面的2个标注,
一个是当前的ip,这个ip可能是公网ip,可以在【菜单】-【ip地址】选择当前的局域网ip。第二个是端口。
一个是端口,我们访问都是要端口的,默认是80。如果是其他,就要把访问地址改成相应的端口。同时务必开启Windows防火墙端口!
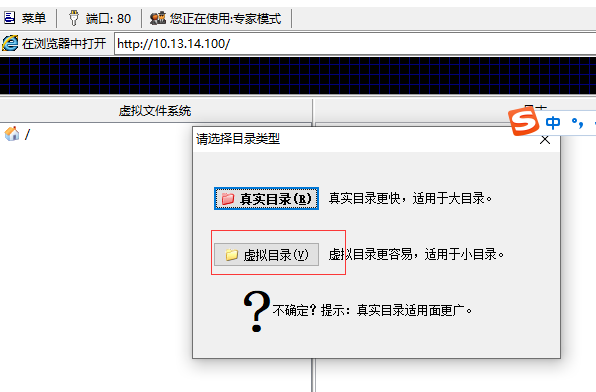
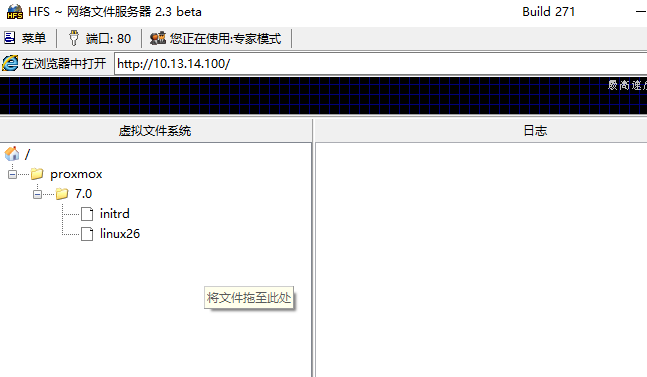
将proxmox 文件夹拖过去。提示选择目录,就选择虚拟目录
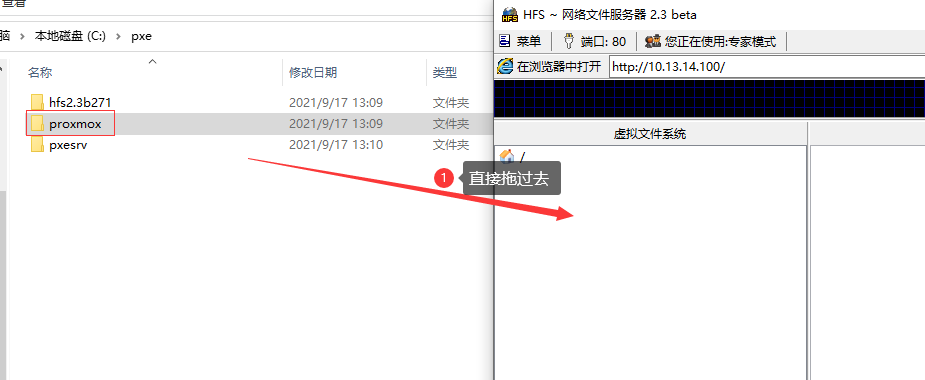
最终如下
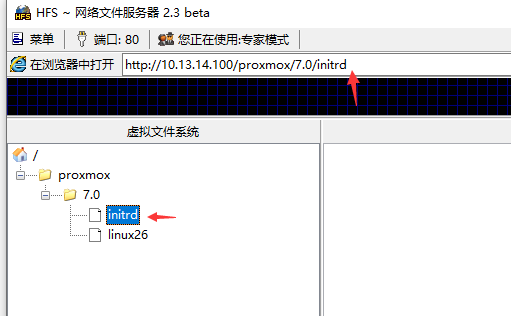
选中文件,可以得到文件的下载地址,如下。
现在可以在其他的电脑上,试一下,能否访问。如果不行,请尝试开防火墙端口或者关闭防火墙。然后试试用管理员身份运行。
三:启动Tiny PXE Server
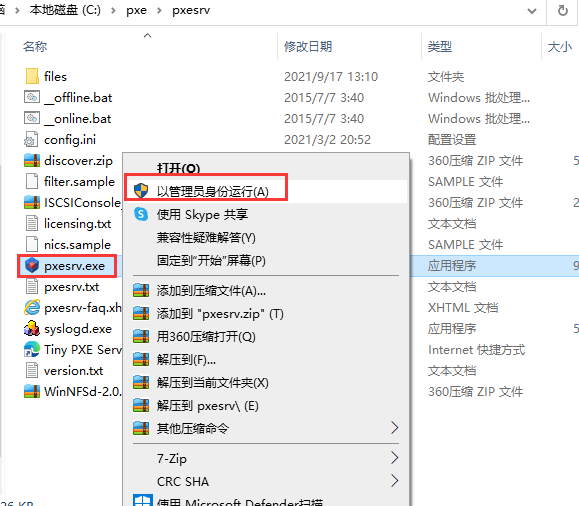
进入pxesrv目录。选择以管理员身份运行。
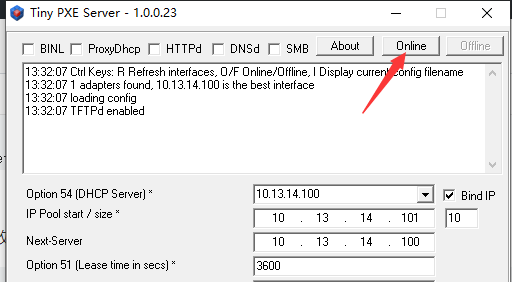
启动界面如下。注意图上的提示,确保一样。这时先不要点启动。
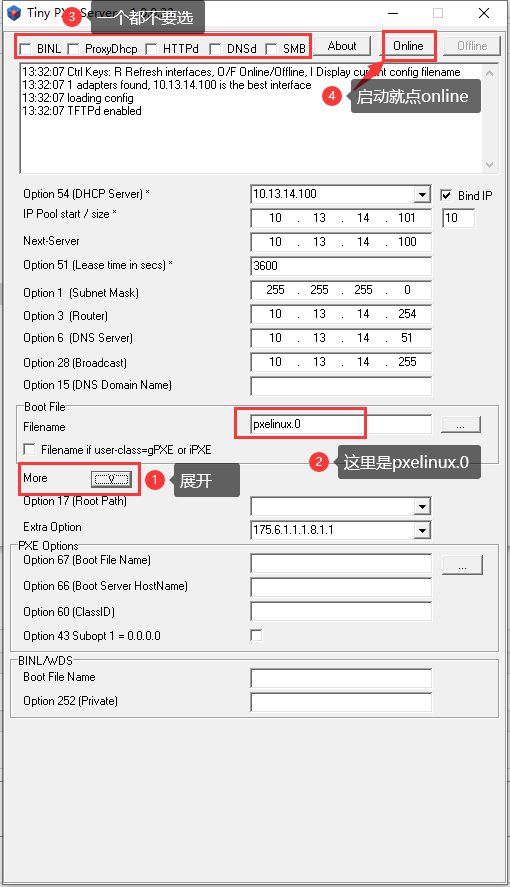
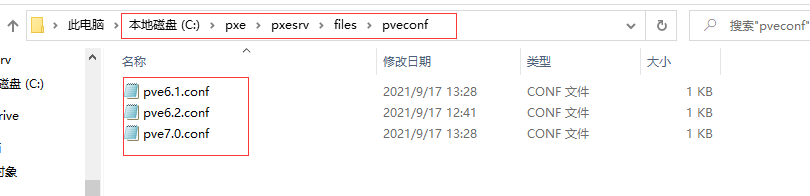
打开pxeserver的file目录下的pveconf
下面的conf就是配置文件。6.1对应的就是6.1版本。可以自己修改。
写法根据github页说明
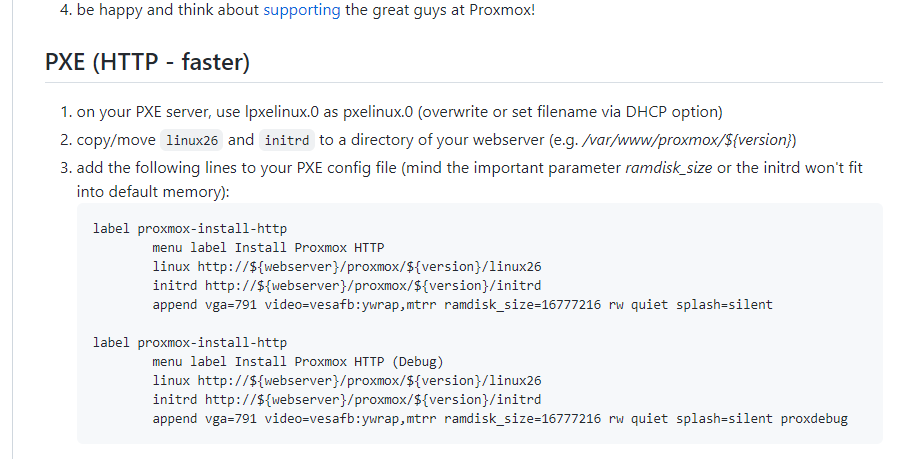
如下
- label proxmox-install-http
- menu label Install Proxmox HTTP
- linux http://10.13.14.100/proxmox/7.0/linux26
- initrd http://10.13.14.100/proxmox/7.0/initrd
- append vga=791 video=vesafb:ywrap,mtrr ramdisk_size=16777216 rw quiet splash=silent
- label proxmox-install-http
- menu label Install Proxmox HTTP (Debug)
- linux http://10.13.14.100/proxmox/7.0/linux26
- initrd http://10.13.14.100/proxmox/7.0/initrd
- append vga=791 video=vesafb:ywrap,mtrr ramdisk_size=16777216 rw quiet splash=silent proxdebug
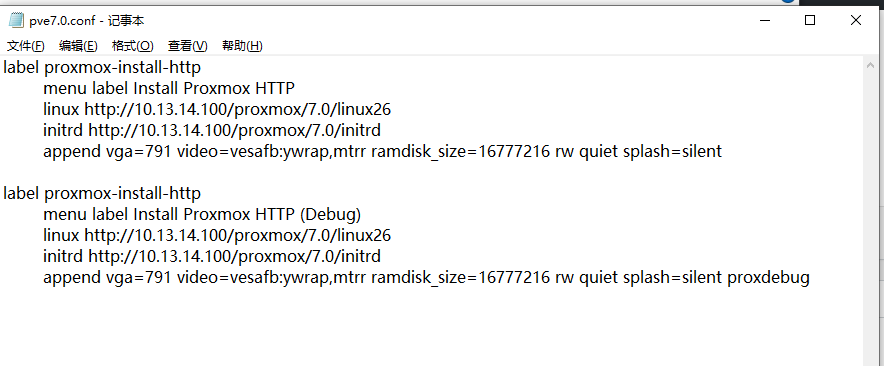
这里把linux和initrd后面的地址改成hfs上的地址。
如果你是192.168.1.4,就改成下面这样。如果你的网站目录改了其他的,也要同步更改。
- label proxmox-install-http
- menu label Install Proxmox HTTP
- linux http://192.168.1.4/proxmox/7.0/linux26
- initrd http://192.168.1.4/proxmox/7.0/initrd
- append vga=791 video=vesafb:ywrap,mtrr ramdisk_size=16777216 rw quiet splash=silent
改好了保存
四:启动测试
点击online启动
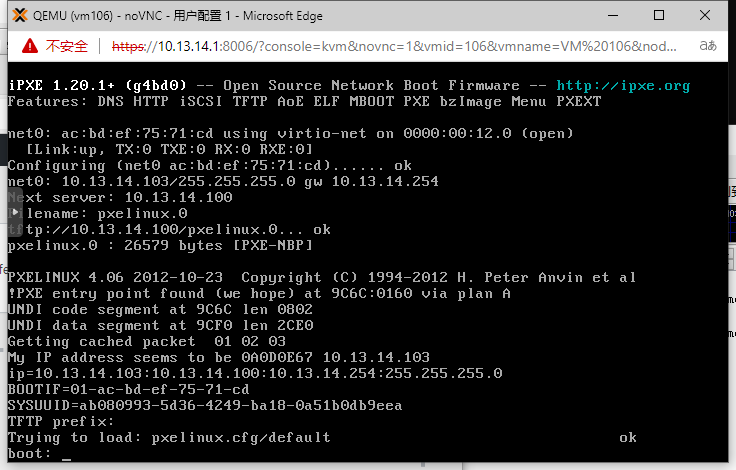
我这里用一个虚拟机做测试。开机的时候,已经DHCP到,同时获得了启动文件,default
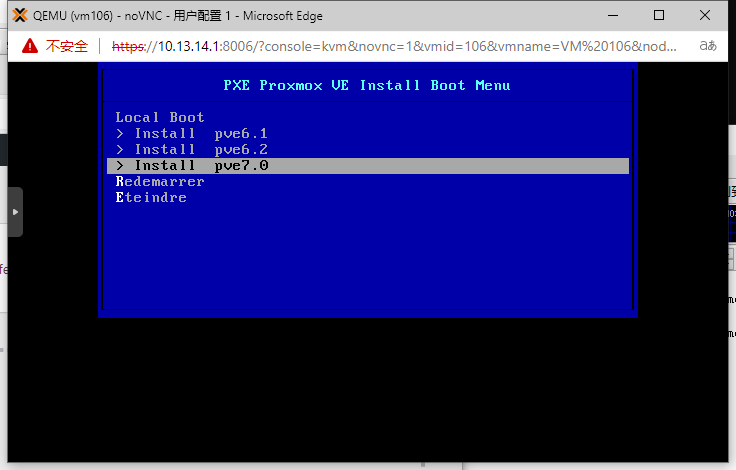
接着出现了引导界面。我这里选择pve7.0
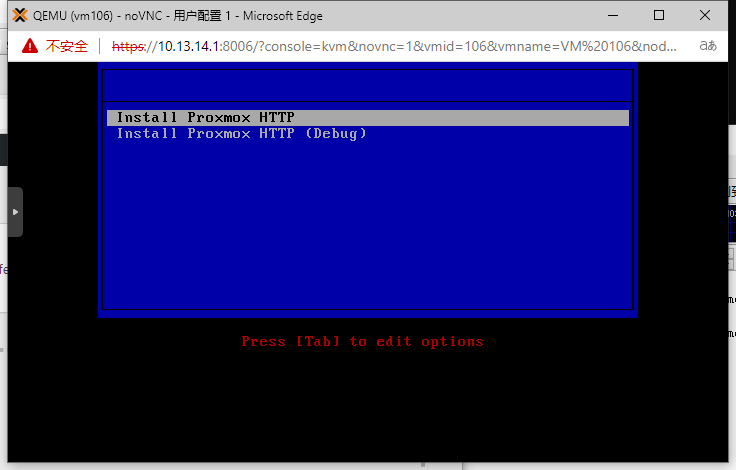
出现了启动菜单,选择第一个继续。
此时才看hfs,是有客户端在下载文件,有进度提示
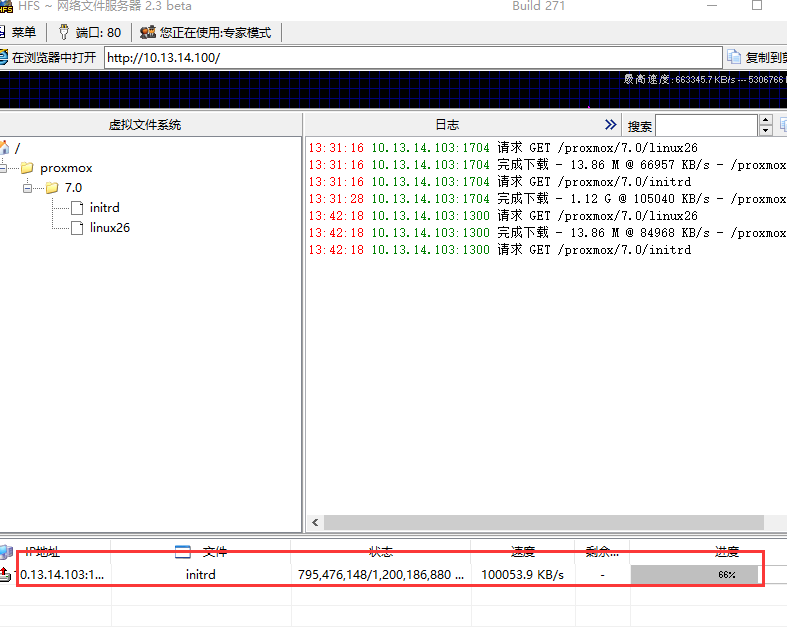
等下载完之后,会启动到pve installer
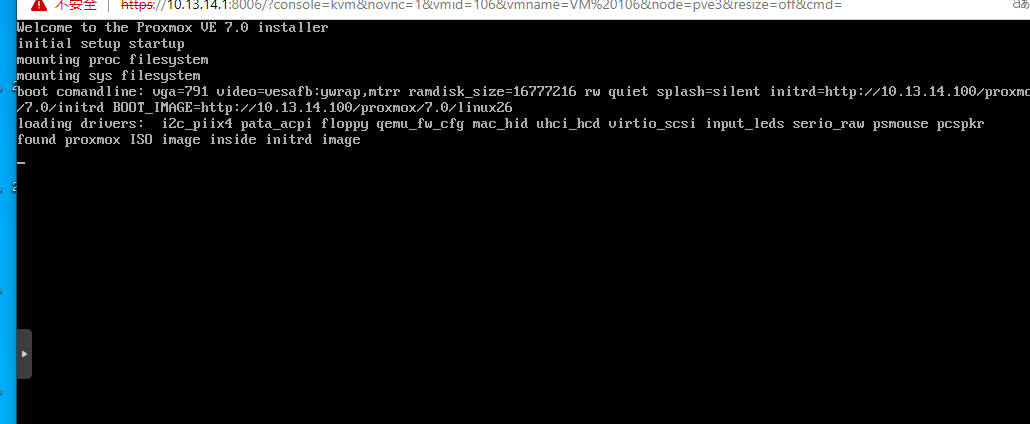
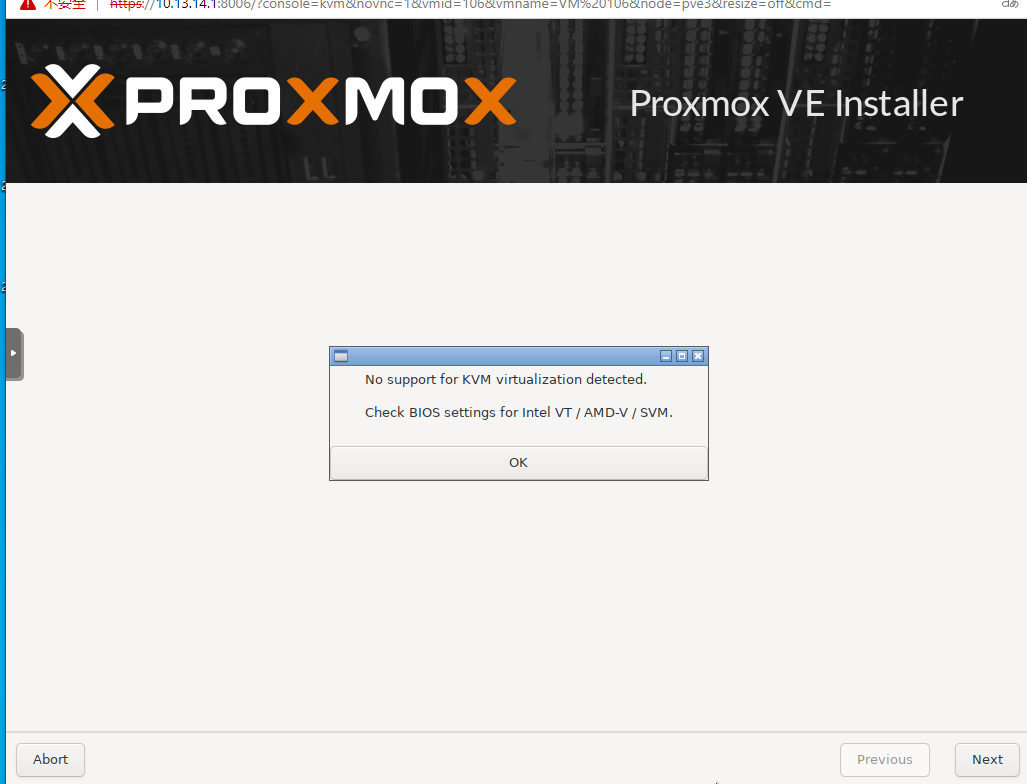
不出意外会出现安装界面。现在安装即可。
五:原理解析
hfs
用于在pxe中的文件提供服务,这里使用http速度相对于tftp是非常快的。
Tiny PXE Server
Tiny PXE Server是一个非常友好的pxe服务器。双击软件包目录下的pxesrv-faq.xhtml 就可以看到很多帮助文件,我已经截取了部份,如下。
- 1.how to pxe boot pxelinux
- enter pxelinux.0 as boot filename
- put pxelinux.cfg/default as boot menu in root folder (see example in zip file)
- note : put menu.c32 in root folder
- 2.how to pxe boot grub4dos
- enter grldr as boot filename
- put menu.lst/default as boot menu in root folder (see example in zip file)
- note : use (pd) as pxe device
- 3.how to pxe boot ipxe+menu
- enter ipxe-undionly.kpxe as boot filename
- enter menu.ipxe as user-class boot filename
- put menu.ipxe in root folder (see example in zip file)
- note : use ipxe variable ${dhcp-server} to dynamically retrieve the ip of the boot server
- 4.how to pxe boot ipxe+pxelinux
- enter ipxe-undionly.kpxe as boot filename
- enter pxelinux.0 as user class boot filename
- put pxelinux.cfg/default as boot menu in root folder (see example in zip file)
- note : put menu.c32 in root folder
- 5.how to pxe boot ipxe+iscsi thru rootpath
- enter ipxe-undionly.kpxe as boot filename
- enter iscsi path in root path
- execute iscsi target (example : iscsi:192.168.1.100:tcp:3260:0:test)
- 6.how to pxe boot ipxe + g4dos
- enter ipxe-undionly.kpxe as boot filename
- enter grldr as user class boot filename
- put menu.lst/default as boot menu in root folder (see example in zip file)
- note : use (pd) as pxe device
本文所述的方法,就是第一种pxe boot pxelinux
根据FQ,可以注意到3点,一个是menu.c32 ,一个是pxelinux.cfg/default 一个是root floder
rootfloder就是tftp的root目录,这里已经在Tiny PXE Server的配置文件中定义了。
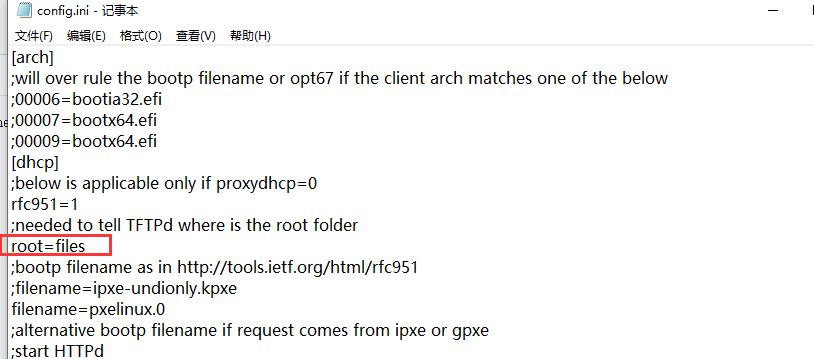
在程序中,也有个root pat

如果自定义路径的话,这里的path就要定义一下,二选一,配置文件中是缺省值,在程序上直接输路径就可以,这个值覆盖了配置文件值。
menu.c32是一个启动菜单,在软件包的files目录下
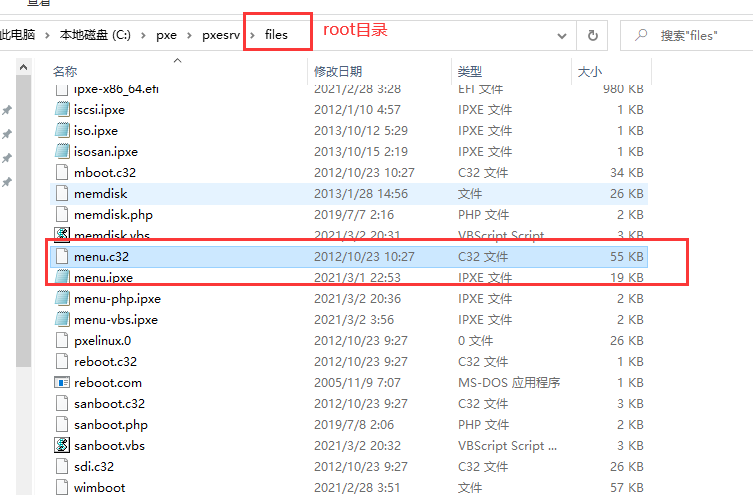
pxelinux.cfg/default是在files目录下,有个pxelinux.cfg的文件夹,里面有个default配置文件。
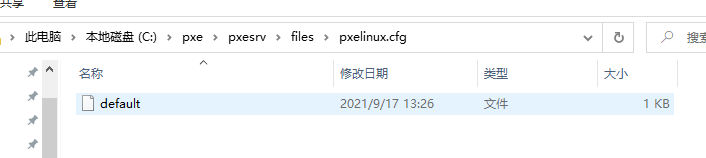
文件内容如下。可以参考这里定义了启动菜单,以及各种菜单的启动配置文件(APPEND )在哪里。这个位置,也是相对于root path来的。
- DEFAULT menu.c32
- PROMPT 0
- ALLOWOPTIONS 0
- TIMEOUT 100
- #NOESCAPE 1
- #MENU SHIFTKEY 1
- MENU TITLE PXE Proxmox VE Install Boot Menu
- LABEL local #这个就是启动菜单,可以增加删除
- MENU LABEL Local Boot
- MENU DEFAULT
- localboot -1
- LABEL pve6.1 #这个是我定义的启动菜单
- MENU LABEL > Install pve6.1
- KERNEL menu.c32
- APPEND pveconf/pve6.1.conf
- LABEL pve6.2
- MENU LABEL > Install pve6.2
- KERNEL menu.c32
- APPEND pveconf/pve6.2.conf
- LABEL pve7.0
- MENU LABEL > Install pve7.0
- KERNEL menu.c32
- APPEND pveconf/pve7.0.conf
- label reboot
- MENU LABEL ^Redemarrer
- kernel reboot.c32g
根据上面的路径,导航到这里。出现配置文件。
- label proxmox-install-http
- menu label Install Proxmox HTTP #菜单名
- linux http://10.13.14.100/proxmox/7.0/linux26 #定义了linux路径。路径就是hfs上的文件地址。
- initrd http://10.13.14.100/proxmox/7.0/initrd #定义了initrd路径。路径就是hfs上的文件地址。
- append vga=791 video=vesafb:ywrap,mtrr ramdisk_size=16777216 rw quiet splash=silent #pve启动命令行
- label proxmox-install-http
- menu label Install Proxmox HTTP (Debug)
- linux http://10.13.14.100/proxmox/7.0/linux26
- initrd http://10.13.14.100/proxmox/7.0/initrd
- append vga=791 video=vesafb:ywrap,mtrr ramdisk_size=16777216 rw quiet splash=silent proxdebug
那么本篇文章就很好理解了。
首先制作好pve的pxe引导文件,linux26以及initrd。我已做好传在网盘。
随后使用hfs做web服务器,将pxe 引导文件放上去,使其可以通过http访问
接着使用Tiny PXE Server定义了启动方式、启动菜单以及启动选项。根据pxelinux.cfg/default定义的启动菜单,去一级一级寻找。
使用UEFI引导时的设置
上面都是基于传统bios下的pxe引导。
如果是UEFI则需要特殊一点,需要启动UEFI bios再去加载ipxe脚本。
首先做一个pxe脚本,名为pve.ipxe
- #!ipxe
- dhcp
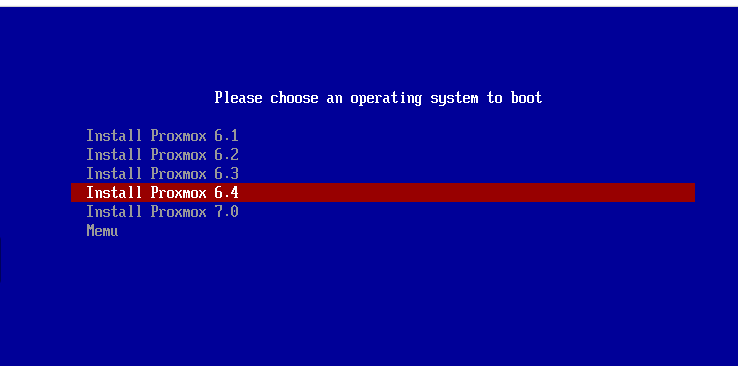
- menu Please choose an operating system to boot
- item sixone Install Proxmox 6.1
- item sixtwo Install Proxmox 6.2
- item sixthree Install Proxmox 6.3
- item sixfour Install Proxmox 6.4
- item sevenzero Install Proxmox 7.0
- choose --default sevenzero --timeout 5000 target && goto ${target}
- :sixone
- initrd http://10.13.14.103/proxmox/6.1/initrd
- chain http://10.13.14.103/proxmox/6.1/linux26 vga=791 video=vesafb:ywrap,mtrr ramdisk_size=16777216 rw quiet initrd=initrd splash=silent
- :sixtwo
- initrd http://10.13.14.103/proxmox/6.2/initrd
- chain http://10.13.14.103/proxmox/6.2/linux26 vga=791 video=vesafb:ywrap,mtrr ramdisk_size=16777216 rw quiet initrd=initrd splash=silent
- :sixthree
- initrd http://10.13.14.103/proxmox/6.3/initrd
- chain http://10.13.14.103/proxmox/6.3/linux26 vga=791 video=vesafb:ywrap,mtrr ramdisk_size=16777216 rw quiet initrd=initrd splash=silent
- :sixfour
- initrd http://10.13.14.103/proxmox/6.4/initrd
- chain http://10.13.14.103/proxmox/6.4/linux26 vga=791 video=vesafb:ywrap,mtrr ramdisk_size=16777216 rw quiet initrd=initrd splash=silent
- :sevenzero
- initrd http://10.13.14.103/proxmox/7.0/initrd
- chain http://10.13.14.103/proxmox/7.0/linux26 vga=791 video=vesafb:ywrap,mtrr ramdisk_size=16777216 rw quiet initrd=initrd splash=silent
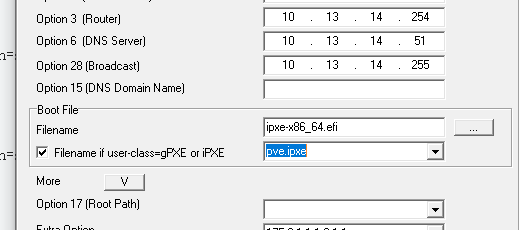
将文件放置到file目录。
在tiny pxe server上设置filename 为ipxe-x86_x64.efi,随后设置filename,然后输入pve.ipxe,也就是上面脚本的名字。
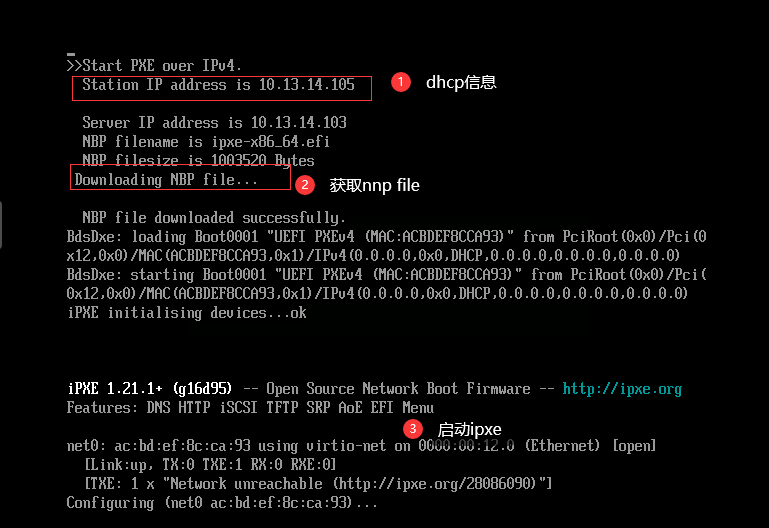
随后获取pxe脚本
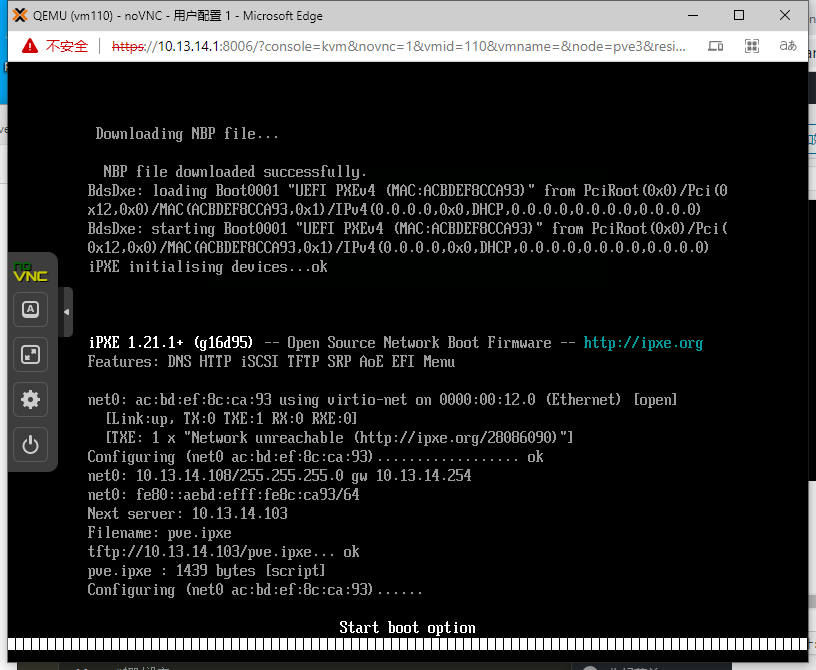
直到启动到菜单
ProxmoxVE 专用PXE引导系统
本系统是基于Ubuntu Jammy制作的,
- 集成了nginx作为http启动
- 集成了
isc-dhcp-server作为dhcp服务端,支持UEFI和BIOS自动判断引导。 - 集成了tftpd程序作为引导下发。
- 编译了引导文件,使增删配置更加简单方便。
用法
登录
本镜像为pve备份包,请还原之后直接使用。另外提供了vmdk文件,其他平台请自己使用。
还原教程请参考,佛西博客 - Proxmox VE虚拟机成品镜像下载 (buduanwang.vip)
还原时,为了保持MAC地址不变,请勿勾选[唯一]选项
登录账号密码均为root
检查服务是否正常
systemctl status nginx
systemctl status tftpd-hpa.service
systemctl status isc-dhcp-server
确保上面3个服务均为运行状态
修改ip配置
修改/etc/netplan/50-cloud-init.yaml 文件,将下面的ip地址修改你的ip地址
- # This file is generated from information provided by the datasource. Changes
- # to it will not persist across an instance reboot. To disable cloud-init's
- # network configuration capabilities, write a file
- # /etc/cloud/cloud.cfg.d/99-disable-network-config.cfg with the following:
- # network: {config: disabled}
- network:
- version: 2
- ethernets:
- eth0:
- addresses:
- - 10.13.14.124/24
- gateway4: 10.13.14.254
- match:
- macaddress: ac:bd:ef:c3:10:77
- set-name: eth0
修改/etc/dhcp/dhcpd.conf ,修改当前的dhcp地址池信息,以及next-server地址为本机地址。
- root@pxeserver:~# cat /etc/dhcp/dhcpd.conf
- default-lease-time 600;
- max-lease-time 7200;
- subnet 10.13.14.0 netmask 255.255.255.0 {
- range 10.13.14.150 10.13.14.200;
- option routers 10.13.14.124;
- }
- option arch code 93 = unsigned integer 16;
- if option arch = 00:07 {
- filename "ipxe.efi";
- } else {
- filename "lpxelinux.0";
- }
- next-server 10.13.14.124;
了解当前的pxe启动信息
所有的pxe相关的文件在/opt目录下
- root@pxeserver:/opt# tree -L 3
- .
- ├── tftp ---->>tftp的相关文件
- │ ├── ipxe.efi --->>目前用到EFI启动的文件
- │ ├── ldlinux.c32 --->>bios启动的文件
- │ ├── libutil.c32 --->>bios启动的文件
- │ ├── lpxelinux.0 --->>bios启动的文件
- │ ├── menu.c32 --->>bios启动的文件
- │ ├── pxelinux.cfg --->>bios启动的配置文件夹
- │ └── default --->>lpxelinux.0的配置文件
- └── www
- ├── 6.0
- ├── 6.1
- ├── 6.2
- ├── 6.3
- ├── 6.4
- ├── 7.0
- ├── 7.1
- ├── 7.2
- ├── 7.3
- ├── 7.4
- ├── ipxe.sh --->>efi启动的配置文件
- └── latest --->>默认启动的pxe镜像
- ├── initrd
- └── linux26
EFI启动的时候,会自动读取http://[tftpd服务器ip]/ipxe.sh。因此需要改动配置,请修改/opt/www/ipxe.sh,让我们看看这个配置文件内容
- #!ipxe
- dhcp
- menu Please choose an operating system to boot
- item latest Install Proxmox VE latest
- item latest-debug Install Proxmox VE latest-debug
- item sevenzero Install Proxmox VE 7.3
- item sevenzero Install Proxmox VE 7.2
- item sevenzero Install Proxmox VE 7.1
- item sevenzero Install Proxmox VE 7.0
- item sevenzero Install Proxmox VE 6.4
- item sevenzero Install Proxmox VE 6.3
- item sevenzero Install Proxmox VE 6.2
- item sevenzero Install Proxmox VE 6.1
- item sevenzero Install Proxmox VE 6.0
- #这里配置了5S超时,自动进入latest选项。
- choose --default latest --timeout 5000 target && goto ${target}
- :latest
- initrd http://${next-server}/latest/initrd
- chain http://${next-server}/latest/linux26 vga=791 video=vesafb:ywrap,mtrr ramdisk_size=26777216 rw quiet initrd=initrd splash=silent
- :latest-debug
- initrd http://${next-server}/latest/initrd
- chain http://${next-server}/latest/linux26 vga=791 video=vesafb:ywrap,mtrr ramdisk_size=26777216 rw quiet initrd=initrd splash=silent proxdebug
- :7.3
- initrd http://${next-server}/7.3/initrd
- chain http://${next-server}/7.3/linux26 vga=791 video=vesafb:ywrap,mtrr ramdisk_size=26777216 rw quiet initrd=initrd splash=silent
- :7.2
- initrd http://${next-server}/7.2/initrd
- chain http://${next-server}/7.2/linux26 vga=791 video=vesafb:ywrap,mtrr ramdisk_size=26777216 rw quiet initrd=initrd splash=silent
- :7.1
- initrd http://${next-server}/7.1/initrd
- chain http://${next-server}/7.1/linux26 vga=791 video=vesafb:ywrap,mtrr ramdisk_size=26777216 rw quiet initrd=initrd splash=silent
- :7.0
- initrd http://${next-server}/7.0/initrd
- chain http://${next-server}/7.0/linux26 vga=791 video=vesafb:ywrap,mtrr ramdisk_size=26777216 rw quiet initrd=initrd splash=silent
- :6.4
- initrd http://${next-server}/6.4/initrd
- chain http://${next-server}/6.4/linux26 vga=791 video=vesafb:ywrap,mtrr ramdisk_size=26777216 rw quiet initrd=initrd splash=silent
- :6.3
- initrd http://${next-server}/6.3/initrd
- chain http://${next-server}/6.3/linux26 vga=791 video=vesafb:ywrap,mtrr ramdisk_size=26777216 rw quiet initrd=initrd splash=silent
- :6.2
- initrd http://${next-server}/6.2/initrd
- chain http://${next-server}/6.2/linux26 vga=791 video=vesafb:ywrap,mtrr ramdisk_size=26777216 rw quiet initrd=initrd splash=silent
- :6.1
- initrd http://${next-server}/6.1/initrd
- chain http://${next-server}/6.1/linux26 vga=791 video=vesafb:ywrap,mtrr ramdisk_size=26777216 rw quiet initrd=initrd splash=silent
- :6.0
- initrd http://${next-server}/6.0/initrd
- chain http://${next-server}/6.0/linux26 vga=791 video=vesafb:ywrap,mtrr ramdisk_size=26777216 rw quiet initrd=initrd splash=silent
如果是bios启动,则会引导/opt/tftp/lpxelinux.0,lpxelinux.0会加载pxelinux.cfg目录的下的defualt文件,我们看一下default文件内容
- DEFAULT menu.c32
- PROMPT 0
- ALLOWOPTIONS 0
- TIMEOUT 100
- #NOESCAPE 1
- #MENU SHIFTKEY 1
- MENU TITLE Proxmox VE Install Boot Menu
- LABEL local
- MENU LABEL Local Boot
- localboot -1
- label proxmox-install-http
- menu label Install Proxmox HTTP Latest
- linux http://{next-server}/latest/linux26
- initrd http://{next-server}/latest/initrd
- append vga=791 video=vesafb:ywrap,mtrr ramdisk_size=26777216 rw quiet splash=silent
- MENU DEFAULT
- label proxmox-install-http
- menu label Install Proxmox HTTP Latest(Debug)
- linux http://{next-server}/latest/linux26
- initrd http://{next-server}/latest/initrd
- append vga=791 video=vesafb:ywrap,mtrr ramdisk_size=26777216 rw quiet splash=silent proxdebug
- label reboot
- MENU LABEL ^Redemarrer
- kernel reboot.c32
- label shutdown
- MENU LABEL ^Eteindre
- kernel halt.c32
注意事项
建议为EFI引导
EFI引导务必关闭安全启动,否则无法引导成功。
虚拟镜像只有10G空间,如果要全部放pve,则需要扩容。
如果要批量自动安装,请务必把磁盘放到第一启动,pxe放置到第二启动,否则安装重启之后,还是pxe启动了。
虚拟机mac地址AC:BD:EF:C3:10:77
作者:佛西
链接:https://foxi.buduanwang.vip/virtualization/pve/1385.html/
文章版权归作者所有,未经允许请勿转载
如需获得支持,请点击网页右上角