一、将图片保存为base64编码(不建议)
使用步骤:
1、 安装vue-quill-editor
npm install vue-quill-editor -S
2、main.js中全局引入
// 富文本编辑器
import VueQuillEditor from 'vue-quill-editor'
import 'quill/dist/quill.core.css'
import 'quill/dist/quill.snow.css'
import 'quill/dist/quill.bubble.css'
Vue.use(VueQuillEditor)
3、页面中使用
<template>
    <div>
        <quill-editor  ref="myQuillEditor" v-model="content" :options="editorOption"
      class="my-quill-editor"></quill-editor>
    </div>
</template>

<script>
export default {
    data() {
        return {
            content: '',
            editorOption: {
                // 占位配置
                placeholder: '请输入...',
                height: '300px',
                modules: {
                    // 配置工具栏
                    toolbar: [
                        ['bold', 'italic', 'underline', 'strike'], // 加粗 斜体 下划线 删除线
                        ['blockquote', 'code-block'], // 引用  代码块
                        [{ header: 1 }, { header: 2 }], // 1、2 级标题
                        [{ list: 'ordered' }, { list: 'bullet' }], // 有序、无序列表
                        [{ script: 'sub' }, { script: 'super' }], // 上标/下标
                        [{ indent: '-1' }, { indent: '+1' }], // 缩进
                        [{ direction: 'rtl' }], // 文本方向
                        ['link', 'image', 'video'], // 链接、图片、视频
                        [{ align: [] }], // 添加居中按钮
                        [{ color: [] }], // 文字颜色按钮
                    ],
                    // 更改插入的图片大小
                    imageResize: {
                        displayStyles: {
                            backgroundColor: "black",
                            border: "none",
                            color: "white",
                        },
                        modules: ["Resize", "DisplaySize", "Toolbar"],
                    },
                }
            },
        }
    }
}
</script>
<style>
    /* 编辑器高度及背景色 */
    ::v-deep .ql-editor {
        min-height: 300px;
        background-color: #fff;
    }
.my-quill-editor{
  height: 300px;
  margin-bottom: 60px;
}
</style>
此时使用时会报错:
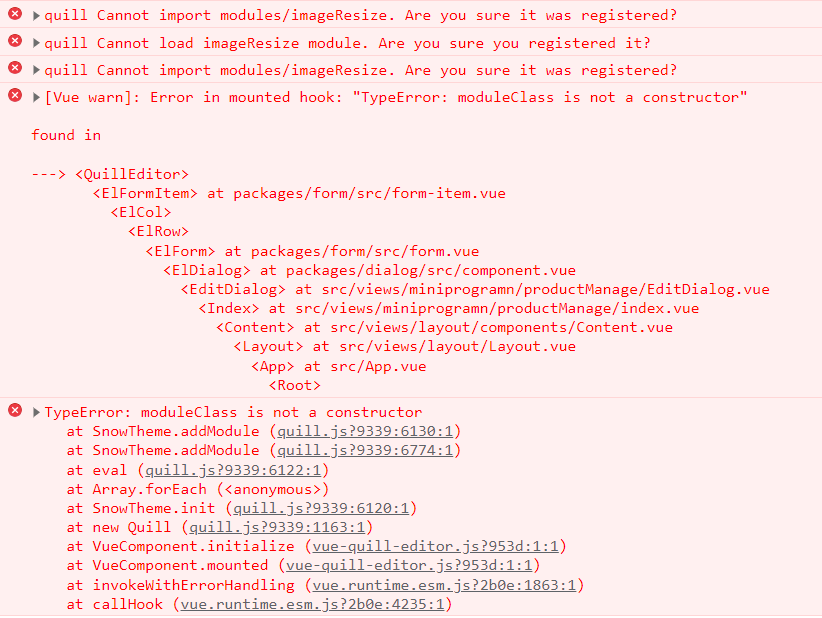
继续以下步骤
4、更改插入图片大小、 安装
npm install quill
npm install quill-image-resize-module --save
npm install quill-image-drop-module --save
5、在main.js中引入
// 富文本图片大小
import imageResize  from 'quill-image-resize-module' // 调整大小组件。
import { ImageDrop } from 'quill-image-drop-module'; // 拖动加载图片组件。
Quill.register('modules/imageResize', imageResize );
Quill.register('modules/imageDrop', ImageDrop);
6、在vue.config.js文件中引入
const webpack = require('webpack');
module.exports = {
  configureWebpack: {
    // 在这里添加你的自定义Webpack配置
    plugins: [
      new webpack.ProvidePlugin({
        'window.Quill': 'quill/dist/quill.js',
        'Quill': 'quill/dist/quill.js'
      })
    ]
  }
};
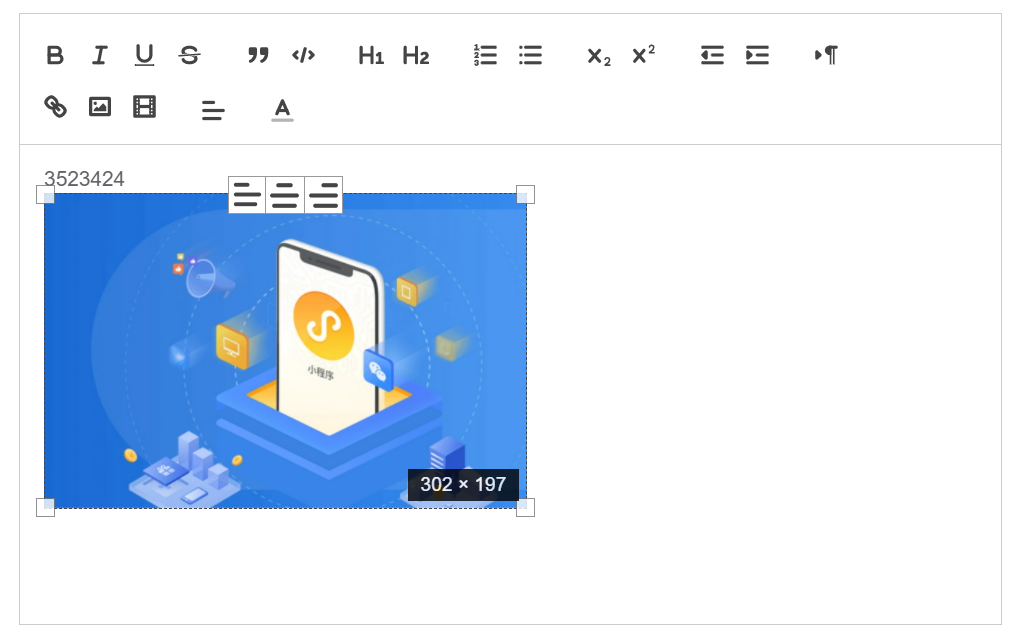
效果:
7、 在页面中显示样式
<template>
    <div>
        // 添加  class="ql-editor" 样式,不然文字居中不会显示
        <div v-html="content" class="ql-editor"></div>
    </div>
</template>
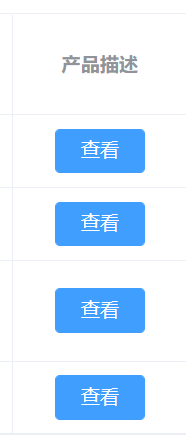
项目开发中,我们可以在列表中添加查看按钮,通过弹出对话框的形式查看富文本
对话框代码如下:
<template>
  <div class="upload-container">
    <el-button size="mini" type="primary" @click="initPage">{{name}}
    </el-button>
    <el-dialog :visible.sync="dialogVisible" append-to-body :close-on-click-modal="false" width="60%">
      <div>
        <div v-html="desc" class="ql-editor"></div>
      </div>
    </el-dialog>
  </div>
</template>

<script>
export default {
  name: "quillEditor",
  props: {
    content: {
      type: String,
      default: ""
    },
    name: {
      type: String,
      default: "查看"
    },
  },
  data() {
    return {
      dialogVisible: false,
      desc: null
    };
  },
  created() {
    console.log(this.content)
    this.desc=this.content
  },
  methods: {
    /**
     * 初始化查询
     */
    initPage() {
      this.dialogVisible = true;
    },

  }
}
</script>
引入
import QuillEditorDialog from "./quillEditorDialog.vue";
注册
components: {
      QuillEditorDialog
    },
使用
<el-table-column label="产品描述" align="center" width="110px">
        <template slot-scope="scope">
          <quill-editor-dialog  ref="quill-editor-dialog" :content="scope.row.productDesc"/>
        </template>
      </el-table-column>
8、图片适配PC后,手机端显示太大,如果只有一处调用就在页面中添加css样式,如何多次调用在app.vue中添加css样式
/* PC端样式 */
@media (min-width: 768px) {
  .ql-editor img {
    max-width: 100%;
    height: auto;
  }
}

/* 手机端样式 */
@media (max-width: 767px) {
  .ql-editor img {
    width: 100%;
    height: auto;
  }
}
二、将图片保存为url(建议)
vue3富文本编辑器参考:vue3.0富文本编辑器vue-quill-editor
使用步骤:
1、安装依赖
npm install vue-quill-editor –save 或者
yarn add vue-quill-editor
2、在main.js中引入并注册
// 富文本编辑器
import VueQuillEditor from 'vue-quill-editor'
import 'quill/dist/quill.core.css'
import 'quill/dist/quill.snow.css'
import 'quill/dist/quill.bubble.css'
Vue.use(VueQuillEditor)
3、使用富文本编辑器
//这是在页面中引入富文本编辑器
<quill-editor ref="myTextEditor" v-model="content" :options="editorOption"
 style="height: 300px; margin-bottom: 80px"></quill-editor>
注意:这里已经通过style来控制富文本编辑器的高度为300,还控制了富文本编辑器与下面的组件的距离为80px。
数据模型:
export default {
  data() {
    return {
      //富文本内容
      content: "",
      editorOption: {}
    };
  },
};
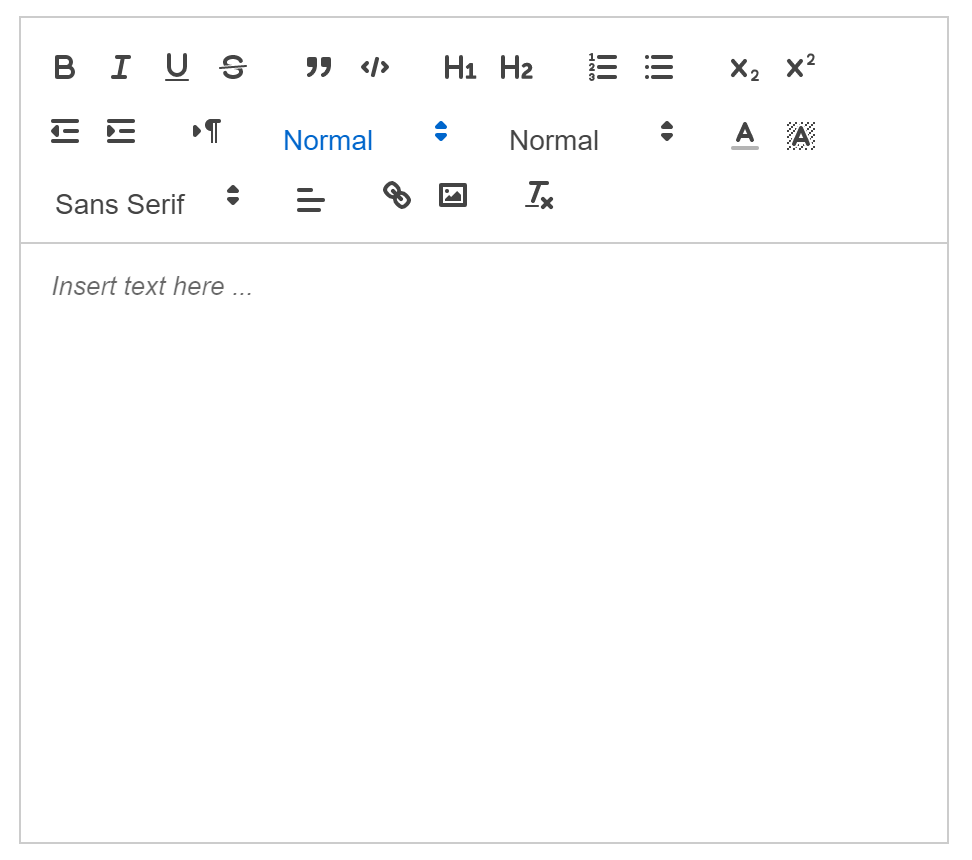
效果如下:
ue-quill-editor插入图片的方式是将图片转为base64再放入内容中,这样就会产生一个问题,如果图片比较大的话,富文本的内容就会很大,内容存在数据库中的,这样一来,一方面会占用大量的数据库存储空间,另一方面当图片太大的时候富文本的内容,会超过数据库的存储上限,从而会产生内容被截断从而显示不全的问题(即使是text类型,也有存储上限65535)。
那么问题来了,如何将图片上传到自己的服务器或第三方服务,然后将获得的图片url插入到文本中呢?大致有两个方法,其一是将任务交给服务端,服务端截取base64图片并转化为文件,将其路径或者url替换原来的图片数据;其二是对控件本身下手,首先将图片上传,然后插入到富文本中。
4、使用npm或者yarn安装quill-image-extend-modulenpm install quill-image-extend-module --save-dev
yarn add quill-image-extend-module
5、在Vue的script标签中中引入
注意,这个需要引入到有富文本编辑器的对应的那个vue文件中import {quillEditor, Quill} from 'vue-quill-editor'
import {container, ImageExtend, QuillWatch} from 'quill-image-extend-module'
Quill.register('modules/ImageExtend', ImageExtend)
6、data()中放入下面的代码
(1)、action:"后台接口地址"(请求地址的Api)
(2)、name: "后台接口地址参数name"(Api的请求体)
(3)、下面代码中headers请求头去掉注释,设置对应的请求头参数
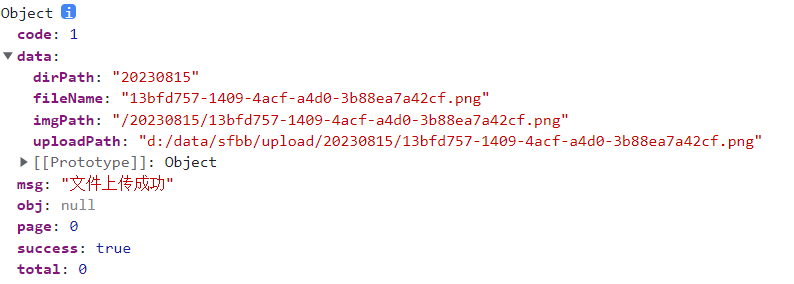
return {
        //富文本内容
        content:"",
        editorOption: {
          modules: {
            ImageExtend: {
              loading: true,
              name: "file",
              size: 8,
              action: "/api/fileUpload/uploadImage",
              response: res => {
                console.log(res)
                return 'http://localhost:8988/' + res.data.imgPath; // 注意:这里是返回的图片的url,我们再将url存到数据库
              },
              // headers: (xhr,formData) => {
              //   //xhr.setRequestHeader(
              //   //  "X-Nideshop-Token",
              //   //  localStorage.getItem("token")
              //   //);
              // }, // 可选参数 设置请求头部
              sizeError: () => {
                return this.$message.error("粘贴图片大小不能超过8MB!");
              } // 图片超过大小的回调
            },
            toolbar: {
              container: [
                ["bold", "italic", "underline", "strike"], // 加粗,斜体,下划线,删除线
                ["blockquote", "code-block"], //引用,代码块
                [{ header: 1 }, { header: 2 }], // 几级标题
                [{ list: "ordered" }, { list: "bullet" }], // 有序列表,无序列表
                [{ script: "sub" }, { script: "super" }], // 下角标,上角标
                [{ indent: "-1" }, { indent: "+1" }], // 缩进
                [{ direction: "rtl" }], // 文字输入方向
                [{ size: ["small", false, "large", "huge"] }], // 字体大小
                [{ header: [1, 2, 3, 4, 5, 6, false] }], // 标题
                [{ color: [] }, { background: [] }], // 颜色选择
                [{ font: [] }], // 字体
                [{ align: [] }], // 居中
                ["link", "image"],
                ["clean"]
              ],
              handlers: {
                image: function() {
                  QuillWatch.emit(this.quill.id);
                }
              }
            }
          }
        },
}
response中返回的res如下所示:
上传图片时,后台接收的controller
@PostMapping("/uploadImage")
    @Log("图片上传")
    public Result uploadImage(@RequestParam("file") MultipartFile multipartFile) {
        return fileUploadService.uploadImage(multipartFile);
    }
注意:参数名file与前端保持一致,否则无法接收到请求。