一、双目相机拍照后使用Matlab进行双目标定
必看: USB双目相机的具体标定过程:https://blog.csdn.net/qq_40700822/article/details/124251201?spm=1001.2014.3001.5501
主要参考:https://blog.csdn.net/dulingwen/article/details/98071584
感谢大佬的分享!!!(*≧ω≦)!!
二、标定后生成深度图,之后在进行测距(这里主要是对双目参数的解读)
1、导入相关库和相机的标定参数
首先导入需要的相关库以及双目相机标定的各项参数:
 # -*- coding: utf-8 -*-
import cv2
import numpy as np
import stereoconfig_040_2 #导入相机标定的参数
import pcl
import pcl.pcl_visualization
123456
首先对导入的左右相机的图片进行预处理,一般可以削弱光照不均的影响,使得两个图片的曝光值差距缩小。
小知识:python-opencv读取的灰度图像是二维列表(数组),彩色图像是三位列表(数组)。
.ndim返回的是数组的维度,返回的只有一个数,该数即表示数组的维度。
参考:https://blog.csdn.net/mokeding/article/details/17599585
#像素的访问和访问numpy中ndarray的方法完全一样
img[j,i] = 255  # 灰度图访问;j,i 分别表示图像的行和列 即 j * i 二维

#BGR 图像访问 彩色 BGR 图像 为 j * i * 3 三维
img[j,i,0] = 255   # 0 -- 为通道,指B通道
img[j,i,1] = 255   # 1 -- 为通道,指G通道
img[j,i,2] = 255   # 2 -- 为通道,指R通道
1234567
2、图像预处理
# 预处理
def preprocess(img1, img2):
    # 彩色图->灰度图
    if(img1.ndim == 3): #判断是否为三维数组
        img1 = cv2.cvtColor(img1, cv2.COLOR_BGR2GRAY)  # 通过OpenCV加载的图像通道顺序是BGR
    if(img2.ndim == 3):#判断是否为三维数组
        img2 = cv2.cvtColor(img2, cv2.COLOR_BGR2GRAY)

    # 直方图均衡
    # 当然这里也可以按需对图像进行处理
    img1 = cv2.equalizeHist(img1)
    img2 = cv2.equalizeHist(img2)

    return img1, img2
1234567891011121314
3、消除图像的畸变
cv.undistort()消除畸变函数参数含义
参考OpenCV官网:https://docs.opencv.org/master/d9/d0c/group__calib3d.html#ga69f2545a8b62a6b0fc2ee060dc30559d
cv.undistort(	src, cameraMatrix, distCoeffs[, dst[, newCameraMatrix]]	) ->	dst
1
各个参数的含义:
| 参数名 | 含义 |
|---|---|
| src | 输入未畸变矫正的图片 |
| dst | 输出矫正之后的图片,与src输入的图片具有相同的大小和类型 |
| cameraMatrix | 输入相机的内参数矩阵 A = [ [fx, 0, cx], [0, fy, cy], [0, 0, 1] ] |
| distCoeffs | 输入相机的畸变参数向量 ( (k1,k2,p1,p2[,k3[,k4,k5,k6[,s1,s2,s3,s4[,τx,τy ] ] ] ] ) )中的4, 5, 8, 12 或 14 个元素。如果向量为NULL /空,则假定失真系数为零。一般取标定后相机的[k1, k2, p1, p2, k3] |
| newCameraMatrix | 畸变图像的相机矩阵。 默认情况下,它与cameraMatrix相同,但是您还可以使用其他矩阵来缩放和移动结果。 |
消除畸变函数的定义:
# 消除畸变
def undistortion(image, camera_matrix, dist_coeff):
    undistortion_image = cv2.undistort(image, camera_matrix, dist_coeff)

    return undistortion_image
12345
调用示例,不能直接使用(stereoconfig_040_2.py完整代码见文末):
 # 读取相机内参和外参
config = stereoconfig_040_2.stereoCamera()
i = 3
string = 'Val'
# 读取数据集的图片
iml = cv2.imread('./%sLeft%d.bmp' %(string,i) )  # 左图
imr = cv2.imread('./%sRight%d.bmp'%(string,i) )  # 右图
iml = undistortion(iml, config.cam_matrix_left, config.distortion_l)
imr = undistortion(imr, config.cam_matrix_right, config.distortion_r)

#cv2.undistort()的dist_coeff参数的形式
# 左右相机畸变系数:[k1, k2, p1, p2, k3]
#config.distortion_l = np.array([[-0.0806, 0.3806, -0.0033, 0.0005148, -0.5229]])
#config.distortion_r = np.array([[-0.0485, 0.2200, -0.002,  0.0017,    -0.2876]])
1234567891011121314
4、立体校正
# 获取畸变校正和立体校正的映射变换矩阵、重投影矩阵
# @param:config是一个类,存储着双目标定的参数:config = stereoconfig.stereoCamera()
def getRectifyTransform(height, width, config):
    # 读取内参和外参
    left_K = config.cam_matrix_left
    right_K = config.cam_matrix_right
    left_distortion = config.distortion_l
    right_distortion = config.distortion_r
    R = config.R
    T = config.T

    # 计算校正变换
    R1, R2, P1, P2, Q, roi1, roi2 = cv2.stereoRectify(left_K, left_distortion, right_K, right_distortion,
                                                    (width, height), R, T, alpha=0)

    map1x, map1y = cv2.initUndistortRectifyMap(left_K, left_distortion, R1, P1, (width, height), cv2.CV_32FC1)
    map2x, map2y = cv2.initUndistortRectifyMap(right_K, right_distortion, R2, P2, (width, height), cv2.CV_32FC1)

    return map1x, map1y, map2x, map2y, Q


12345678910111213141516171819202122
cv.stereoRectify()参数含义:
官网定义的形式:
cv.stereoRectify(
cameraMatrix1,
distCoeffs1,
cameraMatrix2,
distCoeffs2,
imageSize,
R,
T[, R1
 [, R2
 [, P1
 [, P2
 [, Q
 [, flags
 [, alpha
 [, newImageSize]]]]]]]]
 ) ->	R1, R2, P1, P2, Q, validPixROI1, validPixROI2
12345678910111213141516
cv.stereoRectify()参数的含义:
| 参数名 | 含义 |
|---|---|
| cameraMatrix1 | 第一个相机的内参数矩阵。 |
| distCoeffs1 | 第一个相机的畸变参数。 |
| cameraMatrix2 | 第二个相机的内参数矩阵。 |
| distCoeffs2 | 第二个相机的畸变参数。 |
| imageSize | 双目相机标定的图像的尺寸大小。 |
| R | 从第一个摄像头的坐标系到第二个摄像头的坐标系的旋转矩阵,请参见stereoCalibrate。(输出旋转矩阵。连同平移矢量T一起,此矩阵将第一个摄像机坐标系中给定的点带到第二个摄像机坐标系中的点。用更专业的术语来说,R和T的元组执行的基础是从第一相机的坐标系到第二相机的坐标系的变化。由于其二元性,该元组等效于第一摄像机相对于第二摄像机坐标系的位置。) |
| T | (输出转换向量,请参见上面的描述。)从第一个摄像机的坐标系到第二个摄像机的坐标系的平移向量,请参见stereoCalibrate。 |
| R1 | 为第一个摄像机输出3x3立体矫正的变换(旋转矩阵)。 该矩阵将未校正的第一照相机的坐标系中给定的点带到校正的第一照相机的坐标系中的点。 用更多的专业术语来说就是,它执行了从未校正的第一摄像机的坐标系到校正了的第一摄像机的坐标系的基准的更改。 |
| R2 | 为第二个摄像机输出3x3立体矫正的变换(旋转矩阵)。 该矩阵将未校正的第二照相机的坐标系中给定的点带到校正的第二照相机的坐标系中的点。 用更多的专业术语来说就是,它执行了从未校正的第二摄像机的坐标系到校正了的第二摄像机的坐标系的基准的更改。 |
| P1 | 在第一个摄像机的新(校正)坐标系中输出3x4投影矩阵,即它将在校正后的第一摄像机坐标系中给定的点,投影到校正后的第一摄像机的图像中。 |
| P2 | 在第二个摄像机的新(校正)坐标系中输出3x4投影矩阵,即它将在校正后的第二摄像机坐标系中给定的点,投影到校正后的第二摄像机的图像中。 |
| Q | 输出4×4视差深度映射矩阵(请参阅reprojectImageTo3D)。 |
| flags | 可能为零或CALIB_ZERO_DISPARITY的操作标志。如果设置了该标志,则该功能使每个摄像机的主要的像素点在校正后的视图中具有相同的像素坐标。并且,如果未设置该标志,则该功能仍可以在水平或垂直方向上移动图像(取决于对极线的方向),以最大化可用图像区域。 |
| alpha | 自由缩放参数。如果它是-1或缺省,则该函数将执行默认缩放。否则,该参数应在0到1之间。alpha = 0表示对校正的图像已经经过缩放和移动了,以便仅有效像素可见(在校正之后的非黑色区域)。 alpha = 1表示对校正后的图像进行抽取和移位,以便将来自摄像机的原始图像中的所有像素保留在校正后的图像中(不丢失任何源图像像素)。任何中间值(0~1)都会在这两种极端情况之间产生中间结果。 |
| newImageSize | 校正后的新图像的分辨率。应将相同的大小传递给initUndistortRectifyMap(请参阅OpenCV示例目录中的stereo_calib.cpp示例)。传递(0,0)(默认值)时,将其设置为原始imageSize。将其设置为较大的值可以帮助您保留原始图像中的细节,尤其是在径向变形较大的情况下。 |
| validPixROI1 | 在所有像素均有效的已校正图像内的可选输出矩形。如果alpha = 0,则ROI覆盖整个图像。否则,它们可能会更小(请参见下图)。 |
| validPixROI2 | 在所有像素均有效的已校正图像内的可选输出矩形。如果alpha = 0,则ROI覆盖整个图像。否则,它们可能会更小(请参见下图)。 |
| cv.initUndistortRectifyMap()函数的定义: |
cv.initUndistortRectifyMap(
cameraMatrix,
distCoeffs,
R,
newCameraMatrix,
size,
m1type[, map1
	  [, map2]
	  ]
  ) ->	map1, map2
12345678910
cv.initUndistortRectifyMap()函数各个参数的含义:
参考OpenCV官网:
https://docs.opencv.org/master/d9/d0c/group__calib3d.html#ga7dfb72c9cf9780a347fbe3d1c47e5d5a
| 参数名 | 含义 |
|---|---|
| cameraMatrix | 相机的内参数矩阵。 |
| distCoeffs | 输入相机的畸变参数向量 (一般取标定后相机的[k1, k2, p1, p2, k3] )。 |
| R | 对象空间中的可选的校正变换(3x3矩阵)。由stereoRectify计算的R1或R2可以在此处传递。如果矩阵为空,则假定身份转换。在cvInitUndistortMap中,R是一个单位矩阵。 |
| newCameraMatrix | 新相机内参数的矩阵。 |
| size | 未校正的图片的尺寸。 |
| m1type | 第一个输出映射的类型可以是CV_32FC1,CV_32FC2或CV_16SC2,请参见convertMaps。 |
| map1 | 第一个输出图。 |
| map2 | 第二个输出图。 |
5、视差计算
# 视差计算
def stereoMatchSGBM(left_image, right_image, down_scale=False):
    # SGBM匹配参数设置
    if left_image.ndim == 2:
        img_channels = 1
    else:
        img_channels = 3

    blockSize = 3
    paraml = {'minDisparity': 0,
             'numDisparities': 128,
             'blockSize': blockSize,
             'P1': 8 * img_channels * blockSize ** 2,
             'P2': 32 * img_channels * blockSize ** 2,
             'disp12MaxDiff': 1,
             'preFilterCap': 63,
             'uniquenessRatio': 15,
             'speckleWindowSize': 100,
             'speckleRange': 1,
             'mode': cv2.STEREO_SGBM_MODE_SGBM_3WAY
             }

    # 构建SGBM对象
    left_matcher = cv2.StereoSGBM_create(**paraml)
    paramr = paraml
    paramr['minDisparity'] = -paraml['numDisparities']
    right_matcher = cv2.StereoSGBM_create(**paramr)

    # 计算视差图
    size = (left_image.shape[1], left_image.shape[0])
    if down_scale == False:
        disparity_left = left_matcher.compute(left_image, right_image)
        disparity_right = right_matcher.compute(right_image, left_image)

    else:
        left_image_down = cv2.pyrDown(left_image)
        right_image_down = cv2.pyrDown(right_image)
        factor = left_image.shape[1] / left_image_down.shape[1]

        disparity_left_half = left_matcher.compute(left_image_down, right_image_down)
        disparity_right_half = right_matcher.compute(right_image_down, left_image_down)
        disparity_left = cv2.resize(disparity_left_half, size, interpolation=cv2.INTER_AREA)
        disparity_right = cv2.resize(disparity_right_half, size, interpolation=cv2.INTER_AREA)
        disparity_left = factor * disparity_left
        disparity_right = factor * disparity_right

    # 真实视差(因为SGBM算法得到的视差是×16的)
    trueDisp_left = disparity_left.astype(np.float32) / 16.
    trueDisp_right = disparity_right.astype(np.float32) / 16.

    return trueDisp_left, trueDisp_right

12345678910111213141516171819202122232425262728293031323334353637383940414243444546474849505152
Python-openCV 中cv2.StereoSGBM_create()参数的含义:
参考:https://docs.opencv.org/trunk/d2/d85/classcv_1_1StereoSGBM.html
参考OpenCV官网:https://docs.opencv.org/trunk/d2/d85/classcv_1_1StereoSGBM.html
cv2.StereoSGBM_create()的SGBM算法的定义:
cv2.StereoSGBM_create(
[,minDisparity
[,numDisparities
[,blockSize
[,P1
[,P2
[,disp12MaxDiff
[,preFilterCap
[,uniquenessRatio
[,speckleWindowSize
[,speckleRange
[,mode]]]]]]]]]]]]
)
12345678910111213
各个参数的含义:
| 参数名 | 含义 |
|---|---|
| minDisparity | 最小可能的差异值。通常情况下,它是零,但有时整流算法可能会改变图像,所以这个参数需要作相应的调整。 |
| numDisparities | 最大差异减去最小差异。该值总是大于零。在当前的实现中,该参数必须可以被16整除。 |
| blockSize | 匹配的块大小。它必须是> = 1的奇数。通常情况下,它应该在3~11的范围内。 |
| P1 | 控制视差平滑度的第一个参数。见下文。 |
| P2 | 第二个参数控制视差平滑度。值越大,差异越平滑。P1是相邻像素之间的视差变化加或减1的惩罚。P2是相邻像素之间的视差变化超过1的惩罚。该算法需要P2> P1。请参见stereo_match.cpp示例,其中显示了一些相当好的P1和P2值(即分别设置为 P1 = 8 * number_of_image_channels * blockSize * blockSize和 P2 = 32 * number_of_image_channels * blockSize * blockSize)。 |
| disp12MaxDiff | 左右视差检查中允许的最大差异(以整数像素为单位)。将其设置为非正值以禁用检查。 |
| preFilterCap | 预滤波图像像素的截断值。该算法首先计算每个像素的x导数,并通过[-preFilterCap,preFilterCap]间隔剪切其值。结果值传递给Birchfield-Tomasi像素成本函数。 |
| uniquenessRatio | 最佳(最小)计算成本函数值应该“赢”第二个最佳值以考虑找到的匹配正确的百分比保证金。通常,5-15范围内的值就足够了。 |
| speckleWindowSize | 平滑视差区域的最大尺寸,以考虑其噪声斑点和无效。将其设置为0可禁用斑点过滤。否则,将其设置在50-200的范围内。 |
| speckleRange | 每个连接组件内的最大视差变化。如果你做斑点过滤,将参数设置为正值,它将被隐式乘以16.通常,1或2就足够好了。 |
| mode | 将其设置为StereoSGBM :: MODE_HH以运行全尺寸双通道动态编程算法。它将消耗O(W * H * numDisparities)字节,这对640x480立体声很大,对于HD尺寸的图片很大。默认情况下,它被设置为false。 |
Python-openCV 中cv2.pyrDown()中的参数和含义:
参考OpenCV官网:https://docs.opencv.org/master/d4/d86/group__imgproc__filter.html#gaf9bba239dfca11654cb7f50f889fc2ff
cv.pyrDown(	src[, dst[, dstsize[, borderType]]]	) ->	dst
1
| 参数名 | 含义 |
|---|---|
| src | 输入图像 |
| dst | 输出图像;与上面的输入图像具有相同的尺寸大小和类型 |
| dstsize | 输出图像的大小 |
| borderType | 像素外推方法,请参见BorderTypes(不支持BORDER_CONSTANT) |
6、其他函数的参数以及含义
reprojectImageTo3D的定义:
cv.reprojectImageTo3D(
disparity,
Q
[, _3dImage
[, handleMissingValues
[, ddepth]]]
 ) ->	_3dImage
1234567
cv2.reprojectImageTo3D()参数以及其含义:
参考官网:https://docs.opencv.org/master/d9/d0c/group__calib3d.html#ga1bc1152bd57d63bc524204f21fde6e02
| 参数名 | 含义 |
|---|---|
| disparity | 输入单通道8位无符号,16位有符号,32位有符号或32位浮点视差图像。 假定8位/ 16位带符号格式的值没有小数位。 如果视差是由StereoBM或StereoSGBM以及其他算法计算出的16位带符号格式,则应在此处使用之前将其除以16(并缩放为浮点数)。 |
| _3dImage | 输出与视差大小相同的3通道浮点图像。 _3dImage(x,y)的每个元素都包含根据视差图计算的点(x,y)的3D坐标。 如果使用通过stereoRectify获得的Q,则返回的点将在第一个摄像机的校正坐标系中表示。 |
| Q | 可以使用stereoRectify获得的4×4透视变换矩阵。 |
| handleMissingValues | 指示函数是否应处理缺失值(即未计算视差的点)。如果handleMissingValues = true,则具有与异常值相对应的最小视差的像素(请参见StereoMatcher :: compute)将转换为Z值非常大(当前设置为10000)的3D点。 |
| ddepth | 可选的输出数组深度。如果为-1,则输出图像将具有CV_32F深度。 ddepth也可以设置为CV_16S,CV_32S或CV_32F。 |
三、双目测距代码的实现
1、stereoconfig_040_2.py–相机标定的参数
import numpy as np


####################仅仅是一个示例###################################


# 双目相机参数
class stereoCamera(object):
    def __init__(self):
        # 左相机内参
        self.cam_matrix_left = np.array([   [830.5873,   -3.0662,  658.1007],
                                            [       0,  830.8116,  482.9859],
                                            [       0,         0,         1]
                                        ])
        # 右相机内参
        self.cam_matrix_right = np.array([  [830.4255,   -3.5852,  636.8418],
                                            [       0,  830.7571,  476.0664],
                                            [       0,         0,         1]
                                        ])

        # 左右相机畸变系数:[k1, k2, p1, p2, k3]
        self.distortion_l = np.array([[-0.0806, 0.3806, -0.0033, 0.0005148, -0.5229]])
        self.distortion_r = np.array([[-0.0485, 0.2200, -0.002,  0.0017,    -0.2876]])

        # 旋转矩阵
        self.R = np.array([ [      1,  0.0017, -0.0093],
                            [-0.0018,  1.0000, -0.0019],
                            [ 0.0093,  0.0019,  1.0000]
                            ])

        # 平移矩阵
        self.T = np.array([[-119.9578], [0.1121], [-0.2134]])

        # 焦距
        self.focal_length = 859.367 # 默认值,一般取立体校正后的重投影矩阵Q中的 Q[2,3]

        # 基线距离
        self.baseline = 119.9578 # 单位:mm, 为平移向量的第一个参数(取绝对值)


123456789101112131415161718192021222324252627282930313233343536373839404142
2、dianyuntu.py–测距实现代码
 # -*- coding: utf-8 -*-
import cv2
import numpy as np
import stereoconfig_040_2   #导入相机标定的参数
import pcl
import pcl.pcl_visualization


# 预处理
def preprocess(img1, img2):
    # 彩色图->灰度图
    if(img1.ndim == 3):#判断为三维数组
        img1 = cv2.cvtColor(img1, cv2.COLOR_BGR2GRAY)  # 通过OpenCV加载的图像通道顺序是BGR
    if(img2.ndim == 3):
        img2 = cv2.cvtColor(img2, cv2.COLOR_BGR2GRAY)

    # 直方图均衡
    img1 = cv2.equalizeHist(img1)
    img2 = cv2.equalizeHist(img2)

    return img1, img2


# 消除畸变
def undistortion(image, camera_matrix, dist_coeff):
    undistortion_image = cv2.undistort(image, camera_matrix, dist_coeff)

    return undistortion_image


# 获取畸变校正和立体校正的映射变换矩阵、重投影矩阵
# @param:config是一个类,存储着双目标定的参数:config = stereoconfig.stereoCamera()
def getRectifyTransform(height, width, config):
    # 读取内参和外参
    left_K = config.cam_matrix_left
    right_K = config.cam_matrix_right
    left_distortion = config.distortion_l
    right_distortion = config.distortion_r
    R = config.R
    T = config.T

    # 计算校正变换
    R1, R2, P1, P2, Q, roi1, roi2 = cv2.stereoRectify(left_K, left_distortion, right_K, right_distortion,
                                                    (width, height), R, T, alpha=0)

    map1x, map1y = cv2.initUndistortRectifyMap(left_K, left_distortion, R1, P1, (width, height), cv2.CV_32FC1)
    map2x, map2y = cv2.initUndistortRectifyMap(right_K, right_distortion, R2, P2, (width, height), cv2.CV_32FC1)

    return map1x, map1y, map2x, map2y, Q


# 畸变校正和立体校正
def rectifyImage(image1, image2, map1x, map1y, map2x, map2y):
    rectifyed_img1 = cv2.remap(image1, map1x, map1y, cv2.INTER_AREA)
    rectifyed_img2 = cv2.remap(image2, map2x, map2y, cv2.INTER_AREA)

    return rectifyed_img1, rectifyed_img2


# 立体校正检验----画线
def draw_line(image1, image2):
    # 建立输出图像
    height = max(image1.shape[0], image2.shape[0])
    width = image1.shape[1] + image2.shape[1]

    output = np.zeros((height, width, 3), dtype=np.uint8)
    output[0:image1.shape[0], 0:image1.shape[1]] = image1
    output[0:image2.shape[0], image1.shape[1]:] = image2

    # 绘制等间距平行线
    line_interval = 50  # 直线间隔:50
    for k in range(height // line_interval):
        cv2.line(output, (0, line_interval * (k + 1)), (2 * width, line_interval * (k + 1)), (0, 255, 0), thickness=2, lineType=cv2.LINE_AA)

    return output


# 视差计算
def stereoMatchSGBM(left_image, right_image, down_scale=False):
    # SGBM匹配参数设置
    if left_image.ndim == 2:
        img_channels = 1
    else:
        img_channels = 3
    blockSize = 3
    paraml = {'minDisparity': 0,
             'numDisparities': 128,
             'blockSize': blockSize,
             'P1': 8 * img_channels * blockSize ** 2,
             'P2': 32 * img_channels * blockSize ** 2,
             'disp12MaxDiff': 1,
             'preFilterCap': 63,
             'uniquenessRatio': 15,
             'speckleWindowSize': 100,
             'speckleRange': 1,
             'mode': cv2.STEREO_SGBM_MODE_SGBM_3WAY
             }

    # 构建SGBM对象
    left_matcher = cv2.StereoSGBM_create(**paraml)
    paramr = paraml
    paramr['minDisparity'] = -paraml['numDisparities']
    right_matcher = cv2.StereoSGBM_create(**paramr)

    # 计算视差图
    size = (left_image.shape[1], left_image.shape[0])
    if down_scale == False:
        disparity_left = left_matcher.compute(left_image, right_image)
        disparity_right = right_matcher.compute(right_image, left_image)

    else:
        left_image_down = cv2.pyrDown(left_image)
        right_image_down = cv2.pyrDown(right_image)
        factor = left_image.shape[1] / left_image_down.shape[1]

        disparity_left_half = left_matcher.compute(left_image_down, right_image_down)
        disparity_right_half = right_matcher.compute(right_image_down, left_image_down)
        disparity_left = cv2.resize(disparity_left_half, size, interpolation=cv2.INTER_AREA)
        disparity_right = cv2.resize(disparity_right_half, size, interpolation=cv2.INTER_AREA)
        disparity_left = factor * disparity_left
        disparity_right = factor * disparity_right

    # 真实视差(因为SGBM算法得到的视差是×16的)
    trueDisp_left = disparity_left.astype(np.float32) / 16.
    trueDisp_right = disparity_right.astype(np.float32) / 16.

    return trueDisp_left, trueDisp_right


# 将h×w×3数组转换为N×3的数组
def hw3ToN3(points):
    height, width = points.shape[0:2]

    points_1 = points[:, :, 0].reshape(height * width, 1)
    points_2 = points[:, :, 1].reshape(height * width, 1)
    points_3 = points[:, :, 2].reshape(height * width, 1)

    points_ = np.hstack((points_1, points_2, points_3))

    return points_


# 深度、颜色转换为点云
def DepthColor2Cloud(points_3d, colors):
    rows, cols = points_3d.shape[0:2]
    size = rows * cols

    points_ = hw3ToN3(points_3d)
    colors_ = hw3ToN3(colors).astype(np.int64)

    # 颜色信息
    blue = colors_[:, 0].reshape(size, 1)
    green = colors_[:, 1].reshape(size, 1)
    red = colors_[:, 2].reshape(size, 1)

    rgb = np.left_shift(blue, 0) + np.left_shift(green, 8) + np.left_shift(red, 16)

    # 将坐标+颜色叠加为点云数组
    pointcloud = np.hstack((points_, rgb)).astype(np.float32)

    # 删掉一些不合适的点
    X = pointcloud[:, 0]
    Y = -pointcloud[:, 1]
    Z = -pointcloud[:, 2]

    remove_idx1 = np.where(Z <= 0)
    remove_idx2 = np.where(Z > 15000)
    remove_idx3 = np.where(X > 10000)
    remove_idx4 = np.where(X < -10000)
    remove_idx5 = np.where(Y > 10000)
    remove_idx6 = np.where(Y < -10000)
    remove_idx = np.hstack((remove_idx1[0], remove_idx2[0], remove_idx3[0], remove_idx4[0], remove_idx5[0], remove_idx6[0]))

    pointcloud_1 = np.delete(pointcloud, remove_idx, 0)

    return pointcloud_1


# 点云显示
def view_cloud(pointcloud):
    cloud = pcl.PointCloud_PointXYZRGBA()
    cloud.from_array(pointcloud)

    try:
        visual = pcl.pcl_visualization.CloudViewing()
        visual.ShowColorACloud(cloud)
        v = True
        while v:
            v = not (visual.WasStopped())
    except:
        pass


if __name__ == '__main__':

    i = 3
    string = 're'
    # 读取数据集的图片
    iml = cv2.imread('./%sLift%d.bmp' %(string,i) )  # 左图
    imr = cv2.imread('./%sRight%d.bmp'%(string,i) ) # 右图
    height, width = iml.shape[0:2]

    print("width = %d \n"  % width)
    print("height = %d \n" % height)


    # 读取相机内参和外参
    config = stereoconfig_040_2.stereoCamera()

    # 立体校正
    map1x, map1y, map2x, map2y, Q = getRectifyTransform(height, width, config)  # 获取用于畸变校正和立体校正的映射矩阵以及用于计算像素空间坐标的重投影矩阵
    iml_rectified, imr_rectified = rectifyImage(iml, imr, map1x, map1y, map2x, map2y)

    print("Print Q!")
    print(Q)

    # 绘制等间距平行线,检查立体校正的效果
    line = draw_line(iml_rectified, imr_rectified)
    cv2.imwrite('./%s检验%d.png' %(string,i), line)

    # 消除畸变
    iml = undistortion(iml, config.cam_matrix_left, config.distortion_l)
    imr = undistortion(imr, config.cam_matrix_right, config.distortion_r)

    # 立体匹配
    iml_, imr_ = preprocess(iml, imr)  # 预处理,一般可以削弱光照不均的影响,不做也可以

    iml_rectified_l, imr_rectified_r = rectifyImage(iml_, imr_, map1x, map1y, map2x, map2y)

    disp, _ = stereoMatchSGBM(iml_rectified_l, imr_rectified_r, True)
    cv2.imwrite('./%s视差%d.png' %(string,i), disp)


    # 计算像素点的3D坐标(左相机坐标系下)
    points_3d = cv2.reprojectImageTo3D(disp, Q)  # 可以使用上文的stereo_config.py给出的参数

    #points_3d = points_3d

        # 鼠标点击事件
    def onMouse(event, x, y, flags, param):
        if event == cv2.EVENT_LBUTTONDOWN:
            print('点 (%d, %d) 的三维坐标 (%f, %f, %f)' % (x, y, points_3d[y, x, 0], points_3d[y, x, 1], points_3d[y, x, 2]))
            dis = ( (points_3d[y, x, 0] ** 2 + points_3d[y, x, 1] ** 2 + points_3d[y, x, 2] **2) ** 0.5) / 1000
            print('点 (%d, %d) 距离左摄像头的相对距离为 %0.3f m' %(x, y, dis) )

        # 显示图片
    cv2.namedWindow("disparity",0)
    cv2.imshow("disparity", disp)
    cv2.setMouseCallback("disparity", onMouse, 0)


    # 构建点云--Point_XYZRGBA格式
    pointcloud = DepthColor2Cloud(points_3d, iml)

    # 显示点云
    view_cloud(pointcloud)

    cv2.waitKey(0)
    cv2.destroyAllWindows()
123456789101112131415161718192021222324252627282930313233343536373839404142434445464748495051525354555657585960616263646566676869707172737475767778798081828384858687888990919293949596979899100101102103104105106107108109110111112113114115116117118119120121122123124125126127128129130131132133134135136137138139140141142143144145146147148149150151152153154155156157158159160161162163164165166167168169170171172173174175176177178179180181182183184185186187188189190191192193194195196197198199200201202203204205206207208209210211212213214215216217218219220221222223224225226227228229230231232233234235236237238239240241242243244245246247248249250251252253254255256257258259260261
3、代码打包下载地址
本人瞎写的代码,如有错误,还请见谅!
https://download.csdn.net/download/qq_40700822/18378679
4、查看实现的效果
直接使用python运行上边打包的代码的dianyuntu.py即可,如果报错,就是环境没有搭建好,自行解决吧。
PS. 我的摄像头的分辨率是1920*720,所以效果一般。
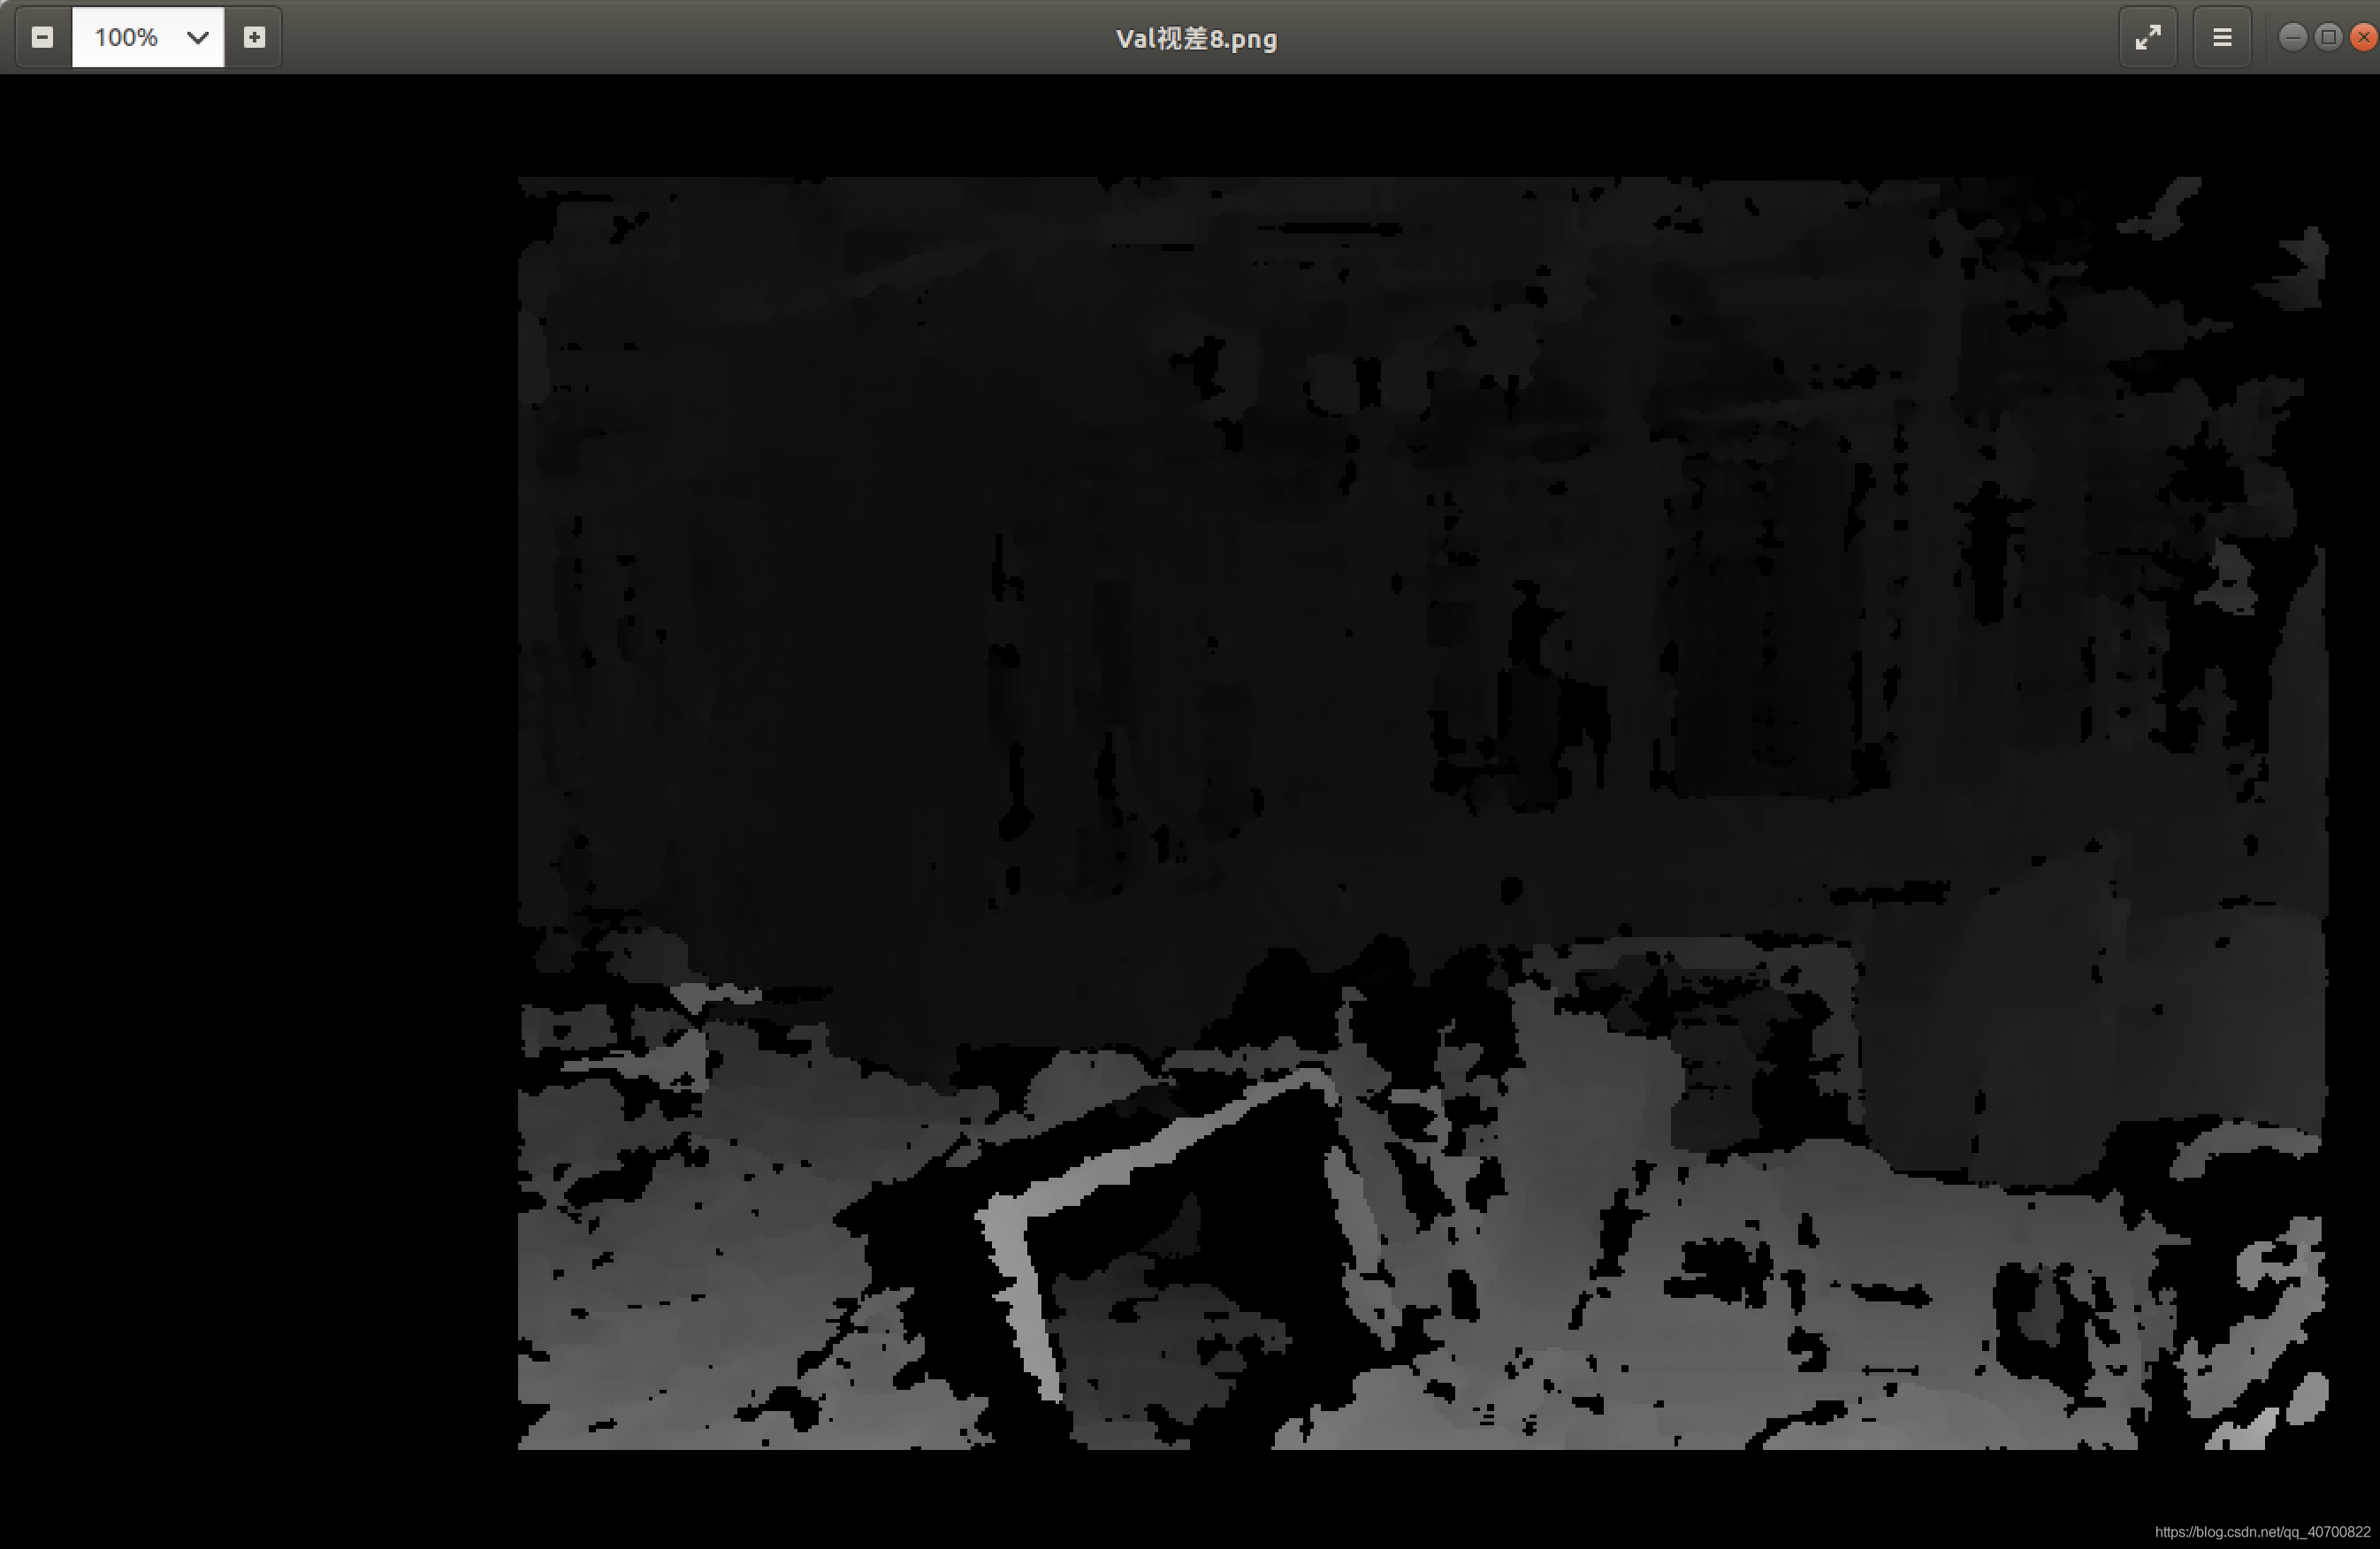
得到的视差图:
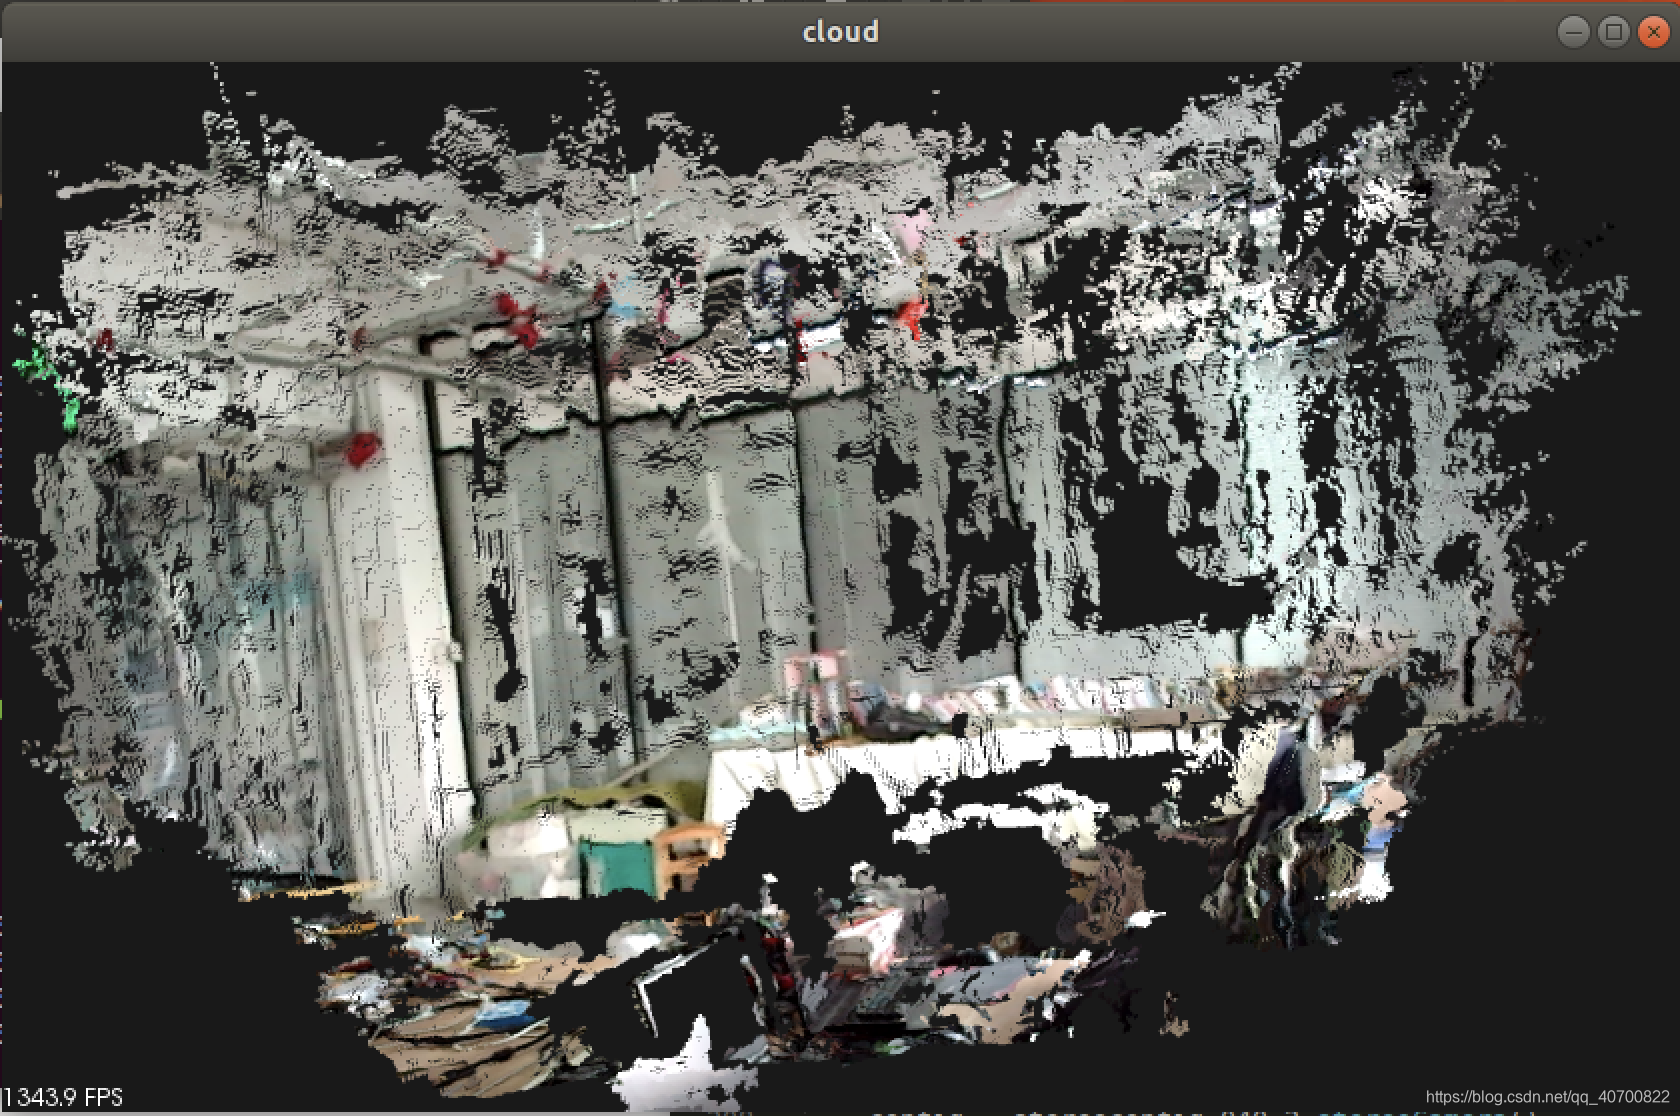
得到的点云图: