PXE一键装机
发邮件
[root@localhost ~]# echo "mial hello" | mail -s "test-6" 2397683704@qq.com

修改qq邮箱的白名单
^ 表示高亮
裸机的内存必须2G以上,不然加载不了,会报错
pxelinux.cfg这个是文件夹,需要在该目录下创建vim default
PXE一键装机详细步骤
1. yum安装dhcp、tftp、sysllinux、vsftpd
软件名  dhcp	          服务名  dhcpd
软件名  tftp-server      服务名  tftp.socket
软件名  vsftpd           服务名  vsftpd
软件名  sysllinux
# 安装软件
[root@localhost ~]# yum install -y dhcp
[root@localhost ~]# yum install -y tftp-server.x86_64
[root@localhost ~]# yum install -y vsftpd
[root@localhost ~]# yum install -y syslinux


2. 配置dhcp
[root@localhost ~]# cp /usr/share/doc/dhcp-4.2.5/dhcpd.conf.example  /etc/dhcp/dhcpd.conf
cp:是否覆盖"/etc/dhcp/dhcpd.conf"? y
[root@localhost ~]# cd /etc/dhcp
[root@localhost dhcp]# ls
dhclient.d  dhclient-exit-hooks.d  dhcpd6.conf  dhcpd.conf  scripts
[root@localhost dhcp]# vim dhcpd.conf
# PXE一键装机
subnet 192.168.32.0 netmask 255.255.255.0 {
        # 地址池
        range 192.168.32.20 192.168.32.100;
        # 网关
        option routers 192.168.32.2;
        # 指明pxe的下一个服务器地址为tftp地址
        next-server 192.168.32.11;
        # 在tftp中找pxelinux.0这个文件
        filename "pxelinux.0";
}


3. 配置tftp
[root@localhost dhcp]# rpm -ql tftp-server
/etc/xinetd.d/tftp
/usr/lib/systemd/system/tftp.service
/usr/lib/systemd/system/tftp.socket
/usr/sbin/in.tftpd
/usr/share/doc/tftp-server-5.2
/usr/share/doc/tftp-server-5.2/CHANGES
/usr/share/doc/tftp-server-5.2/README
/usr/share/doc/tftp-server-5.2/README.security
/usr/share/man/man8/in.tftpd.8.gz
/usr/share/man/man8/tftpd.8.gz
/var/lib/tftpboot
[root@localhost dhcp]# vim /etc/xinetd.d/tftp
service tftp
{
        socket_type             = dgram
        protocol                = udp
        wait                    = yes
        user                    = root
        server                  = /usr/sbin/in.tftpd
        server_args             = -s /var/lib/tftpboot
        disable                 = no   # 默认是yes,改为no
        per_source              = 11
        cps                     = 100 2
        flags                   = IPv4
}


4. 准备四大文件
# pxelinux.0、vmlinuz、initrd.img、pxelinux.cfg/default  放到tftp目录下

# pxelinux.0
[root@localhost dhcp]# rpm -ql tftp-server
/etc/xinetd.d/tftp
/usr/lib/systemd/system/tftp.service
/usr/lib/systemd/system/tftp.socket
/usr/sbin/in.tftpd
/usr/share/doc/tftp-server-5.2
/usr/share/doc/tftp-server-5.2/CHANGES
/usr/share/doc/tftp-server-5.2/README
/usr/share/doc/tftp-server-5.2/README.security
/usr/share/man/man8/in.tftpd.8.gz
/usr/share/man/man8/tftpd.8.gz
/var/lib/tftpboot
[root@localhost tftpboot]# cd /var/lib/tftpboot
[root@localhost tftpboot]# rpm -ql syslinux | grep linux.0
/usr/share/syslinux/gpxelinux.0
/usr/share/syslinux/pxelinux.0
[root@localhost tftpboot]# cp /usr/share/syslinux/pxelinux.0 /var/lib/tftpboot
[root@localhost tftpboot]# ls
pxelinux.0


# 将光盘镜像中的内核(vmlinuz)、驱动(initrd.img)文件放到tftpboot目录下
[root@localhost tftpboot]# mount /dev/sr0 /mnt
mount: /dev/sr0 写保护,将以只读方式挂载
[root@localhost tftpboot]# df
文件系统                   1K-块    已用     可用 已用% 挂载点
/dev/mapper/centos-root 40137576 5155184 34982392   13% /
devtmpfs                  917604       0   917604    0% /dev
tmpfs                     933524       0   933524    0% /dev/shm
tmpfs                     933524    9276   924248    1% /run
tmpfs                     933524       0   933524    0% /sys/fs/cgroup
/dev/mapper/centos-home 19593216   33052 19560164    1% /home
/dev/sda1                1038336  182372   855964   18% /boot
tmpfs                     186708       4   186704    1% /run/user/42
tmpfs                     186708      28   186680    1% /run/user/0
/dev/sr0                 4414592 4414592        0  100% /mnt
[root@localhost mnt]# cd /mnt/isolinux/
[root@localhost isolinux]# ls
boot.cat  grub.conf   isolinux.bin  memtest     TRANS.TBL     vmlinuz
boot.msg  initrd.img  isolinux.cfg  splash.png  vesamenu.c32
[root@localhost isolinux]# cp vmlinuz initrd.img /var/lib/tftpboot/
[root@localhost isolinux]# cd /var/lib/tftpboot/
[root@localhost tftpboot]# ls
initrd.img  pxelinux.0  vmlinuz
[root@localhost tftpboot]#
// 目前已准备了三个文件,还剩一个isolinux.cfg需要自己手动写


# pxelinux.cfg/default
[root@localhost tftpboot]# mkdir pxelinux.cfg
[root@localhost tftpboot]# cd pcelinux.cfg
[root@localhost pxelinux.cfg]# vim default
default linux
timeout 600

        #  标签
        label linux
                # 内核
                kernel vmlinuz
                # ftp,下面分隔符为tab键
                append initrd=initrd.img        method=ftp://192.168.32.11/centos7


# 使用ftp挂载yum仓库
[root@localhost tftpboot]# cd /var/ftp/
[root@localhost ftp]# ls
pub
[root@localhost ftp]# mkdir centos7
[root@localhost ftp]# ls
centos7  pub
[root@localhost ftp]# mount /dev/sr0 /var/ftp/centos7/
mount: /dev/sr0 写保护,将以只读方式挂载
[root@localhost ftp]# df
文件系统                   1K-块    已用     可用 已用% 挂载点
/dev/mapper/centos-root 40137576 5200472 34937104   13% /
devtmpfs                  917604       0   917604    0% /dev
tmpfs                     933524       0   933524    0% /dev/shm
tmpfs                     933524    9368   924156    2% /run
tmpfs                     933524       0   933524    0% /sys/fs/cgroup
/dev/mapper/centos-home 19593216   33052 19560164    1% /home
/dev/sda1                1038336  182372   855964   18% /boot
tmpfs                     186708       4   186704    1% /run/user/42
tmpfs                     186708      28   186680    1% /run/user/0
/dev/sr0                 4414592 4414592        0  100% /mnt
[root@localhost ftp]# cd centos7/
[root@localhost centos7]# ls
CentOS_BuildTag  EULA  images    LiveOS    repodata              RPM-GPG-KEY-CentOS-Testing-7
EFI              GPL   isolinux  Packages  RPM-GPG-KEY-CentOS-7  TRANS.TBL
[root@localhost centos7]#


# 启动服务
[root@localhost tftpboot]# systemctl start dhcpd
[root@localhost tftpboot]# systemctl start tftp.socket
[root@localhost tftpboot]# systemctl start vsftpd
[root@localhost centos7]# ss -nl
// 查看dhcp(69)、tftp(67)、vsftp(21)端口是否开启


// 到这里已经完成了一半,可以开一台裸机查看结果
裸机
内存  必须2G及以上


5. 准备应答文件,自动安装操作系统
[root@localhost ~]# yum install -y system-config-kickstart   # 安装图形化工具,制作应答文件的工具

在“虚拟机” --> “应用程序” --> "系统工具" --> "kickstart"
kictstart图形化工具操作步骤
1. 基本配置
2. 安装方法配置
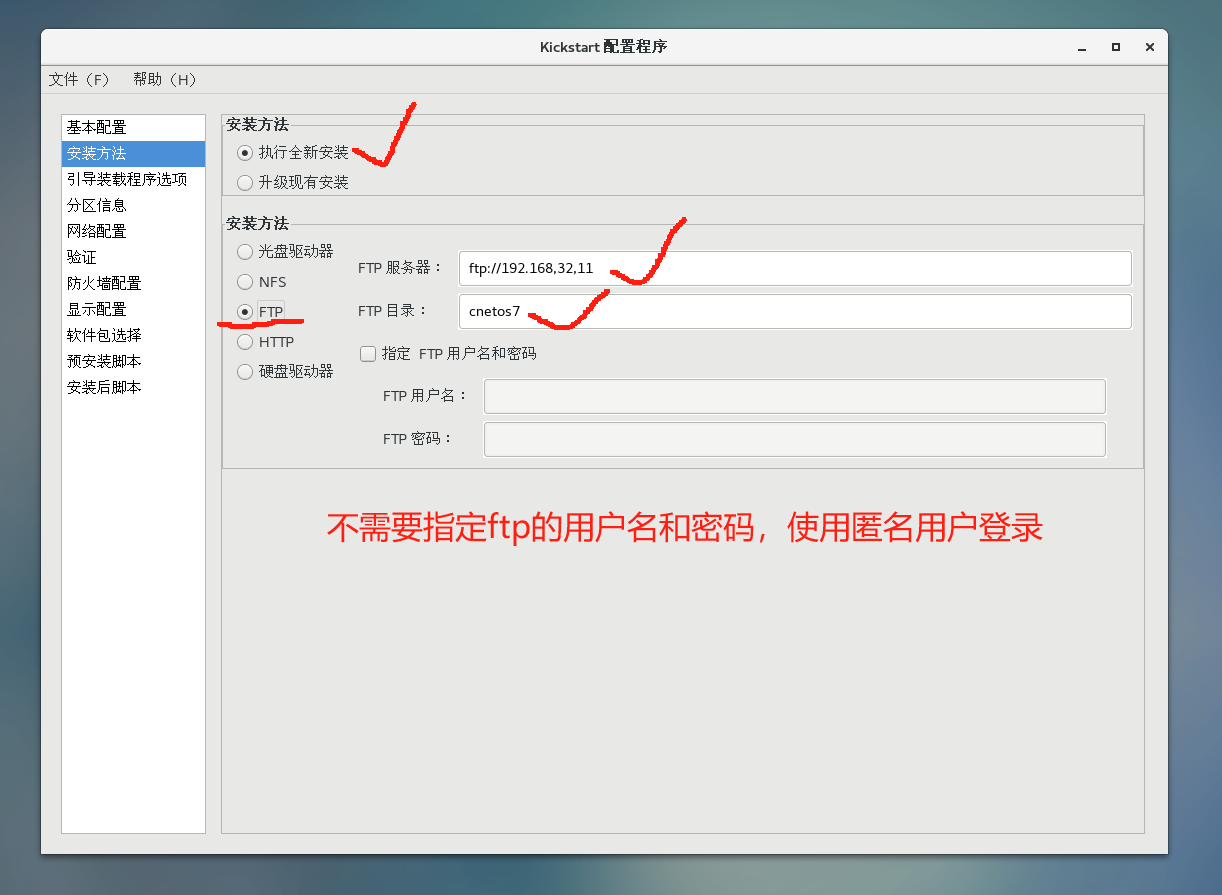
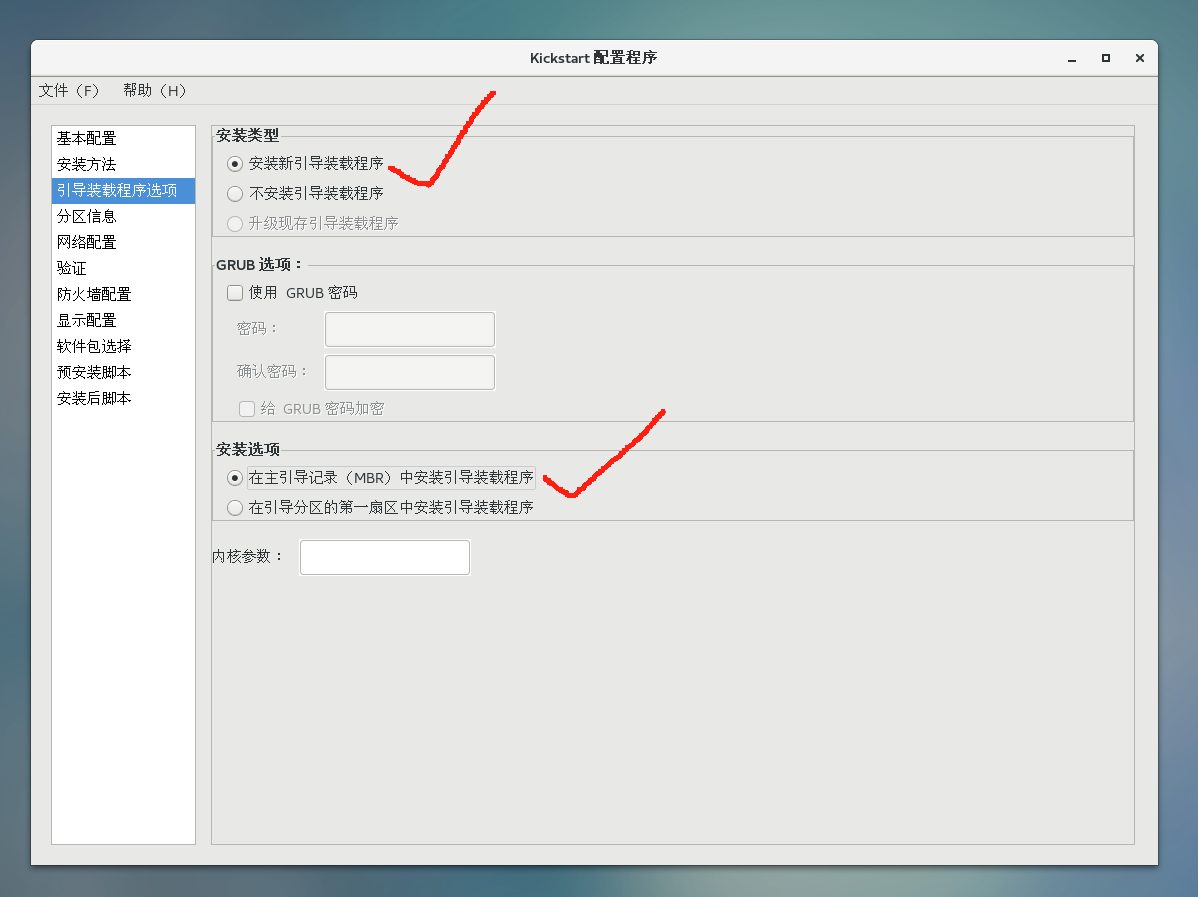
3. 引导装载程序配置
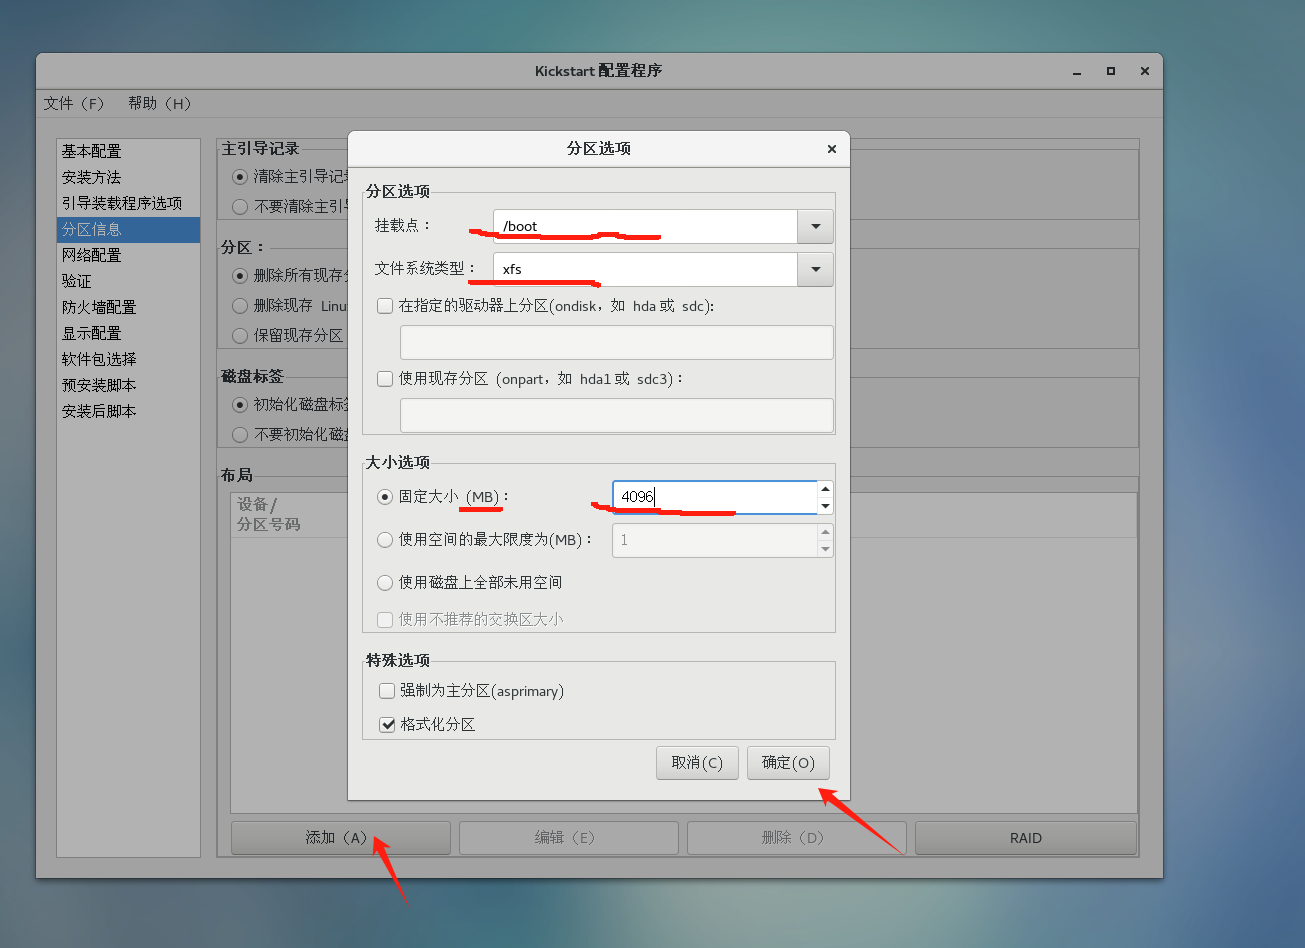
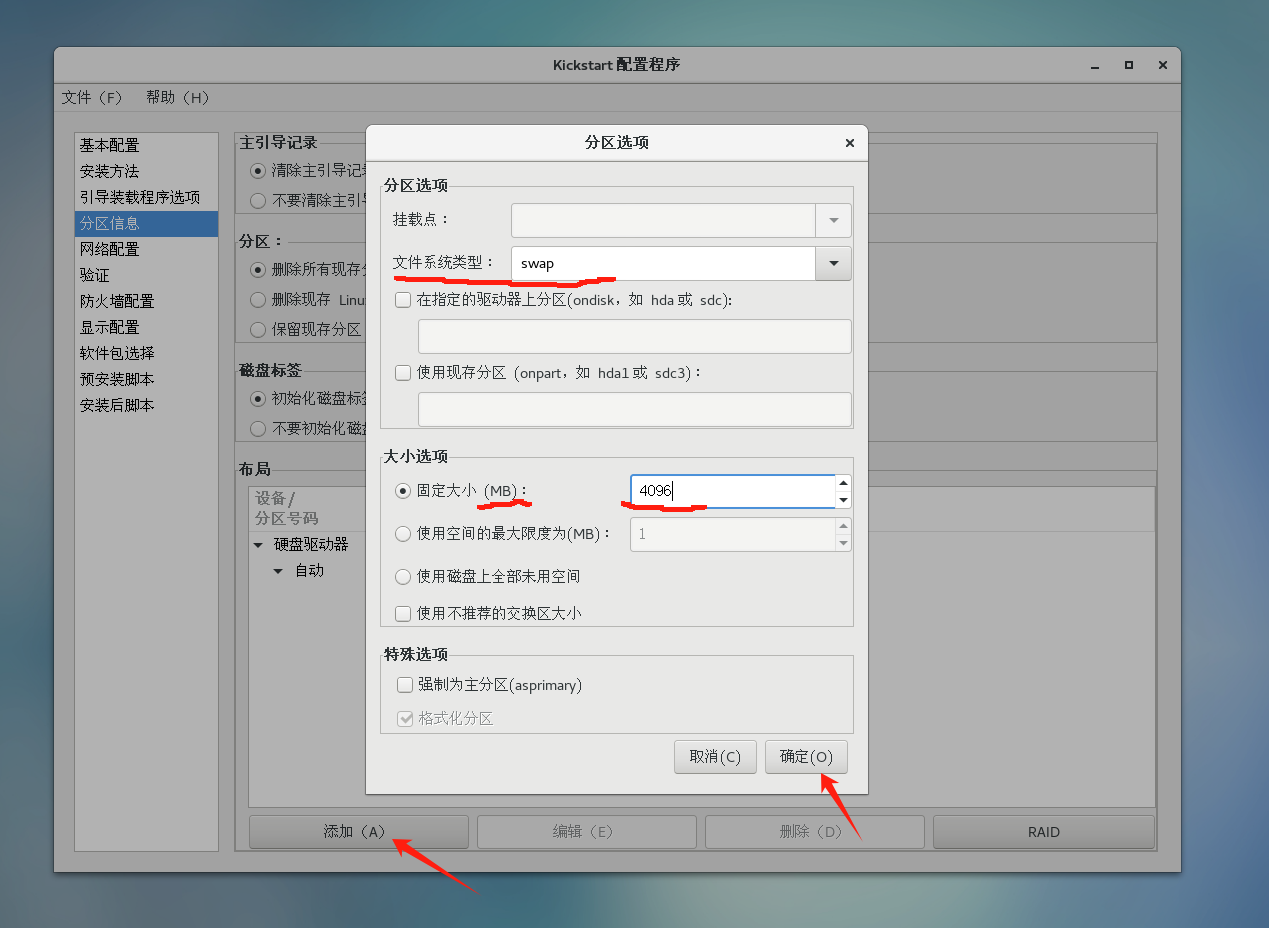
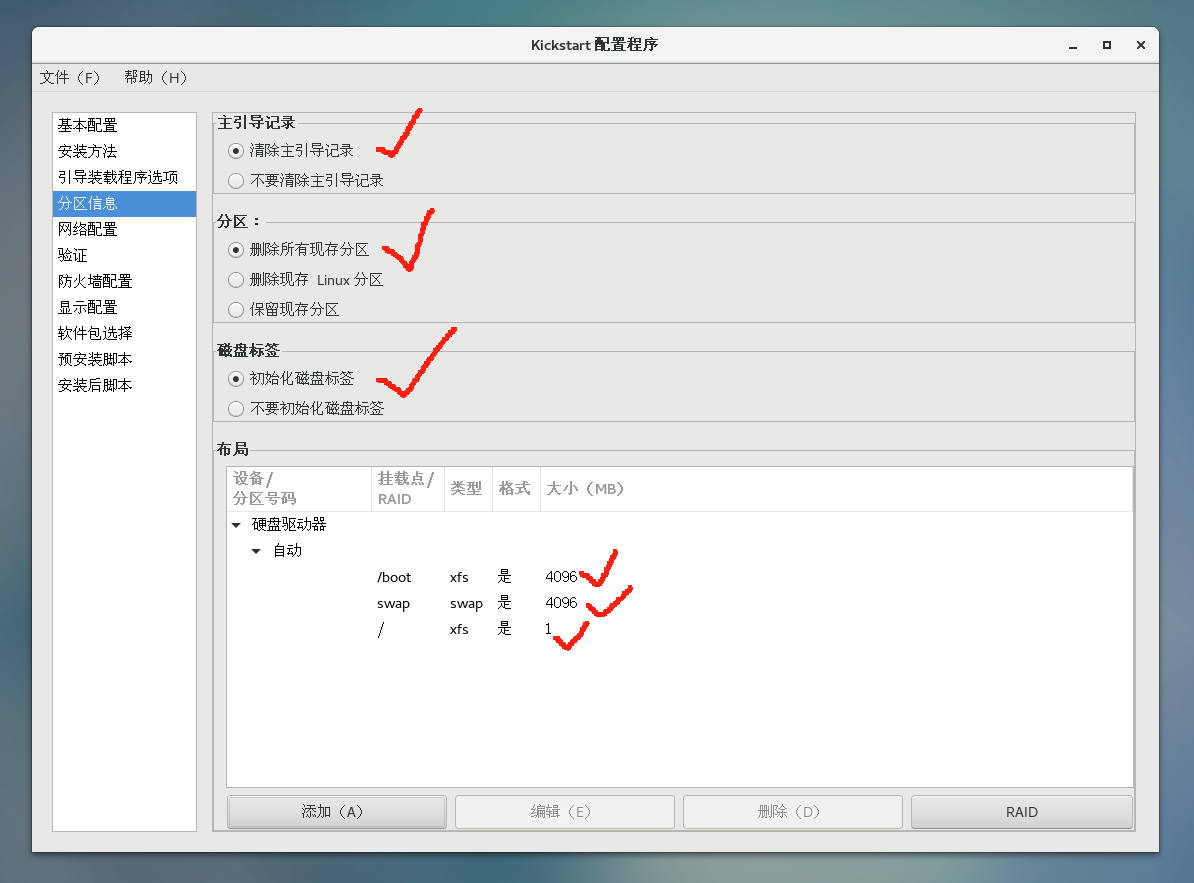
4. 分区信息
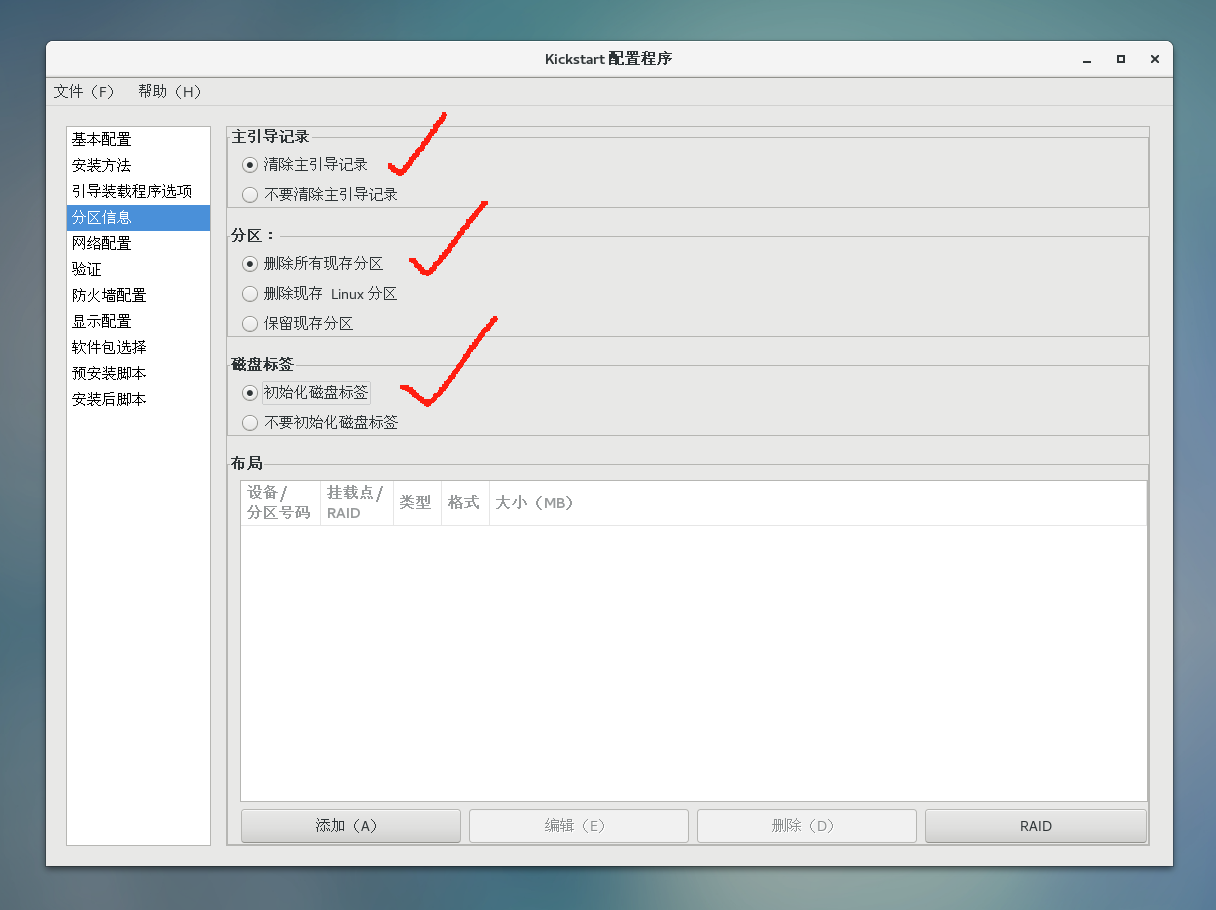
添加/boot分区,大小4G
添加swap分区,swap大小=内存大小的2倍
添加根分区,将剩余空间全部都给根分区

分区信息完毕
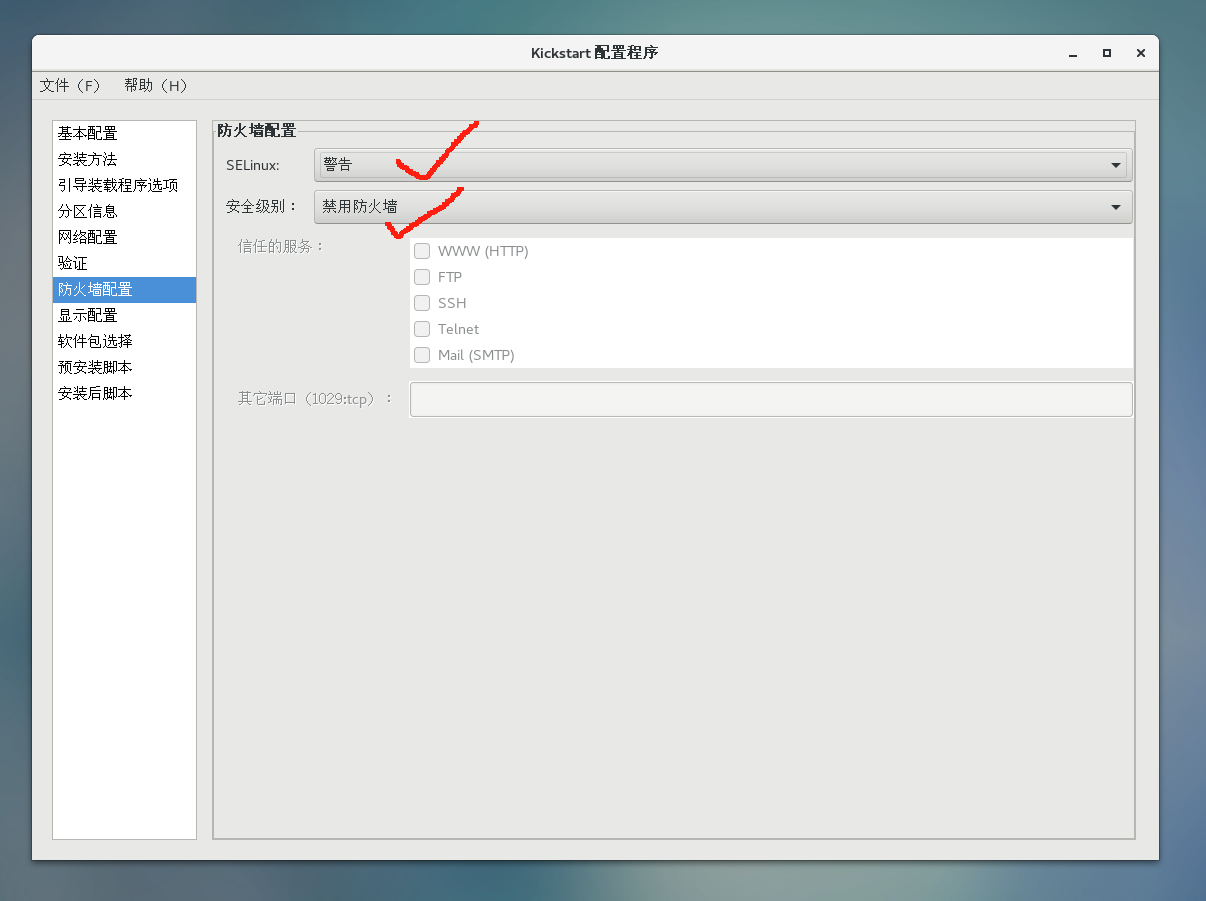
5. 防火墙配置
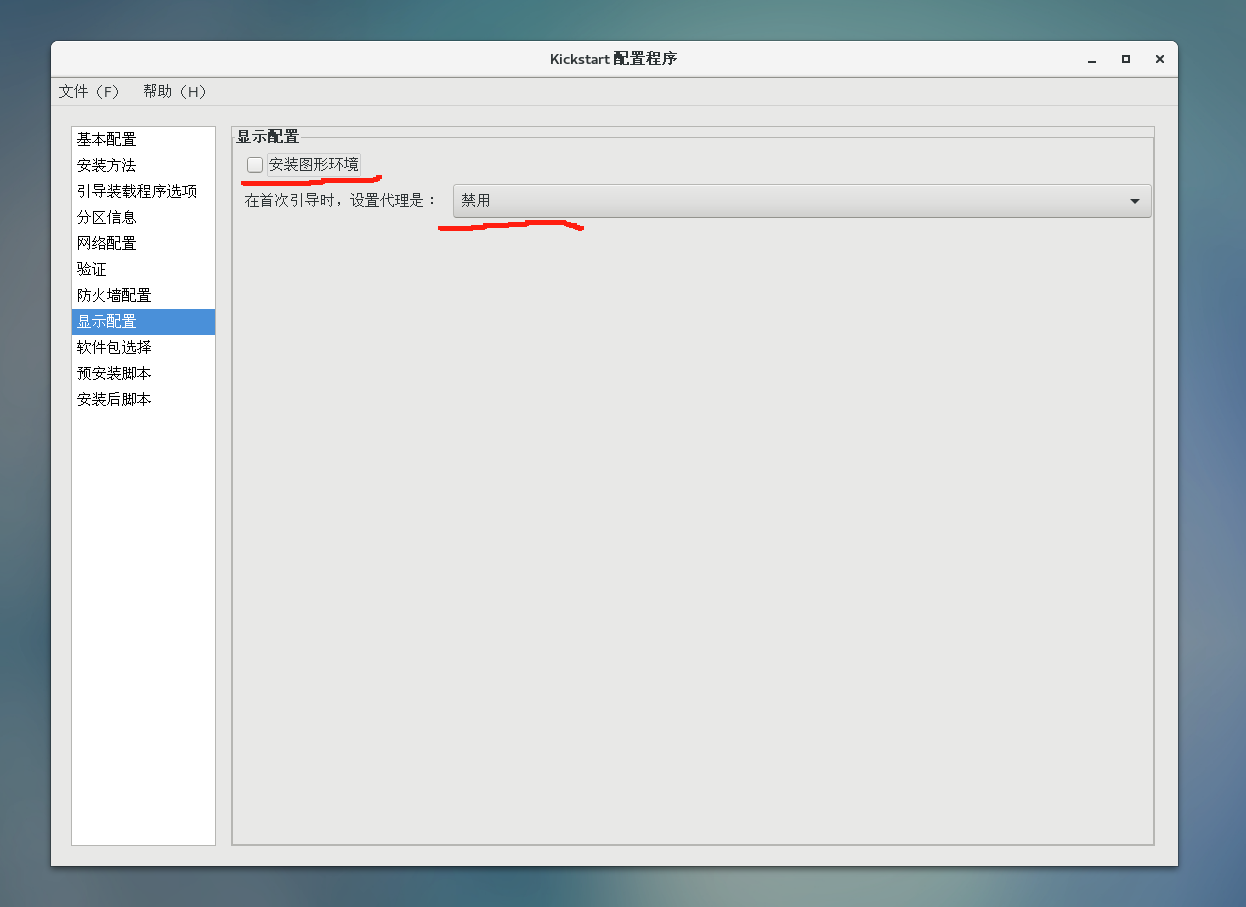
6. 显示配置
不安装图形界面(init 5)
7. 安装后脚本配置
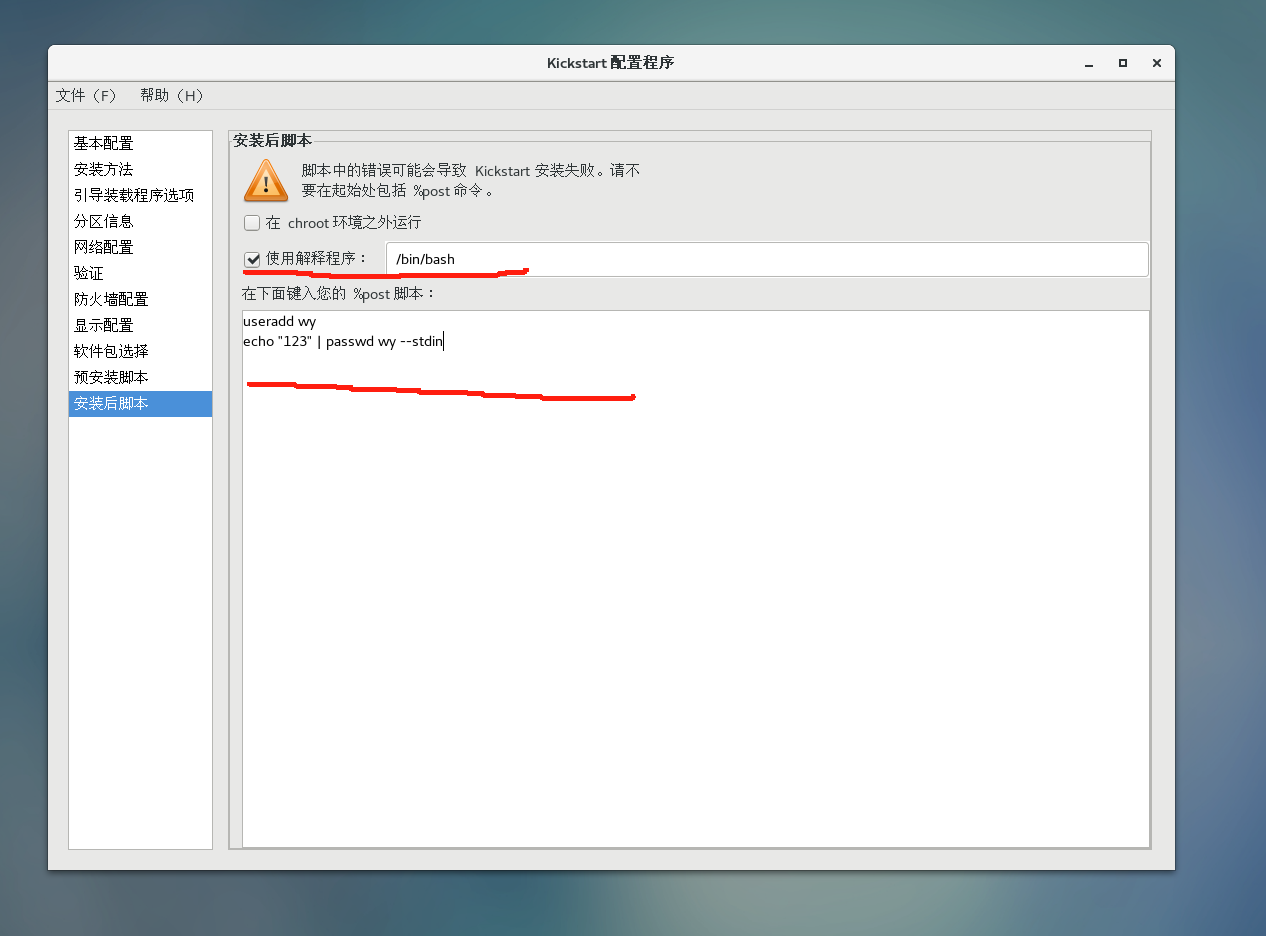
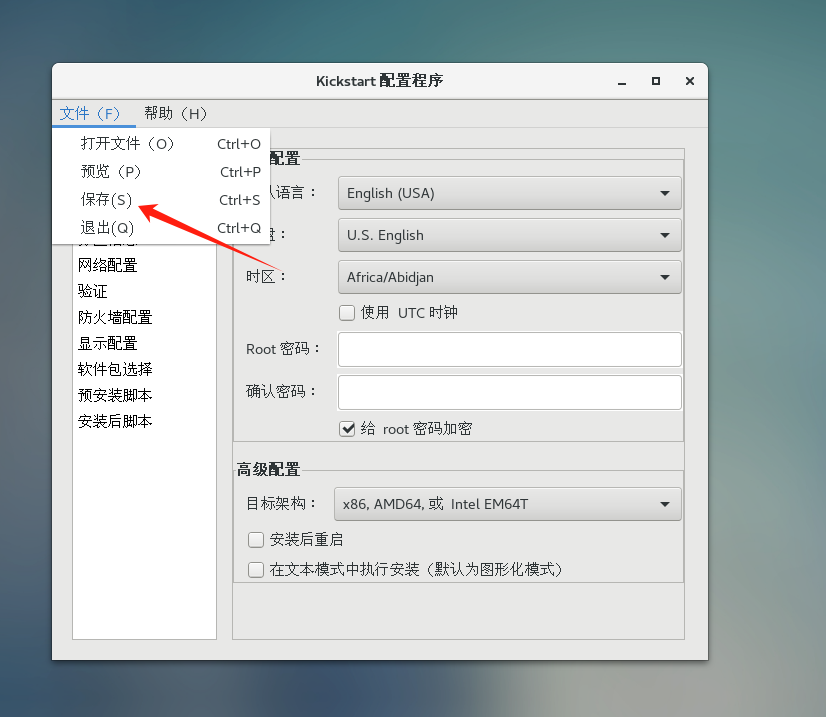
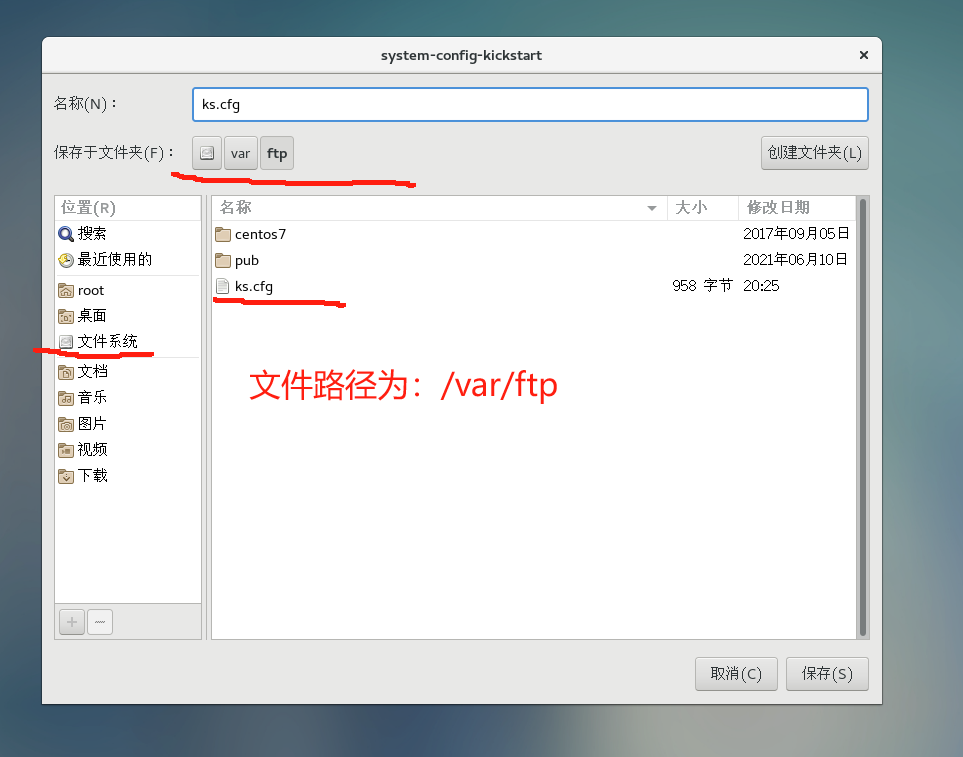
8. 保存文件
保存路径为:/var/ftp/ks.cfg
9. 继续修改服务端配置
# 查看ks.cfg 文件
[root@localhost ~]# cd /var/ftp
[root@localhost ftp]# ls
centos7  ks.cfg  pub
[root@localhost ftp]#


# 修改/var/lib/tftpboot/pxelinux.cfg/default这个文件
[root@localhost ftp]# cd /var/lib/tftpboot/pxelinux.cfg
[root@localhost pxelinux.cfg]# ls
default
[root@localhost pxelinux.cfg]# vim default
default linux
timeout 600

        #  标签
        label linux
                # 内核
                kernel vmlinuz
                # ftp,tab键为分隔符
                append initrd=initrd.img        method=ftp://192.168.32.11/centos7      ks=ftp://192.168.32.11/ks.cfg
// 服务端配置 已全部完成,可以去裸机上自动安装操作系统了


# 启动服务
[root@localhost tftpboot]# systemctl start dhcpd
[root@localhost tftpboot]# systemctl start tftp.socket
[root@localhost tftpboot]# systemctl start vsftpd
[root@localhost centos7]# ss -nl
// 查看dhcp(69)、tftp(67)、vsftp(21)端口是否开启
报错
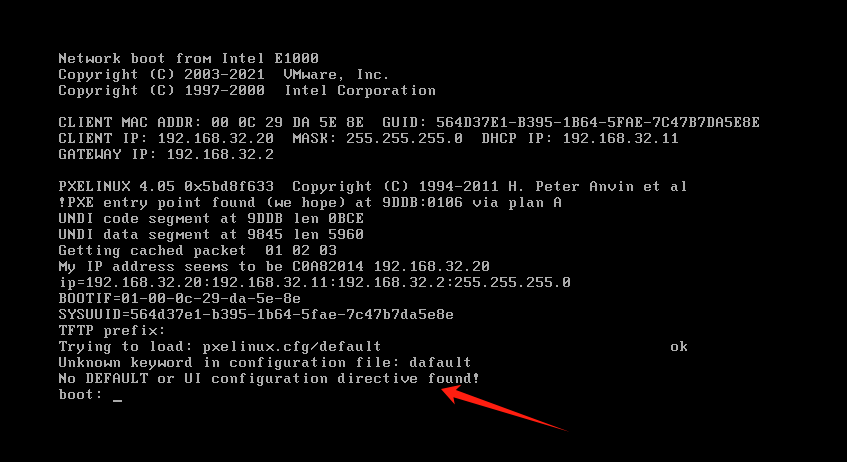
pxelinux.cfg/default配置文件有问题

dhcp获取IP地址有问题

无法下载192.168.32.11/centos7里面的数据,有可能没有挂载
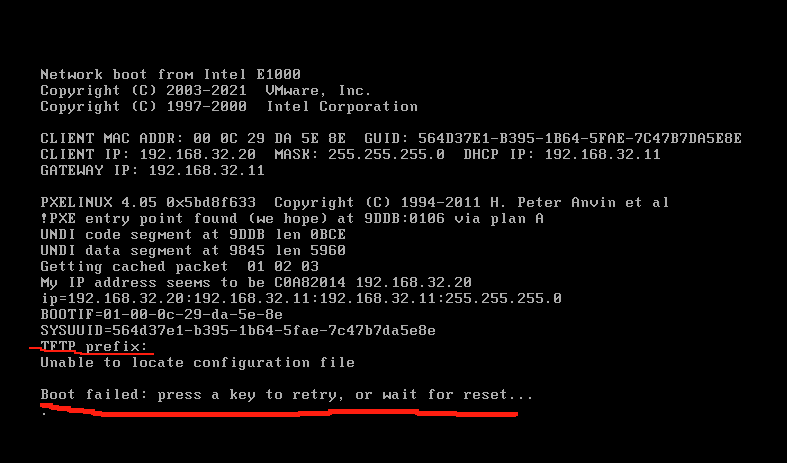
tftp的四大文件有问题,发现pxelinux.cfg下面没有default这个文件
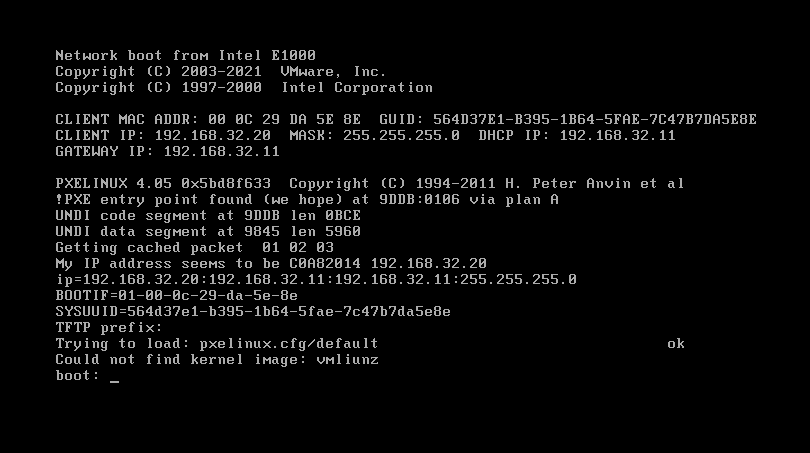
vmliunz拼错了,vmlinuz