添加FramelessWindow.h头文件
在你的qt项目中将FramelessWindow.h头文件导入进来,或者使用cmake、qmake将包含该头文件的目录引入。
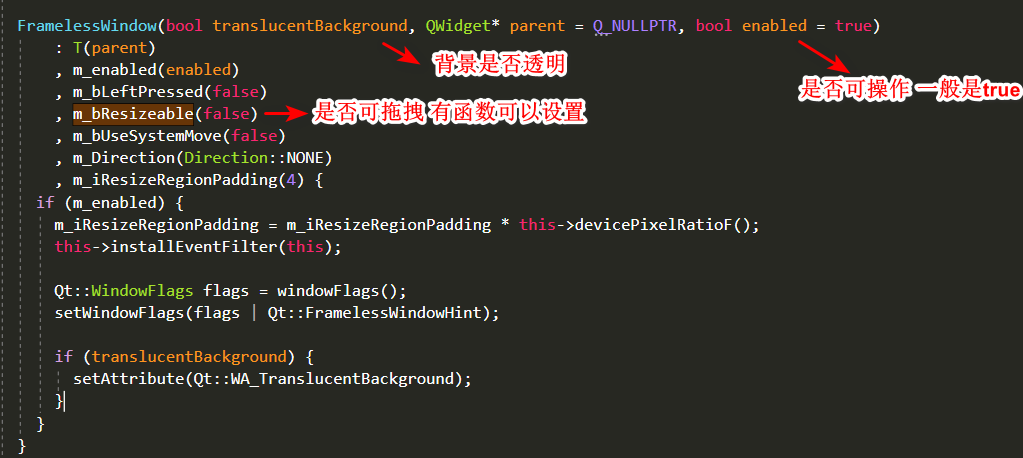
简单浏览framelessWindow代码
我们发现FramelessWindow是一个继承模板参数的类模板。

并且看一下构造函数
简单实现
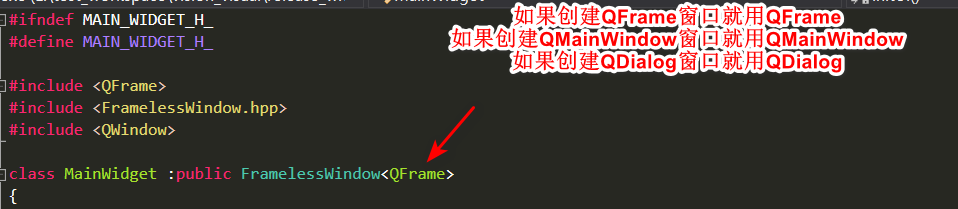
1.继承该类模板,如果你想创建一个QFrame窗口那么就用QFrame当 模板参数,如果创建QMainWindow窗口就使用QMainWindow,QDialog就QDialog。
这里我使用QFrame
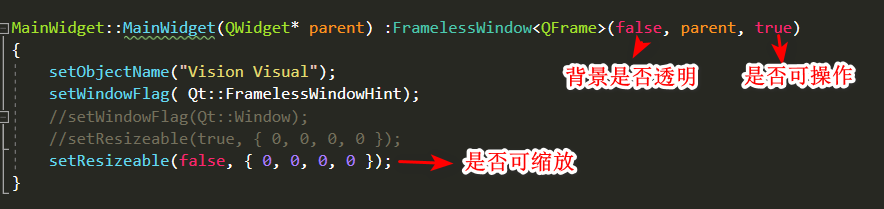
2.编写构造函数,这里背景色我使用不是透明,enable=true,并且使用setResizeable开启了可改变大小的功能,后面的4个数字窗口的四个边界padding,当鼠标在这个padding中,那么就鼠标就变成缩放的指针图标并且开启缩放功能。
3.一般来说我们想要窗口可以随意拖拽,但是去掉系统的标题栏后拖拽功能也需要我们自己实现,FramelessWindow已经帮我们实现了该功能。使用setTitleBar函数将我们想要可以拖拽的控件添加进去,即可实现鼠标拖拽。
QFrame* MainWidget::createHeader()
{
	QFrame* header = new QFrame();
	header->setFixedHeight(36);
	QHBoxLayout* header_lyt = new QHBoxLayout();
	header_lyt->setContentsMargins({ 2, 2, 2, 2 });
	header->setLayout(header_lyt);

	QFrame* menu_bar_frame = new QFrame();
	QHBoxLayout* menu_bar_lyt = new QHBoxLayout();
	menu_bar_lyt->setContentsMargins({ 0, 0, 0, 0 });
	QLabel* logo = new QLabel();
	logo->setFixedSize({ 24, 24 });
	QPixmap* pixmap = new QPixmap("./resources/icons/algorithm_icon.png");
	pixmap->scaled(logo->size(), Qt::KeepAspectRatio, Qt::SmoothTransformation);
	logo->setPixmap(*pixmap);

	QPushButton* button = new QPushButton(u8"文件(F)");
	QMenu* menu = new QMenu();
	menu->addAction("Option 1");
	menu->addAction("Option 2");
	menu->addAction("Option 3");
	button->setMenu(menu);
	button->setStyleSheet("QPushButton::menu-indicator{image:none}");
	QFrame* menu_frame = new QFrame();
	QHBoxLayout* menu_frame_lyt = new QHBoxLayout();
	menu_frame_lyt->setContentsMargins(0, 0, 0, 0);
	menu_frame->setLayout(menu_frame_lyt);
	menu_frame_lyt->addWidget(button);
	menu_bar_lyt->addWidget(logo);
	menu_bar_lyt->addWidget(menu_frame);
	menu_bar_frame->setLayout(menu_bar_lyt);

	QFrame* op_bar = new QFrame();
	op_bar->setFixedWidth(100);
	QHBoxLayout* op_bar_lyt = new QHBoxLayout();
	op_bar_lyt->setContentsMargins({ 0, 0, 0, 0 });

	QToolButton* min_btn = new QToolButton();
	resize_btn = new QToolButton();
	QToolButton* close_btn = new QToolButton();

	QIcon min_icon("./resources/icons/min_icon.png");
	normal_icon = QIcon("./resources/icons/window_icon.png");
	max_icon = QIcon("./resources/icons/max_icon.png");
	QIcon close_icon("./resources/icons/close_icon.png");
	min_btn->setIcon(min_icon);
	resize_btn->setIcon(max_icon);
	close_btn->setIcon(close_icon);
	op_bar_lyt->addWidget(min_btn);
	op_bar_lyt->addWidget(resize_btn);
	op_bar_lyt->addWidget(close_btn);
	op_bar->setLayout(op_bar_lyt);

	header_lyt->addWidget(menu_bar_frame);
	header_lyt->addStretch(1);
	header_lyt->addWidget(op_bar);

	setTitlebar({ header, menu_frame, op_bar, menu_bar_frame, logo });


	connect(min_btn, &QPushButton::clicked, this, &MainWidget::onMinBtn);
	connect(resize_btn, &QPushButton::clicked, this, &MainWidget::onResizeBtn);
	connect(close_btn, &QPushButton::clicked, this, &MainWidget::onCloseBtn);


	return header;
}
4.去掉系统的标题栏后,窗口的最小化 最大化和关闭功能也需要我们自己实现。上述代码中的 min_btn resize_btn和close_btn分别实现了最小化按钮,最大化按钮和关闭按钮。他们的槽函数如下。
void MainWidget::onResizeBtn()
{
	if (this->isMaximized())
	{
		this->showNormal();
	}
	else
	{
		this->showMaximized();
	}
}
void MainWidget::onCloseBtn()
{
	close();
}
void MainWidget::resizeEvent(QResizeEvent* event)
{
	if (this->isMaximized())
	{
		resize_btn->setIcon(normal_icon);
	}
	else
	{
		resize_btn->setIcon(max_icon);
	}
}
希望可以帮到大家。