Breakout
简介 - LearnOpenGL CN (learnopengl-cn.github.io)
2D游戏BreakOut实现以及对OpenGL一些知识点的总结。
1.项目结构
- game类:用于管理所有游戏和渲染代码,提供初始化、游戏重置、键盘输入、更新游戏状态、渲染、碰撞检测、生成更新游戏道具的函数。
- resource_manager类:提供静态方法,加载着色器和纹理。
- sprite_renderer类:渲染类,提供具体的渲染方法以及渲染的变换,被各类的Draw函数调用。
- shader&texture类:用于具体生成着色器和纹理,并提供相关状态设置函数。
- game_object类:游戏实体,包括位置、大小、速度、颜色、纹理和用于绘制实体的Draw函数。
- ball_object类:小球实体,继承自game_object类,添加小球半径、是否固定等属性,移动以及重置函数。
- game_level类:从文件读取游戏关卡(砖块放置),检查游戏是否完成、绘制关卡。
- particle_generator类:用于生成粒子特效,详见下文。
- post_processor类:后期处理,详见下文。
- power_up类:道具类,继承自game_object类,添加道具类型、持续时间、是否激活属性。
- text_renderer类:用于渲染文字。
2.game类
-
Init():初始化游戏状态,加载所有需要的着色器、纹理、关卡、音乐、文字、游戏实体,以部分为例。
// 加载音乐 SoundEngine->play2D("music/breakout.mp3", GL_TRUE); // 设置字体 Text = new TextRenderer(this->Width, this->Height); Text->Load("fonts/OCRAEXT.TTF", 24); // 加载着色器 ResourceManager::LoadShader("shaders/sprite.vs", "shaders/sprite.fs", nullptr, "sprite"); // 配置着色器 glm::mat4 projection = glm::ortho(0.0f, static_cast<GLfloat>(this->Width), static_cast<GLfloat>(this->Height), 0.0f, -1.0f, 1.0f); ResourceManager::GetShader("sprite").Use().SetInteger("sprite", 0); ResourceManager::GetShader("sprite").SetMatrix4("projection", projection); // 加载纹理 ResourceManager::LoadTexture("resources/textures/background.jpg", GL_FALSE, "background"); // 设置渲染控制 Renderer = new SpriteRenderer(ResourceManager::GetShader("sprite")); // 加载关卡 GameLevel one; one.Load("levels/one.lvl", this->Width, this->Height * 0.5); this->Levels.push_back(one); // 设置挡板 glm::vec2 playerPos = glm::vec2(this->Width / 2 - PLAYER_SIZE.x / 2, this->Height - PLAYER_SIZE.y); Player = new GameObject(playerPos, PLAYER_SIZE, ResourceManager::GetTexture("paddle")); // 设置小球 glm::vec2 ballPos = playerPos + glm::vec2(PLAYER_SIZE.x / 2 - BALL_RADIUS, -BALL_RADIUS * 2); Ball = new BallObject(ballPos, BALL_RADIUS, BALL_VELOCITY, ResourceManager::GetTexture("face")); -
Update(GLfloat dt):接受一个dt参数表示游戏时间片段,在此进行所有需要更新游戏状态的操作,包括小球移动、碰撞检测、更新例子状态、更新道具状态(持续时间)、判断游戏结束/获胜。
-
ProcessInput(GLfloat dt):同样接受dt,处理键盘输入,此处有一个技巧,当按一个键时可能会触发多次,可增加KeysProcessed数组标记当前按键为True,防止重复触发。
if (this->Keys[GLFW_KEY_ENTER] && !this->KeysProcessed[GLFW_KEY_ENTER]) { this->State = GAME_ACTIVE; this->KeysProcessed[GLFW_KEY_ENTER] = GL_TRUE; } -
Render():根据不同游戏状态渲染文字、游戏物体等。运用帧缓冲区后期处理。
-
Docollisions():碰撞检测与处理,使用改进的检测圆形的AABB碰撞检测。
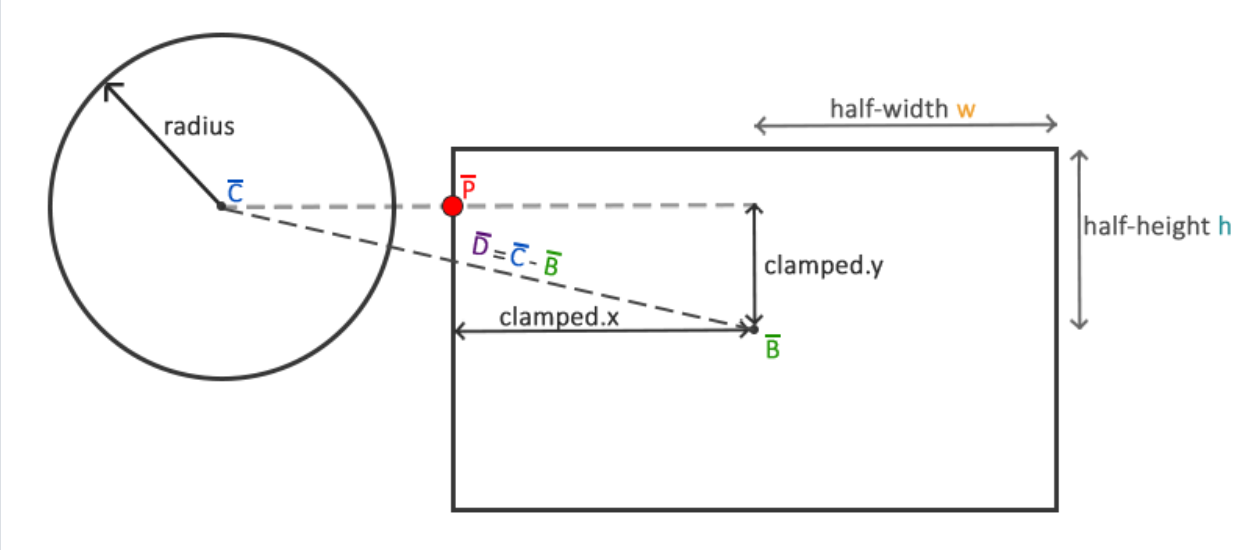
使用限制操作获取D在AABB中的向量
float clamp(float value, float min, float max) { return std::max(min, std::min(max, value)); }处理碰撞后逻辑:与砖块碰撞检查其是否可被摧毁,并重定位小球,反转速度。
重定位:小球会部分进入AABB,以此判断碰撞,要将其减去进入向量来隔离在物体外部。
-
其他类请详见代码及注释。
3.主函数
创建OpenGL主窗口,进行相关设置。创建游戏类,在游戏循环中调用用户输入与更新游戏状态的函数。
while (!glfwWindowShouldClose(window)){
		// Calculate delta time
		GLfloat currentFrame = glfwGetTime();
		deltaTime = currentFrame - lastFrame;
		lastFrame = currentFrame;
		glfwPollEvents();

		// 管理用户输入
		Breakout.ProcessInput(deltaTime);

		// 更新游戏状态
		Breakout.Update(deltaTime);

		// Render
		glClearColor(0.1f, 0.1f, 0.1f, 1.0f);
		glClear(GL_COLOR_BUFFER_BIT);

		Breakout.Render();
		glfwSwapBuffers(window);
	}
4.渲染
Breakout是静态游戏,故不需要View矩阵,是2D游戏,故使用正交矩阵变换至裁剪空间。
glm::mat4 projection = glm::ortho(0.0f, 800.0f, 600.0f, 0.0f, -1.0f, 1.0f);
顶点着色器如下,片元着色器获取纹理与颜色向量。
#version 330 core
layout (location = 0) in vec4 vertex; // <vec2 position, vec2 texCoords>

out vec2 TexCoords;

uniform mat4 model;
uniform mat4 projection;

void main()
{
    TexCoords = vertex.zw;
    gl_Position = projection * model * vec4(vertex.xy, 0.0, 1.0);
}
将其封装至SpriteRenderer类中,DrawSprite函数用于具体渲染,供各类的Draw函数调用以渲染物体。注意变换顺序:缩放、选装、位移。由于旋转是绕原点(0, 0)的所以要先把旋转原点移至图形中心,再旋转,再移回。(games101也有提过)
model = glm::translate(model, glm::vec3(0.5f * size.x, 0.5f * size.y, 0.0f));
// 移至中心
model = glm::rotate(model, rotate, glm::vec3(0.0f, 0.0f, 1.0f)); // 旋转
model = glm::translate(model, glm::vec3(-0.5f * size.x, -0.5f * size.y, 0.0f));
5.粒子
一个粒子就是个总是面向摄像机方向且(通常)包含一个大部分区域是透明的纹理的小四边形,使用粒子发生器发射,不断随时间消亡并产生,给每个粒子初始化一个生命值、位置(在小球周围)、颜色,当生命值随时间减少时粒子消失。
由于预先规定粒子总数,不能简单地直接添加粒子,需要找到第一个消亡的粒子然后用新产生的粒子更新他(下一个消亡的粒子总是在上一个的下标右边),下边是更新粒子的代码。
void ParticleGenerator::Update(GLfloat dt, GameObject& object, GLuint newParticles, glm::vec2 offset) {
    // 每帧添加newParticle个新粒子
    for (GLuint i = 0; i < newParticles; i++) {
        int unusedParticle = this->firstUnusedParticle();
        this->respawnParticle(this->particles[unusedParticle], object, offset);
    }
    // 更新所有粒子
    for (GLuint i = 0; i < this->amount; i++) {
        Particle& p = this->particles[i];
        p.Life -= dt;
        if (p.Life > 0.0f) {
            p.Position -= p.Velocity * dt;
            p.Color.a -= dt * 2.5;
        }
    }
}
6.后期处理
详细请见:[帧缓冲 - LearnOpenGL CN (learnopengl-cn.github.io)](https://learnopengl-cn.github.io/04 Advanced OpenGL/05 Framebuffers/)
渲染步骤:
- 绑定至多重采样的帧缓冲(每个像素可以存储大于1个颜色值的颜色缓冲)
- 和往常一样渲染游戏
- 将多重采样的帧缓冲内容传输至一个普通的帧缓冲中(这个帧缓冲使用了一个纹理作为其颜色缓冲附件)
- 解除绑定(绑定回默认的帧缓冲)
- 在后期处理着色器中使用来自普通帧缓冲的颜色缓冲纹理
- 渲染屏幕大小的四边形作为后期处理着色器的输出
在渲染场景前后使用BeginRender和EndRender函数,可以将渲染转到帧缓冲区进行
void PostProcessor::BeginRender()
{
    glBindFramebuffer(GL_FRAMEBUFFER, this->MSFBO);
    glClearColor(0.0f, 0.0f, 0.0f, 1.0f);
    glClear(GL_COLOR_BUFFER_BIT);
}

void PostProcessor::EndRender()
{
    // Now resolve multisampled color-buffer into intermediate FBO to store to texture
    glBindFramebuffer(GL_READ_FRAMEBUFFER, this->MSFBO);
    glBindFramebuffer(GL_DRAW_FRAMEBUFFER, this->FBO);
    glBlitFramebuffer(0, 0, this->Width, this->Height, 0, 0, this->Width, this->Height, GL_COLOR_BUFFER_BIT, GL_NEAREST);
    glBindFramebuffer(GL_FRAMEBUFFER, 0); // Binds both READ and WRITE framebuffer to default framebuffer
}
通过不同的卷积核作用于片元着色器来实现不同效果。
GLint edge_kernel[9] = {	// chaos
        -1, -1, -1,
        -1,  8, -1,
        -1, -1, -1
};
GLint edge_kernel[9] = {	// shake
        -1, -1, -1,
        -1,  8, -1,
        -1, -1, -1
};
7. OpenGL初始化
// ..:: 初始化代码 :: ..
// 1. 绑定顶点数组对象
glBindVertexArray(VAO);
// 2. 把我们的顶点数组复制到一个顶点缓冲中,供OpenGL使用
glBindBuffer(GL_ARRAY_BUFFER, VBO);
glBufferData(GL_ARRAY_BUFFER, sizeof(vertices), vertices, GL_STATIC_DRAW);
// 3. 复制我们的索引数组到一个索引缓冲中,供OpenGL使用
glBindBuffer(GL_ELEMENT_ARRAY_BUFFER, EBO);
glBufferData(GL_ELEMENT_ARRAY_BUFFER, sizeof(indices), indices, GL_STATIC_DRAW);
// 4. 设定顶点属性指针
glVertexAttribPointer(0, 3, GL_FLOAT, GL_FALSE, 3 * sizeof(float), (void*)0);
glEnableVertexAttribArray(0);

[...]

// ..:: 绘制代码(渲染循环中) :: ..
glUseProgram(shaderProgram);
glBindVertexArray(VAO);
glDrawElements(GL_TRIANGLES, 6, GL_UNSIGNED_INT, 0);
glBindVertexArray(0);