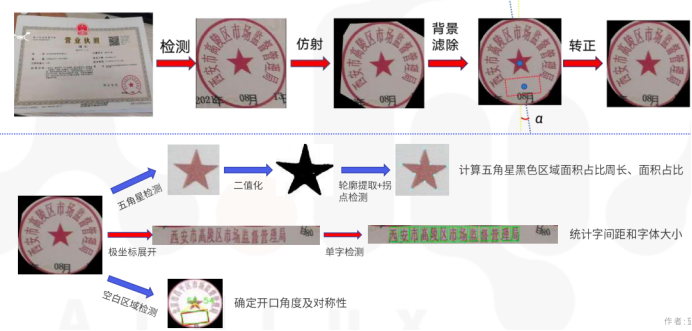
印章检测流程:
利用深度神经网络,提取印章深度特征,同时学习印章之间的相似度,自己与自己相似,自己与其它不相似。
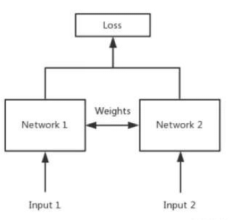
1.Siamese网络
Siamese网络是一种常用的深度学习相似性度量方法,它包含两个共享权重的CNN网络(说白了这两个网络其实就是一个网络,在代码中就构建一个网络就行了),将两个输入映射到同一特征空间,然后计算它们的距离或相似度一一使用共享的卷积层和全连接层,输出特征向量表示,然后计算相似度。
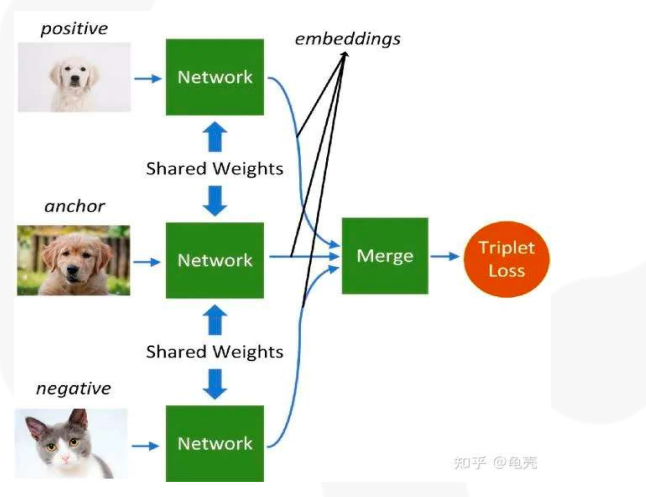
2.Triplet Loss网络
TripletLoss网络是一种通过比较三个样本之间的相似度来训练网络的方法。它包含三个共享权重的CNN网络,分别处理anchor、 positive和negative样本,其中positive样本与anchor相似与negative样本则不相似。通过三元组训练方法学习将同类别样本映射到相邻区域,不同类别样本映射到较远的区域。
3.本文方法
本文利用李生网络,把真章、假章同时输入进行学习,真与真相似度为1;真与假相似度为0,设计损失函数(结合BCELoss和Contrastive Loss) 进行模型训练。

训练步骤:
1.按上述格式放置数据集,放在dataset文件夹下。
2.将train.py当中的train_own_data设置成True。
3.运行train.py开始训练,可以观察对应step训练集和验证集的准确率。
将训练得到的.pth文件转换为onnx模型,再通过AIMO将onnx转换为tflite与dlc模型。

Aidlux平台部署
1.tfilte部署
import aidlite_gpu
import cv2
from cvs import *
import numpy as np
import os
import time
from PIL import Image
from contrast_utils.utils import letterbox_image, preprocess_input, cvtColor

def sigmoid(x):
    return 1 / (1+np.exp(-x))

if __name__ == "__main__":

    # 1.初始化aidlite类并创建aidlite对象
    aidlite = aidlite_gpu.aidlite()
    print("ok")

    # 2.加载模型
    w = h = 112
    input_shape = [w, h]
    in_shape = [ 1 * w * h * 3 * 4, 1 * w * h * 3 * 4]
    out_shape = [ 1 * 1 * 1 * 4]

    model_path = "/home/aidlux/model/tflite/vgg16_fixed_fp32.tflite"
    value = aidlite.ANNModel(model_path, in_shape, out_shape, 4, 0)
    print("gpu:", value)

    img1_pth = "/home/aidlux/test_imgs/test/false/beijing_2019-11-21_10406_200_200_seal.jpg"
    img2_pth = "/home/aidlux/test_imgs/test/true/beijing_0905_61269575.jpg"
    out = "result"
    os.makedirs(out, exist_ok=True)

    img10 = cv2.imread(img1_pth)
    img20 = cv2.imread(img2_pth)

    img1 = Image.fromarray(cv2.cvtColor(img10, cv2.COLOR_BGR2RGB))
    img2 = Image.fromarray(cv2.cvtColor(img20, cv2.COLOR_BGR2RGB))

    image_1 = letterbox_image(img1, [input_shape[1], input_shape[0]], False)
    image_2 = letterbox_image(img2, [input_shape[1], input_shape[0]], False)

    photo_1  = preprocess_input(np.array(image_1, np.float32))
    photo_2  = preprocess_input(np.array(image_2, np.float32))

    photo_1 = np.expand_dims(np.transpose(photo_1, (2, 0, 1)), 0)
    photo_2 = np.expand_dims(np.transpose(photo_2, (2, 0, 1)), 0)

    # 3.传入模型输入数据
    # input_data = np.array([photo_1, photo_2])
    aidlite.setInput_Float32(photo_1, index=0)
    aidlite.setInput_Float32(photo_2, index=1)

    # 4.执行推理
    start = time.time()
    aidlite.invoke()
    end = time.time()
    timerValue = (end - start) * 1000
    print("infer time(ms):{}".format(timerValue))

    # 5.获取输出
    pred = aidlite.getOutput_Float32(0)[0]
    print(pred)
    outs = round(sigmoid(pred), 9)
    print(outs)

    img_pair = np.hstack((cv2.resize(img10, (112,112)), cv2.resize(img20, (112,112))))
    h, w = img_pair.shape[:2]
    print('--+++', img_pair.shape)
    h, w = img_pair.shape[:2]
    cv2.putText(img_pair, 'sim:{}'.format(str(outs)), (0, h), cv2.FONT_ITALIC, 1, (255,255,0), 2)

    # from cvs import *
    cvs.imshow(img_pair)
    cv2.imwrite("/home/aidlux/res/adilux_tflite_img_pair.jpg", img_pair)
2.dlc部署
import aidlite_gpu
import cv2
from cvs import *
import numpy as np
import os
import time
from PIL import Image
from contrast_utils.utils import letterbox_image, preprocess_input, cvtColor

def sigmoid(x):
    return 1 / (1+np.exp(-x))

if __name__ == "__main__":

    # 1.初始化aidlite类并创建aidlite对象
    aidlite = aidlite_gpu.aidlite()
    print("ok")

    # 2.加载模型
    w = h = 112
    input_shape = [w, h]
    #rgb3通道 1个float是32位也就是4字节,每个数据4个字节, 4代表4个字节
    in_shape = [ 1 * w * h * 3 * 4,  1 * w * h * 3 * 4]
    out_shape = [1 * 1 * 1 * 4]

    model_path = "/home/aidlux/model/dlc/vgg16_fixed.dlc"
    # value = aidlite.ANNModel(model_path, in_shape, out_shape, numberOfThreads, enableNNAPI)
    #numberOfThreads- int类型。加载数据和模型所需要的核数,可选的数值为1,2,3,4
    # enableNNAPI -  int类型。选择模型的推理的方式,默认可选值为-1:在cpu上推理,0:在GPU上推理,1:混合模式推理,2:dsp推理模式

    value = aidlite.ANNModel(model_path, in_shape, out_shape, 4, 0) #不支持多输入
    # value = aidlite.FAST_ANNModel(model_path, in_shape, out_shape, 4, 0)
    print("gpu:", value)

    img1_pth = "/home/aidlux/test_imgs/test/false/beijing_2019-11-21_10406_200_200_seal.jpg"
    img2_pth = "/home/aidlux/test_imgs/test/true/beijing_0905_61269575.jpg"
    out = "result"
    os.makedirs(out, exist_ok=True)

    img10 = cv2.imread(img1_pth)
    img20 = cv2.imread(img2_pth)

    img1 = Image.fromarray(cv2.cvtColor(img10, cv2.COLOR_BGR2RGB))
    img2 = Image.fromarray(cv2.cvtColor(img20, cv2.COLOR_BGR2RGB))

    image_1 = letterbox_image(img1, [input_shape[1], input_shape[0]], False)
    image_2 = letterbox_image(img2, [input_shape[1], input_shape[0]], False)

    photo_1  = preprocess_input(np.array(image_1, np.float32))
    photo_2  = preprocess_input(np.array(image_2, np.float32))

    photo_1 = np.expand_dims(np.transpose(photo_1, (2, 0, 1)), 0)
    photo_2 = np.expand_dims(np.transpose(photo_2, (2, 0, 1)), 0)

    # 3.传入模型输入数据
    aidlite.setInput_Float32(photo_1, index=0)
    aidlite.setInput_Float32(photo_2, index=1)

    # 4.执行推理
    start = time.time()
    aidlite.invoke()
    end = time.time()
    timerValue = (end - start) * 1000
    print("infer time(ms):{}".format(timerValue))

    # 5.获取输出
    pred = aidlite.getOutput_Float32(0)[0]
    print(pred)
    outs = round(sigmoid(float(pred)), 9)
    print(outs)

    img_pair = np.hstack((cv2.resize(img10, (112,112)), cv2.resize(img20, (112,112))))
    h, w = img_pair.shape[:2]
    print('--+++', img_pair.shape)
    h, w = img_pair.shape[:2]
    cv2.putText(img_pair, 'sim:{}'.format(str(outs)), (0, h), cv2.FONT_ITALIC, 1, (0,0,255), 2)

    # from cvs import *
    cvs.imshow(img_pair)
    cv2.imwrite("/home/aidlux/res/adilux_dlc_img_pair.jpg", img_pair)
tflite部署:https://www.bilibili.com/video/BV1ZQ4y1p7iL/
dcl部署:https://www.bilibili.com/video/BV1oC4y137t1/