随着企业OpenShift或Kubernetes集群越来越多,规模越来越大, 如何保证分散在多地,不同用途的集群是否合规,保障集群的安全性逐步提上议程,
Compliance Operator 评估 OpenShift Container Platform 的 Kubernetes API 资源以及运行集群的节点的合规性。 Compliance Operator 使用经 NIST 认证的工具 OpenSCAP 来扫描和执行内容提供的安全策略。
在Compilance Operator的CRD中,有几个重要的概念
Profile:基于规范定义不同的Rule的组合
[lab-user@bastion ~]$ oc get -n openshift-compliance profiles.compliance
NAME                 AGE
ocp4-cis             4h18m
ocp4-cis-node        4h18m
ocp4-e8              4h18m
ocp4-high            4h18m
ocp4-high-node       4h18m
ocp4-moderate        4h18m
ocp4-moderate-node   4h18m
ocp4-nerc-cip        4h18m
ocp4-nerc-cip-node   4h18m
ocp4-pci-dss         4h18m
ocp4-pci-dss-node    4h18m
rhcos4-e8            4h18m
rhcos4-high          4h18m
rhcos4-moderate      4h18m
rhcos4-nerc-cip      4h18m
Rule: 最小的规则粒度
[lab-user@bastion ~]$ oc get -n openshift-compliance rules.compliance
NAME                                                                                AGE
ocp4-accounts-restrict-service-account-tokens                                       4h19m
ocp4-accounts-unique-service-account                                                4h19m
ocp4-alert-receiver-configured                                                      4h19m
ocp4-api-server-admission-control-plugin-alwaysadmit                                4h19m
ocp4-api-server-admission-control-plugin-alwayspullimages                           4h19m
ocp4-api-server-admission-control-plugin-namespacelifecycle                         4h19m
ocp4-api-server-admission-control-plugin-noderestriction                            4h19m
ocp4-api-server-admission-control-plugin-scc                                        4h19m
ocp4-api-server-admission-control-plugin-securitycontextdeny                        4h19m
ocp4-api-server-admission-control-plugin-service-account                            4h19m
ocp4-api-server-anonymous-auth                                                      4h19m
ocp4-api-server-api-priority-flowschema-catch-all                                   4h19m
ocp4-api-server-api-priority-gate-enabled                                           4h19m
Scans: 具体客户化的扫描,比如我们用的
[lab-user@bastion ~]$ cat cis-compliance.yaml
apiVersion: compliance.openshift.io/v1alpha1
kind: ScanSettingBinding
metadata:
  name: cis-compliance
profiles:
  - name: ocp4-cis-node
    kind: Profile
    apiGroup: compliance.openshift.io/v1alpha1
  - name: ocp4-cis
    kind: Profile
    apiGroup: compliance.openshift.io/v1alpha1
settingsRef:
  name: default
  kind: ScanSetting
  apiGroup: compliance.openshift.io/v1alpha1
ScanSetting:扫描开始的时间和频率
ComplianceRemediation:ComplianceRemediation CRD 展示了如何修复 ComplianceCheckResult 中定义的问题。
[lab-user@bastion ~]$ oc get complianceremediation
NAME                                                          STATE
ocp4-cis-api-server-encryption-provider-cipher                NotApplied
ocp4-cis-api-server-encryption-provider-config                NotApplied
ocp4-cis-node-master-kubelet-enable-protect-kernel-defaults   NotApplied
ocp4-cis-node-master-kubelet-enable-protect-kernel-sysctl     NotApplied
ocp4-cis-node-worker-kubelet-enable-protect-kernel-defaults   NotApplied
ocp4-cis-node-worker-kubelet-enable-protect-kernel-sysctl     NotApplied
ComplianceCheckResult:扫描结果
[lab-user@bastion ~]$ oc get ComplianceCheckResult
NAME                                                                  STATUS   SEVERITY
ocp4-cis-accounts-restrict-service-account-tokens                     MANUAL   medium
ocp4-cis-accounts-unique-service-account                              MANUAL   medium
ocp4-cis-api-server-admission-control-plugin-alwaysadmit              PASS     medium
ocp4-cis-api-server-admission-control-plugin-alwayspullimages         PASS     high
ocp4-cis-api-server-admission-control-plugin-namespacelifecycle       PASS     medium
ocp4-cis-api-server-admission-control-plugin-noderestriction          PASS     medium
ocp4-cis-api-server-admission-control-plugin-scc                      PASS     medium
ocp4-cis-api-server-admission-control-plugin-securitycontextdeny      PASS     medium
ocp4-cis-api-server-admission-control-plugin-service-account          PASS     medium
ocp4-cis-api-server-anonymous-auth                                    PASS     medium
ocp4-cis-api-server-api-priority-flowschema-catch-all                 PASS     medium
ocp4-cis-api-server-audit-log-maxbackup                               PASS     low
ocp4-cis-api-server-audit-log-maxsize                                 PASS     medium
本文基于OpenShift 4.12, 安装设置过程略。只是讲讲其中遇到的问题和最后运行出来的报告结果。
1.无法创建Pod
在获取扫描信息的过程中,需要创建一个pv-extract-pod从pvc中将扫描结果读取出来,结果简单的一个pod创建失败。
为了排除问题,直接简化成一个最简单的Pod,不绑定pvc信息
[lab-user@bastion ~]$ cat pv-extract.yaml
apiVersion: "v1"
kind: Pod
metadata:
  name: pv-extract
spec:
  containers:
    - name: pv-extract-pod
      image: registry.access.redhat.com/ubi8/ubi
      command: ["sleep", "3000"]
结果系统创建过程中报错
Warning: would violate PodSecurity "restricted:latest": allowPrivilegeEscalation != false (container "pv-extract-pod" must set securityContext.allowPrivilegeEscalation=false), unrestricted capabilities (container "pv-extract-pod" must set securityContext.capabilities.drop=["ALL"]), runAsNonRoot != true (pod or container "pv-extract-pod" must set securityContext.runAsNonRoot=true), seccompProfile (pod or container "pv-extract-pod" must set securityContext.seccompProfile.type to "RuntimeDefault" or "Localhost")
OpenShift 4.12是Kubernetes 1.25的环境,在Pod安全方面已经修改为PSA模式,查阅一堆文档后改为如下后成功。
[lab-user@bastion ~]$ cat pv-extract.yaml
apiVersion: "v1"
kind: Pod
metadata:
  name: pv-extract
spec:
  containers:
    - name: pv-extract-pod
      image: registry.access.redhat.com/ubi8/ubi
      command: ["sleep", "3000"]
      securityContext:
        runAsUser: 2000
        runAsGroup: 3000
        allowPrivilegeEscalation: false
        capabilities:
          drop: ["ALL"]
  securityContext:
    runAsNonRoot: true
    seccompProfile:
      type: RuntimeDefault
2. 加上pvc的Pod后找不到可以部署的节点一直在Pending状态
describe pod发现报错为 3 node(s) had volume node affinity conflict
通过查看pvc绑定的pv确定node的标签信息
[lab-user@bastion ~]$ oc get pv pvc-e539a7bd-e55f-4fdf-8a90-edfd4a0269e6 -o yaml
apiVersion: v1
kind: PersistentVolume
metadata:
  annotations:
    pv.kubernetes.io/provisioned-by: ebs.csi.aws.com
    volume.kubernetes.io/provisioner-deletion-secret-name: ""
    volume.kubernetes.io/provisioner-deletion-secret-namespace: ""
  creationTimestamp: "2023-04-17T05:46:48Z"
  finalizers:
  - kubernetes.io/pv-protection
  - external-attacher/ebs-csi-aws-com
  name: pvc-e539a7bd-e55f-4fdf-8a90-edfd4a0269e6
  resourceVersion: "118966"
  uid: 3d45cc6b-635f-43e5-b0e0-c1a85194b172
spec:
  accessModes:
  - ReadWriteOnce
  capacity:
    storage: 1Gi
  claimRef:
    apiVersion: v1
    kind: PersistentVolumeClaim
    name: ocp4-cis
    namespace: openshift-compliance
    resourceVersion: "118809"
    uid: e539a7bd-e55f-4fdf-8a90-edfd4a0269e6
  csi:
    driver: ebs.csi.aws.com
    fsType: ext4
    volumeAttributes:
      storage.kubernetes.io/csiProvisionerIdentity: 1681698676466-8081-ebs.csi.aws.com
    volumeHandle: vol-025cd315603cab26f
  nodeAffinity:
    required:
      nodeSelectorTerms:
      - matchExpressions:
        - key: topology.ebs.csi.aws.com/zone
          operator: In
          values:
          - us-east-2b
  persistentVolumeReclaimPolicy: Delete
  storageClassName: gp3-csi
  volumeMode: Filesystem
status:
  phase: Bound
所以其实选择的节点是
required:
      nodeSelectorTerms:
      - matchExpressions:
        - key: topology.ebs.csi.aws.com/zone
          operator: In
          values:
          - us-east-2b
而我们worker节点的label为
[lab-user@bastion ~]$ oc describe node -l node-role.kubernetes.io/worker | grep topology.ebs.csi.aws.com/zone
                    topology.ebs.csi.aws.com/zone=us-east-2a
                    topology.ebs.csi.aws.com/zone=us-east-2a
                    topology.ebs.csi.aws.com/zone=us-east-2a
可见schedule不到worker节点,而master的label
[lab-user@bastion ~]$ oc describe node -l node-role.kubernetes.io/master | grep topology.ebs.csi.aws.com/zone
                    topology.ebs.csi.aws.com/zone=us-east-2b
                    topology.ebs.csi.aws.com/zone=us-east-2b
                    topology.ebs.csi.aws.com/zone=us-east-2b
所以修改创建Pod的yaml,转去master(主要看标黑那段)
[lab-user@bastion ~]$ cat pv-extract1.yaml
apiVersion: "v1"
kind: Pod
metadata:
  name: pv-extract
spec:
  containers:
    - name: pv-extract-pod
      image: registry.access.redhat.com/ubi8/ubi
      command: ["sleep", "3000"]
      volumeMounts:
      - mountPath: "/workers-scan-results"
        name: workers-scan-vol
      securityContext:
        allowPrivilegeEscalation: false
        capabilities:
          drop: ["ALL"]
  securityContext:
    runAsNonRoot: true
    seccompProfile:
      type: RuntimeDefault
  volumes:
    - name: workers-scan-vol
      persistentVolumeClaim:
        claimName: ocp4-cis
  nodeSelector:
    node-role.kubernetes.io/master: ""
  tolerations:
  - key: "node-role.kubernetes.io/master"
    operator: "Exists"
    effect: "NoSchedule"
3. Pod创建起来后无法读取pv中的内容
这里走了一些弯路,开始以为是权限问题,所以采用了特权用户,为使用特权用户,需要在namespaces中打开权限
oc label --overwrite ns openshift-compliance \
  pod-security.kubernetes.io/enforce=privileged \
  pod-security.kubernetes.io/warn=baseline \
  pod-security.kubernetes.io/audit=baseline
然后修改pod创建的yaml为
[lab-user@bastion ~]$ cat pv-extract1.yaml
apiVersion: "v1"
kind: Pod
metadata:
  name: pv-extract
spec:
  containers:
    - name: pv-extract-pod
      image: registry.access.redhat.com/ubi8/ubi
      command: ["sleep", "3000"]
      volumeMounts:
      - mountPath: "/workers-scan-results"
        name: workers-scan-vol
      securityContext:
        allowPrivilegeEscalation: true
        capabilities:
          drop: ["ALL"]
  securityContext:
    runAsNonRoot: false
    seccompProfile:
      type: RuntimeDefault
  volumes:
    - name: workers-scan-vol
      persistentVolumeClaim:
        claimName: ocp4-cis
  nodeSelector:
    node-role.kubernetes.io/master: ""
  tolerations:
  - key: "node-role.kubernetes.io/master"
    operator: "Exists"
    effect: "NoSchedule"
创建完成后发现,采用root仍然无法进入扫描结果的0,1等目录,目录权限为
sh-4.4$ ls -al
total 28
drwxrwsr-x. 5 root       1000670000  4096 Apr 17 06:00 .
dr-xr-xr-x. 1 root       root          45 Apr 17 06:28 ..
drwxrws---. 2 1000670000 1000670000  4096 Apr 17 05:47 0
drwxrws---. 2 1000670000 1000670000  4096 Apr 17 06:01 1
drwxrws---. 2 root       1000670000 16384 Apr 17 05:46 lost+found
查了公司相关的Knowledge Base,
https://access.redhat.com/solutions/6746451
改为普通用户进入
[lab-user@bastion ~]$ cat pv-extract2.yaml
apiVersion: "v1"
kind: Pod
metadata:
  name: pv-extract
spec:
  containers:
    - name: pv-extract-pod
      image: registry.access.redhat.com/ubi8/ubi
      command: ["sleep", "3000"]
      volumeMounts:
      - mountPath: "/workers-scan-results"
        name: workers-scan-vol
      securityContext:
        allowPrivilegeEscalation: false
        capabilities:
          drop: ["ALL"]
  securityContext:
    runAsNonRoot: true
    seccompProfile:
      type: RuntimeDefault
  volumes:
    - name: workers-scan-vol
      persistentVolumeClaim:
        claimName: ocp4-cis
  nodeSelector:
    node-role.kubernetes.io/master: ""
  tolerations:
  - key: "node-role.kubernetes.io/master"
    operator: "Exists"
    effect: "NoSchedule"
终于获取成功
oc cp pv-extract:/workers-scan-results .
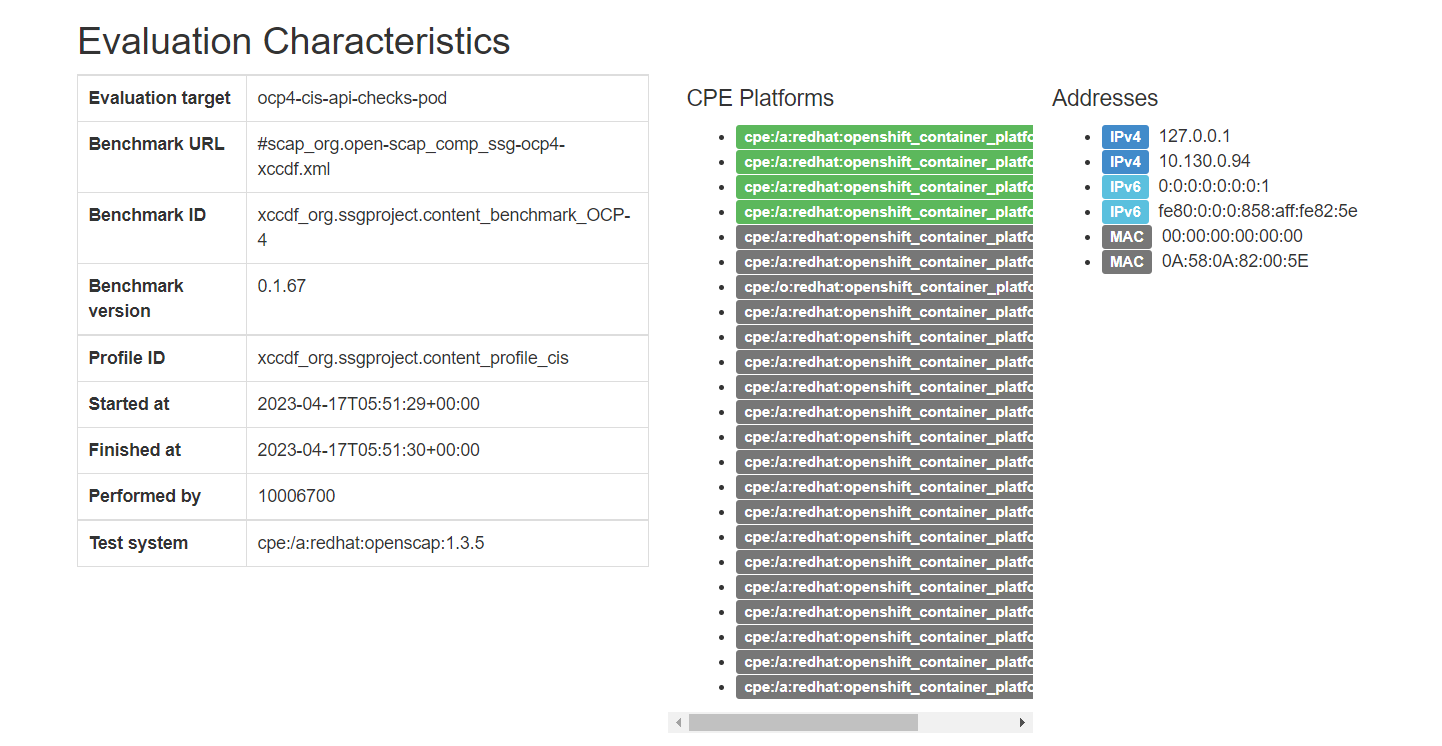
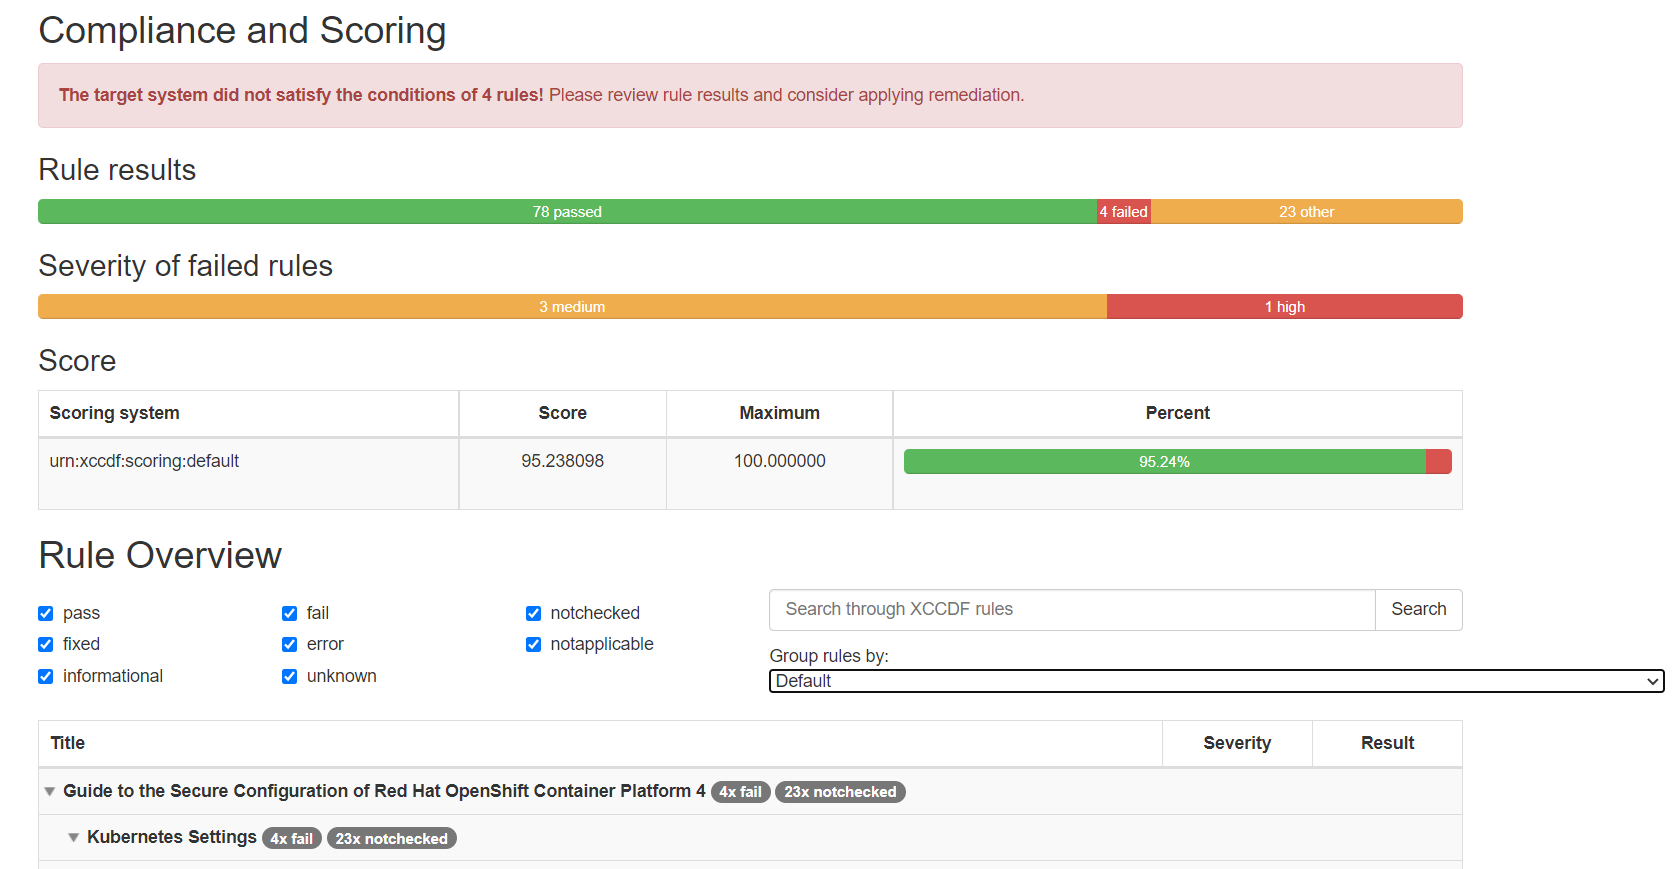
Compilance Report大概的样子