写在前面
看个乐子
软件:VMware17pro+Ubuntu20.04
目前运行tutorials中basic例程没问题,但不保证完全正确安装
网上p4的资料不算很多,github官方社区提供了搭建脚本tutorials/vm-ubuntu-20.04/user-dev-bootstrap.sh at master · p4lang/tutorials (github.com) ,搭建过程一开始也参考了搭建 P4 编程环境 - 锦瑟,无端 - 博客园 (cnblogs.com) 以及P4编程理论与实践(2)—快速上手 | SDNLAB | 专注网络创新技术
但后来发现后两篇博客还是有些久远,虚拟机版本也不一样,一开始用Ubuntu22.04左抄抄右抄抄结果浪费了很多时间,最后换成Ubuntu20.04参考官方脚本终于装完了
虚拟机和宿主机的文件传输
虚拟机有时候会出现git clone失败的情况,我一开始是在宿主机上git clone后利用VM自带的Tools把文件共享给虚拟机,但在后来遇到运行.sh文件时会出错,最后排查到是因为从windows系统共享的.sh文件是dos格式,可以选择利用Vim手动修改的方法,但是可能要改不少文件。最后发现可以从主机下载zip文件传输给虚拟机再解压,或者用dos2unix工具。
sudo make或者make导致卡顿甚至终端闪退
网上都说是内存问题或者硬盘空间,当时我还有25G的硬盘空间,所以怀疑是内存问题,先是将虚拟机修改到8G,发现问题仍然存在,最后参考https://blog.csdn.net/Lorrey_/article/details/127924347解决问题。
没试过上述配置在4G内存情况下能不能解决make卡顿问题
-
打开编辑->首选项->内存
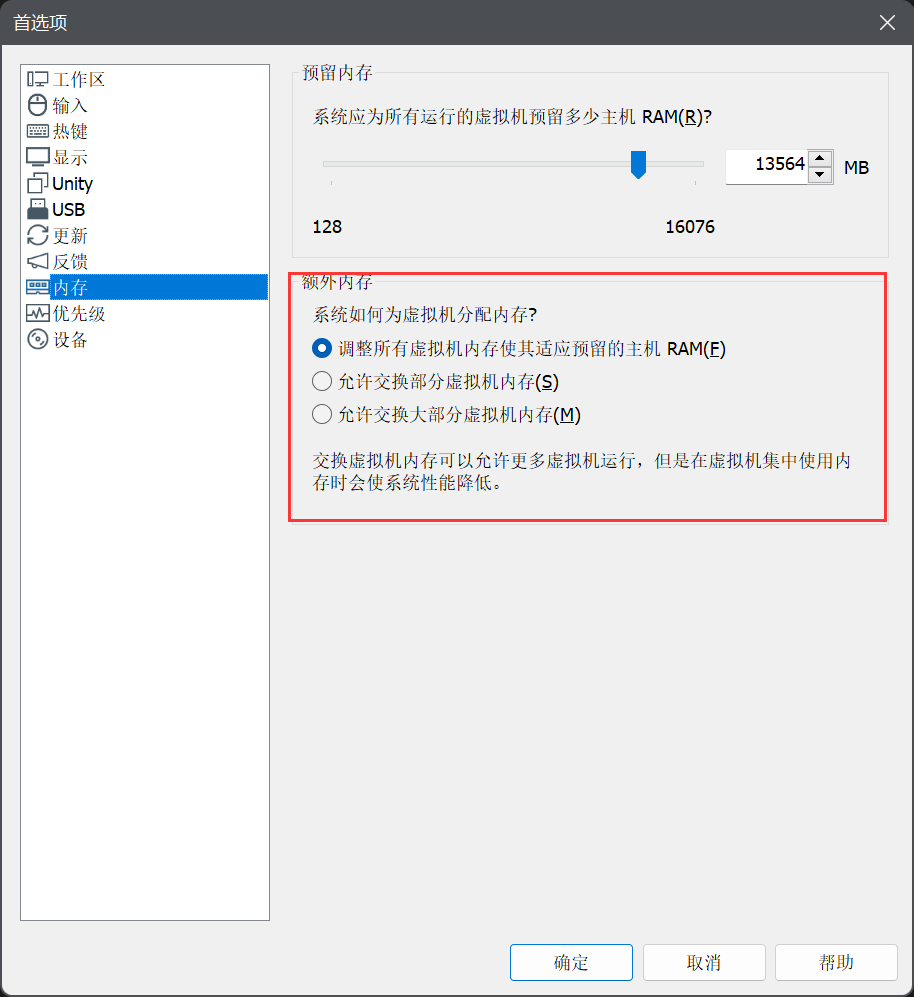
-
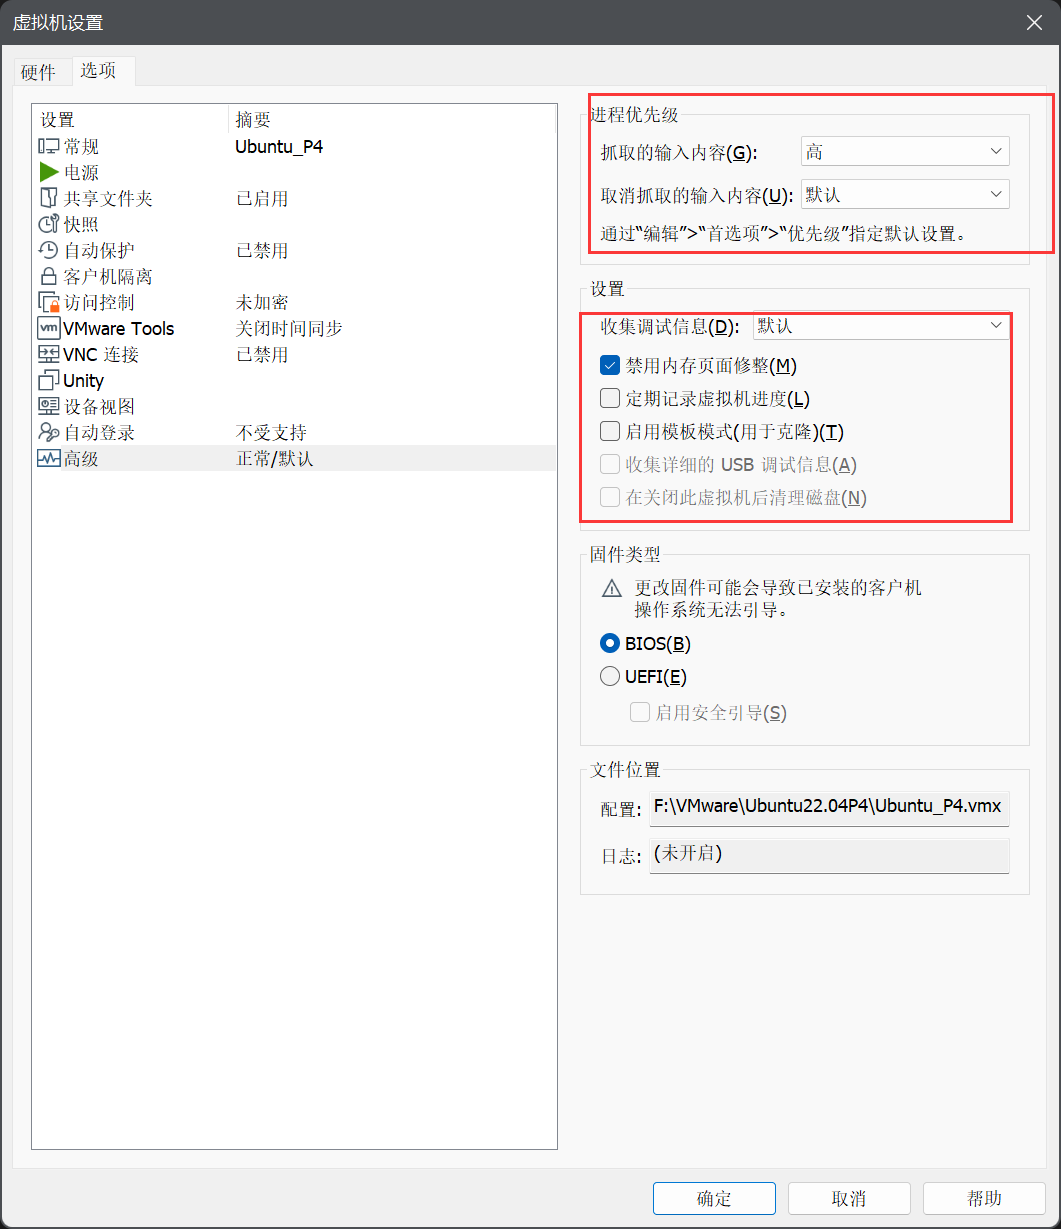
修改优先级
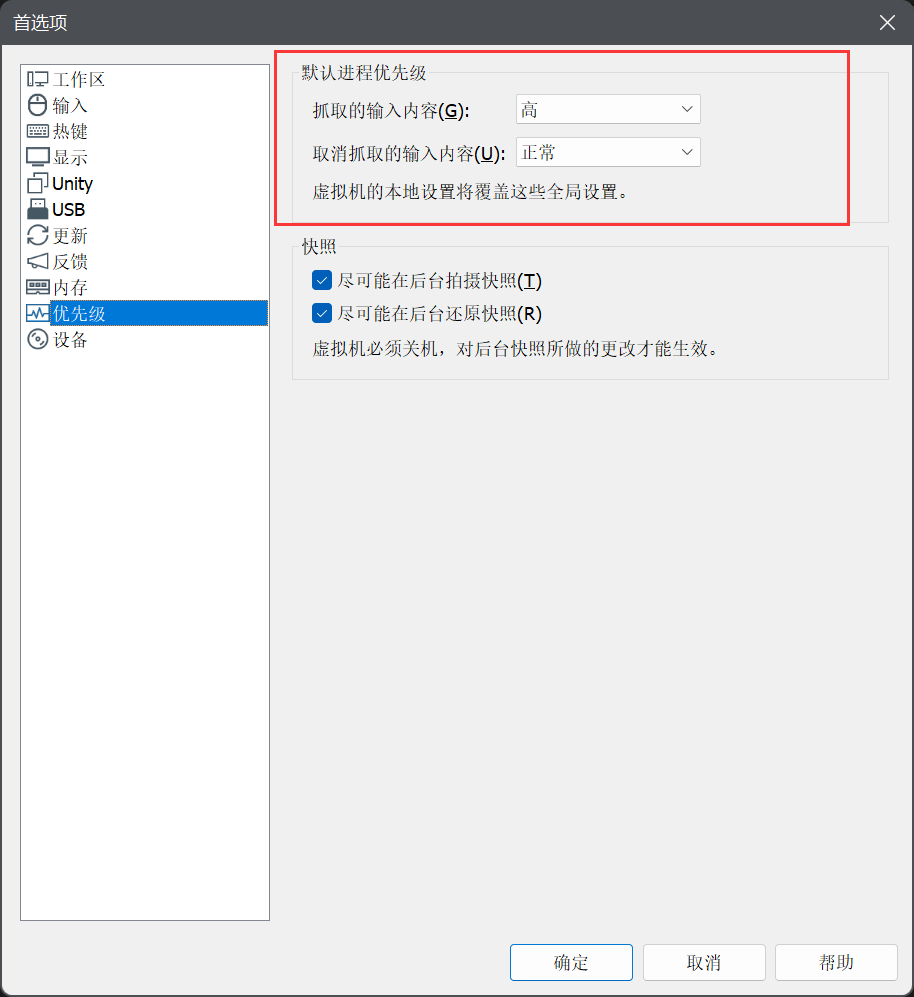
- 编辑虚拟机设置->选项->高级
正式搭建
1. 新建工作目录
mkdir ~/P4
cd ~/P4
echo "P4_HOME=$(pwd)" >> ~/.bashrc
source ~/.bashrc
2. 安装依赖项
直接参考tutorials/vm-ubuntu-20.04 at master · p4lang/tutorials (github.com) 里的root-dev-bootstrap.sh和root-release-bootstrap.sh里的内容即可,只需照抄apt-get和pip部分
3. 准备工作
将py3localpath.py复制到$HOME目录下
cd ~/P4
git clone https://github.com/p4lang/tutorials
sudo cp -p tutorials/vm-ubuntu-20.04/py3localpath.py  ~
新建一个脚本把user-dev-bootstrap.sh前面的定义函数部分和每个组件安装完成后的的获取安装路径部分放进去
cd ~/P4
touch func.sh
chmod +x func.sh
func.sh:
#!/bin/bash
# Print script commands and exit on errors.
set -xe
debug_dump_many_install_files() {
    local OUT_FNAME="$1"
    if [ ${DEBUG_INSTALL} -ge 2 ]
    then
	find /usr/lib /usr/local $HOME/.local | sort > "${OUT_FNAME}"
    fi
}

PY3LOCALPATH=`${HOME}/py3localpath.py`

move_usr_local_lib_python3_from_site_packages_to_dist_packages() {
    local SRC_DIR
    local DST_DIR
    local j
    local k

    SRC_DIR="${PY3LOCALPATH}/site-packages"
    DST_DIR="${PY3LOCALPATH}/dist-packages"

    if [ ! -d ${SRC_DIR} ]
    then
	return 0
    fi

    sudo rm -fr ${SRC_DIR}/__pycache__

    echo "Source dir contents before moving: ${SRC_DIR}"
    ls -lrt ${SRC_DIR}
    echo "Dest dir contents before moving: ${DST_DIR}"
    ls -lrt ${DST_DIR}
    for j in ${SRC_DIR}/*
    do
	echo $j
	k=`basename $j`

        if [ -d ${SRC_DIR}/$k -a -d ${DST_DIR}/$k ]
   	then
	    echo "Both source and dest dir contain a directory: $k"
	    echo "Source dir $k directory contents:"
	    ls -l ${SRC_DIR}/$k
	    echo "Dest dir $k directory contents:"
	    ls -l ${DST_DIR}/$k
            sudo mv ${SRC_DIR}/$k/* ${DST_DIR}/$k/
	    sudo rmdir ${SRC_DIR}/$k
	else
	    echo "Not a conflicting directory: $k"
            sudo mv ${SRC_DIR}/$k ${DST_DIR}/$k
	fi
    done

    echo "Source dir contents after moving: ${SRC_DIR}"
    ls -lrt ${SRC_DIR}
    echo "Dest dir contents after moving: ${DST_DIR}"
    ls -lrt ${DST_DIR}
}
debug_dump_many_install_files $HOME/usr-local-1-before-protobuf.txt
4. 正式安装
可以直接把user-dev-bootstrap.sh拿来整个运行,但是git时不时出现问题,所以建议一个组件一个组件装
1. Protobuf
cd ~/P4
git clone https://github.com/protocolbuffers/protobuf
cd protobuf
PROTOBUF_COMMIT="v3.18.1"
git checkout ${PROTOBUF_COMMIT}
git submodule update --init --recursive
./autogen.sh
./configure --prefix=/usr
NUM_CORES=`grep -c ^processor /proc/cpuinfo`
make -j${NUM_CORES}
sudo make install
sudo ldconfig
cd ..
sed -i '$s|.*|debug_dump_many_install_files $HOME/usr-local-2-after-protobuf.txt|' func.sh
./func.sh
2. gRPC
cd ~/P4
git clone https://github.com/grpc/grpc.git
cd grpc
GRPC_COMMIT="tags/v1.43.2"
git checkout ${GRPC_COMMIT}
git submodule update --init --recursive
mkdir -p cmake/build
cd cmake/build
cmake ../..
NUM_CORES=`grep -c ^processor /proc/cpuinfo`
make -j${NUM_CORES}
sudo make install
cd ../..
sudo pip3 install Cython==0.29.35
sudo pip3 install -rrequirements.txt
GRPC_PYTHON_BUILD_WITH_CYTHON=1 sudo pip3 install .
sudo ldconfig
cd ..
sed -i '$s|.*|debug_dump_many_install_files $HOME/usr-local-3-after-grpc.txt|' func.sh
./func.sh
3. PI/P4Runtime
这里安装的时候可能会缺少nanomsg的依赖项(虽然理论上之前按照root一系列脚本应该都装完了),可以自行去P4lang的PI仓离装一下合适的nanomsg版本
cd ~/P4
git clone https://github.com/p4lang/PI.git
cd PI
PI_COMMIT="f043e6f5f4271076ad7e58aa9889c82dbfc8c3ca"    # 2023-Jul-01
git checkout ${PI_COMMIT}
git submodule update --init --recursive
./autogen.sh
./configure --with-proto
NUM_CORES=`grep -c ^processor /proc/cpuinfo`
make -j${NUM_CORES}
sudo make install
make clean
sudo ldconfig
cd ..
sed -i '$s|.*|debug_dump_many_install_files $HOME/usr-local-4-after-PI.txt|' func.sh
./func.sh
4. Bmv2
cd ~/P4
git clone https://github.com/p4lang/behavioral-model.git
cd behavioral-model
BMV2_COMMIT="6ee70b5eff7f510b32c074aaa4f00358f594fecb"  # 2023-Jul-01
git checkout ${BMV2_COMMIT}
./install_deps.sh
./autogen.sh
./configure --enable-debugger --with-pi --with-thrift
NUM_CORES=`grep -c ^processor /proc/cpuinfo`
make -j${NUM_CORES}
sudo make install-strip
sudo ldconfig
cd ..
sed -i '$s|.*|debug_dump_many_install_files $HOME/usr-local-5-after-behavioral-model.txt|' func.sh
./func.sh
5. P4C
cd ~/P4
git clone https://github.com/p4lang/p4c
cd p4c
P4C_COMMIT="c7a503d5b6f5711cf61e7e2878eaa670fd90c71d"   # 2023-Jul-01
git checkout ${P4C_COMMIT}
git submodule update --init --recursive
mkdir -p build
cd build
cmake .. -DENABLE_TEST_TOOLS=ON
# The command 'make -j${NUM_CORES}' works fine for the others, but
# with 2 GB of RAM for the VM, there are parts of the p4c build where
# running 2 simultaneous C++ compiler runs requires more than that
# much memory.  Things work better by running at most one C++ compilation
# process at a time.
make -j1
sudo make install
sudo ldconfig
cd ../..
sed -i '$s|.*|debug_dump_many_install_files $HOME/usr-local-6-after-p4c.txt|' func.sh
./func.sh
6. Mininet
这个在user-common-bootstrap.sh
cd ~/P4
git clone https://github.com/mininet/mininet mininet
cd mininet
MININET_COMMIT="5b1b376336e1c6330308e64ba41baac6976b6874"  # 2023-May-28
git checkout ${MININET_COMMIT}
PATCH_DIR="${HOME}/patches"
patch -p1 < "${PATCH_DIR}/mininet-patch-for-2023-jun.patch"
cd ..
sudo ./mininet/util/install.sh -nw

find /usr/lib /usr/local $HOME/.local | sort > $HOME/usr-local-7-after-mininet-install.txt
7. PTF
cd ~/P4
git clone https://github.com/p4lang/ptf
cd ptf
PTF_COMMIT="d2e2d8ad005a451ad11f9d21af50079a0552921a"   # 2023-Jul-01
git checkout ${PTF_COMMIT}
sudo pip3 install .
cd ..
sed -i '$s|.*|debug_dump_many_install_files $HOME/usr-local-8-after-ptf-install.txt|' func.sh
./func.sh
测试安装
装完以上这些组件之后就是测试安装成功与否
cd $P4_HOME/tutorials/exercises/basic
sudo cp -p solution/basic.p4 .
之后运行
make run
mininet>h1 ping h2
#上述输出可以Ctrl+C结束
mininet>pingall
mininet>xterm h1 h2
#会跳出两个窗口 h1和h2
#在h2窗口输入
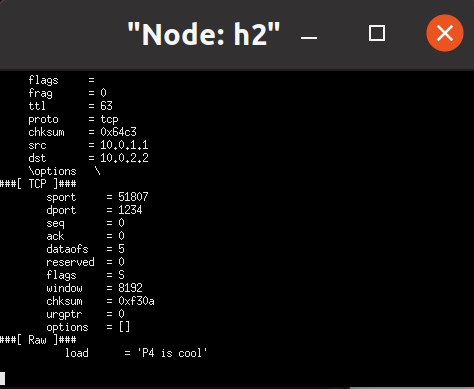
./receive.py
#在h1窗口
./send.py 10.0.2.2 "P4 is cool"
#最后退出mininet
mininet>exit
make stop
make clean
h2成功接收到h1的信息
如果在h1和h2窗口运行py文件时出现报错:usr/bin/env python3\r:没有那个文件或目录
这是因为py文件是dos格式,dos中的回车在linuxkn无法正确解析,所以变成\r
解决方法
sudo apt install dos2unix
dos2unix receive.py
dos2unix send.py