1.学习目标

2 Mybatis 整合 数据访问
使用 SpringBoot 开发企业项目时,持久层数据访问是前端页面数据展示的基础,SpringBoot 支持市面
上常见的关系库产品 (Oracle、Mysql、SqlServer、DB2等) 对应的相关持久层框架,当然除了对于关系库
SpringBoot 集成 Mybatis 并实现持久层数据基本增删改查操作。
2.1. SpringBoot 整合 Mybatis
2.1.1. 环境整合配置
-
Idea 下创建 Maven 普通工程 springboot_mybatis

-
pom.xml 添加核心依赖
  <properties>
    <project.build.sourceEncoding>UTF-8</project.build.sourceEncoding>
    <maven.compiler.source>1.8</maven.compiler.source>
    <maven.compiler.target>1.8</maven.compiler.target>
  </properties>

  <parent>
    <groupId>org.springframework.boot</groupId>
    <artifactId>spring-boot-starter-parent</artifactId>
    <version>2.2.2.RELEASE</version>
  </parent>
  <dependencies>
    <dependency>
      <groupId>org.springframework.boot</groupId>
      <artifactId>spring-boot-starter-web</artifactId>
    </dependency>
    <!-- mybatis 集成 -->
    <dependency>
      <groupId>org.mybatis.spring.boot</groupId>
      <artifactId>mybatis-spring-boot-starter</artifactId>
      <version>2.1.1</version>
    </dependency>
    <!-- springboot 分⻚插件 -->
    <dependency>
      <groupId>com.github.pagehelper</groupId>
      <artifactId>pagehelper-spring-boot-starter</artifactId>
      <version>1.2.13</version>
    </dependency>
    <!-- mysql 驱动 -->
    <dependency>
      <groupId>mysql</groupId>
      <artifactId>mysql-connector-java</artifactId>
    </dependency>
    <!-- c3p0 数据源 -->
    <dependency>
      <groupId>com.mchange</groupId>
      <artifactId>c3p0</artifactId>
      <version>0.9.5.5</version>
    </dependency>
  </dependencies>

  <build>
    <plugins>
      <plugin>
        <groupId>org.springframework.boot</groupId>
        <artifactId>spring-boot-maven-plugin</artifactId>
      </plugin>
    </plugins>
</build>-
application.yml 整合配置
server:
    # 设置项⽬启动的端⼝号
    port: 8080
    # 设置项⽬的访问路径(上下⽂路径)
    servlet:
      context-path: /springboot_mybatis

## 数据源配置
spring:
  datasource:
   type: com.mchange.v2.c3p0.ComboPooledDataSource
   driver-class-name: com.mysql.cj.jdbc.Driver
   url: jdbc:mysql://127.0.0.1:3306/springboot_mybatis?useUnicode=true&characterEncoding=utf8&serverTimezone=GMT%2B8
   username: root
   password: mysql

## mybatis 配置
mybatis:
   mapper-locations: classpath:/mappers/*.xml
   type-aliases-package: com.xxxx.springboot.po
   configuration:
     ## 下划线转驼峰配置
     map-underscore-to-camel-case: true

## pageHelper
pagehelper:
    helper-dialect: mysql

## 显示dao 执⾏sql语句
logging:
  level:
   com:
    xxxx:
     springboot:
       dao: debug
2.1.2. 源代码添加
-
JavaBean 对象定义
package com.xxx.springboot.po;

public class User {
    private Integer id;
    private String userName;
    private String userPwd;

    public Integer getId() {
        return id;
    }

    public void setId(Integer id) {
        this.id = id;
    }

    public String getUserName() {
        return userName;
    }

    public void setUserName(String userName) {
        this.userName = userName;
    }

    public String getUserPwd() {
        return userPwd;
    }

    public void setUserPwd(String userPwd) {
        this.userPwd = userPwd;
    }
}-
Dao层接口方法定义
com.xxxx.springboot.dao 包下创建 UserMapper.java 接口声明查询方法
package com.xxx.springboot.dao;

import com.xxx.springboot.po.User;
public interface UserMapper {

    // 根据⽤户名查询⽤户记录
    User queryUserByUserName(String userName);
}-
SQL映射文件添加
resources/mappers 目录下添加 UserMapper.xml 配置,查询 statetment
<?xml version="1.0" encoding="UTF-8" ?>
<!DOCTYPE mapper PUBLIC "-//mybatis.org//DTD Mapper 3.0//EN"
        "http://mybatis.org/dtd/mybatis-3-mapper.dtd">
<mapper namespace="com.xxx.springboot.dao.UserMapper">
    <select id="queryUserByUserName" parameterType="string" resultType="com.xxx.springboot.po.User">
        select
        id,user_name,user_pwd
        from tb_user
        where user_name=#{userName}
    </select>
</mapper>-
添加 service 、controller 对应代码
UserService.java
package com.xxx.springboot.service;

import com.xxx.springboot.dao.UserMapper;
import com.xxx.springboot.po.User;
import org.springframework.beans.factory.annotation.Autowired;
import org.springframework.stereotype.Service;

@Service
public class UserService {

    @Autowired
    private UserMapper userMapper;
    public User queryUserByUserName(String userName){
        return userMapper.queryUserByUserName(userName);
    }
}
UserController.java
package com.xxx.springboot.controller;

import com.xxx.springboot.po.User;
import com.xxx.springboot.service.UserService;
import org.springframework.web.bind.annotation.GetMapping;
import org.springframework.web.bind.annotation.PathVariable;
import org.springframework.web.bind.annotation.RestController;

import javax.annotation.Resource;

@RestController
public class UserController {

    @Resource
    private UserService userService;
    @GetMapping("user/{userName}")
    public User queryUserByUserName(@PathVariable String userName){
        return userService.queryUserByUserName(userName);
    }
}-
添加应用启动入口
package com.xxx.springboot;

import org.mybatis.spring.annotation.MapperScan;
import org.springframework.boot.SpringApplication;
import org.springframework.boot.autoconfigure.SpringBootApplication;

@SpringBootApplication
@MapperScan("com.xxx.springboot.dao")
public class Starter {
    public static void main(String[] args) {
        SpringApplication.run(Starter.class);
    }
}
2.1.3. 启动测试
运行 Starter main方法,启动应用浏览器测试查询
后端日志打印效果 :

2.2. SpringBoot 数据访问操作
完成 SpringBoot 与 Mybatis 集成后,接下来以用户表为例实现⼀套用户模块基本数据维护。
2.2.1. 查询操作
2.2.1.1. 接口方法定义
UserMapper 接口添加查询的方法
package com.xxx.springboot.dao;

import com.xxx.springboot.po.User;
public interface UserMapper {

    // 通过⽤户ID查询⽤户
    User queryUserById(Integer id);
}
2.2.1.2. 映射文件配置
<?xml version="1.0" encoding="UTF-8" ?>
<!DOCTYPE mapper PUBLIC "-//mybatis.org//DTD Mapper 3.0//EN"
        "http://mybatis.org/dtd/mybatis-3-mapper.dtd">
<mapper namespace="com.xxx.springboot.dao.UserMapper">

    <select id="queryUserById" parameterType="int"
            resultType="com.xxx.springboot.po.User">
         select
            *
         from
            tb_user
         where
            id = #{id,jdbcType=INTEGER}
     </select>
</mapper>
2.2.1.3. UserService
package com.xxx.springboot.service;

import com.xxx.springboot.dao.UserMapper;
import com.xxx.springboot.po.User;
import org.springframework.stereotype.Service;

import javax.annotation.Resource;

@Service
public class UserService {


    /**
     * 通过⽤户ID查询⽤户
     * @param id
     * @return
     */
    public User queryUserById(Integer id){
        return userMapper.queryUserById(id);
    }

}
2.2.1.4. UserController
package com.xxx.springboot.controller;

import com.xxx.springboot.po.User;
import com.xxx.springboot.service.UserService;
import org.springframework.web.bind.annotation.GetMapping;
import org.springframework.web.bind.annotation.PathVariable;
import org.springframework.web.bind.annotation.RestController;

import javax.annotation.Resource;

@RestController
public class UserController {

    @Resource
    private UserService userService;

    /**
     * 根据⽤户ID查询⽤户对象
     * @param userId
     * @return
     */
    @GetMapping("user/{userId}")
    public User queryUserByUserId(@PathVariable Integer userId){
        return userService.queryUserById(userId);
    }

}
2.2.2. 添加操作
2.2.2.1. 接口方法定义
public interface UserMapper {
 	// 添加⽤户
 	public int save(User user);
}
2.2.2.2. 映射文件配置
<?xml version="1.0" encoding="UTF-8" ?>
<!DOCTYPE mapper PUBLIC "-//mybatis.org//DTD Mapper 3.0//EN"
        "http://mybatis.org/dtd/mybatis-3-mapper.dtd">
<mapper namespace="com.xxx.springboot.dao.UserMapper">

    <!--添加用户-->
    <insert id="save" parameterType="com.xxx.springboot.po.User">
         insert into
             tb_user
             (user_name,user_pwd)
         values
            (#{userName},#{userPwd})
     </insert>
</mapper>
2.2.2.3. 添加 commons-lang3 依赖
如果需要使用 StringUtils ⼯具类,需要引入 commons-lang3 依赖。
<dependency>
     <groupId>org.apache.commons</groupId>
     <artifactId>commons-lang3</artifactId>
</dependency>
2.2.2.4. AssertUtil 工具类
package com.xxx.springboot.utils;
import com.xxx.springboot.exceptions.ParamsException;
public class AssertUtil {
    /**
     * 判断结果是否为true
     * 如果结果为true,抛出异常
     * @param
     * @return
     */
    public static void isTrue(Boolean flag, String msg){
        if(flag){
            throw new ParamsException(msg);
        }
    }
}
2.2.2.5. ParamsException 自定义异常
package com.xxx.springboot.exceptions;
/**
 * ⾃定义参数异常
 */
public class ParamsException extends RuntimeException {
    private Integer code = 300;
    private String msg = "参数异常!";
    public ParamsException() {
        super("参数异常!");
    }
    public ParamsException(String msg) {
        super(msg);
        this.msg = msg;
    }
    public ParamsException(Integer code) {
        super("参数异常!");
        this.code = code;
    }
    public ParamsException(Integer code, String msg) {
        super(msg);
        this.code = code;
        this.msg = msg;
    }
    public Integer getCode() {
        return code;
    }
    public void setCode(Integer code) {
        this.code = code;
    }
    public String getMsg() {
        return msg;
    }
    public void setMsg(String msg) {
        this.msg = msg;
    }
}
2.2.2.6. UserService
package com.xxx.springboot.service;

import com.xxx.springboot.dao.UserMapper;
import com.xxx.springboot.po.User;
import com.xxx.springboot.utils.AssertUtil;
import org.apache.commons.lang3.StringUtils;
import org.springframework.stereotype.Service;

import javax.annotation.Resource;

@Service
public class UserService {


    @Resource
    private UserMapper userMapper;
    /**
     * 添加⽤户
     * @param user
     */
    public void saveUser(User user) {
        AssertUtil.isTrue(StringUtils.isBlank(user.getUserName()), "⽤户名不能为空!");
        AssertUtil.isTrue(StringUtils.isBlank(user.getUserPwd()),"⽤户密码不能为空!");
        User temp = userMapper.queryUserByUserName(user.getUserName());
        AssertUtil.isTrue(null != temp, "该⽤户已存在!");
        AssertUtil.isTrue(userMapper.save(user) < 1,"⽤户记录添加失败!");
    }
}
2.2.2.7. ResultInfo
package com.xxx.springboot.po.vo;
public class ResultInfo {

    private Integer code = 200;
    private String msg = "操作成功";
    private Object result;

    public Integer getCode() {
        return code;
    }
    public void setCode(Integer code) {
        this.code = code;
    }
    public String getMsg() {
        return msg;
    }
    public void setMsg(String msg) {
        this.msg = msg;
    }
    public Object getResult() {
        return result;
    }
    public void setResult(Object result) {
        this.result = result;
    }
}
2.2.2.8. UserController
package com.xxx.springboot.controller;

import com.xxx.springboot.exceptions.ParamsException;
import com.xxx.springboot.po.User;
import com.xxx.springboot.po.vo.ResultInfo;
import com.xxx.springboot.service.UserService;
import org.springframework.web.bind.annotation.*;

import javax.annotation.Resource;

@RestController
public class UserController {

    @Resource
    private UserService userService;

    /**
     * 添加⽤户
     * @param user
     * @return
     */
    @PutMapping("user")
    public ResultInfo saveUser(@RequestBody User user){
        ResultInfo resultInfo = new ResultInfo();
        try {
            userService.saveUser(user);
        } catch (ParamsException e) {
            e.printStackTrace();
            resultInfo.setCode(e.getCode());
            resultInfo.setMsg(e.getMsg());
        }catch (Exception e) {
            e.printStackTrace();
            resultInfo.setCode(300);
            resultInfo.setMsg("记录添加失败!");
        }
        return resultInfo;
    }
}
2.2.3. 修改操作
2.2.3.1. 接口方法定义
public interface UserMapper {
     // 修改⽤户
     public int update(User user);
}
2.2.3.2. 映射文件配置
<?xml version="1.0" encoding="UTF-8" ?>
<!DOCTYPE mapper PUBLIC "-//mybatis.org//DTD Mapper 3.0//EN"
        "http://mybatis.org/dtd/mybatis-3-mapper.dtd">
<mapper namespace="com.xxx.springboot.dao.UserMapper">
    <update id="update" parameterType="com.xxx.springboot.po.User">
         update
            tb_user
         set
            user_name =#{userName},user_pwd=#{userPwd}
         where
            id = #{id}
     </update>
</mapper>
2.2.3.3. UserService
package com.xxx.springboot.service;

import com.xxx.springboot.dao.UserMapper;
import com.xxx.springboot.po.User;
import com.xxx.springboot.utils.AssertUtil;
import org.apache.commons.lang3.StringUtils;
import org.springframework.stereotype.Service;

import javax.annotation.Resource;

@Service
public class UserService {


    @Resource
    private UserMapper userMapper;

    /**
     * 修改⽤户
     * @param user
     */
    public void updateUser(User user) {
        AssertUtil.isTrue(StringUtils.isBlank(user.getUserName()), "⽤户名不能为空!");
        AssertUtil.isTrue(StringUtils.isBlank(user.getUserPwd()),"⽤户密码不能为空!");
        //通过用户名查询用户对象是否存在
        User temp = userMapper.queryUserByUserName(user.getUserName());
        //如果用户对象存在,且不是当前修改对象
        AssertUtil.isTrue(null != temp && !(temp.getId().equals(user.getId())), "该⽤户已存在!");
        AssertUtil.isTrue(userMapper.update(user) < 1,"⽤户记录添加失败!");
    }
}
2.2.3.4. UserController
package com.xxx.springboot.controller;

import com.xxx.springboot.exceptions.ParamsException;
import com.xxx.springboot.po.User;
import com.xxx.springboot.po.vo.ResultInfo;
import com.xxx.springboot.service.UserService;
import org.springframework.web.bind.annotation.*;

import javax.annotation.Resource;

@RestController
public class UserController {

    @Resource
    private UserService userService;

    /**
     * 修改⽤户
     * @param user
     * @return
     */
    @PostMapping("/user")
    public ResultInfo updateUser(@RequestBody User user){
        ResultInfo resultInfo = new ResultInfo();
        try {
            userService.updateUser(user);
        } catch (ParamsException e) {
            e.printStackTrace();
            resultInfo.setCode(e.getCode());
            resultInfo.setMsg(e.getMsg());
        }catch (Exception e) {
            e.printStackTrace();
            resultInfo.setCode(300);
            resultInfo.setMsg("记录更新失败!");
        }
        return resultInfo;
    }


}
2.2.4. 删除操作
2.2.4.1. 接口方法定义
public interface UserMapper {
     // 删除⽤户
     public int deleteUserById(Integer id);
}
2.2.4.2. 映射文件配置
<?xml version="1.0" encoding="UTF-8" ?>
<!DOCTYPE mapper PUBLIC "-//mybatis.org//DTD Mapper 3.0//EN"
        "http://mybatis.org/dtd/mybatis-3-mapper.dtd">
<mapper namespace="com.xxx.springboot.dao.UserMapper">

    <delete id="deleteUserById" parameterType="int">
         delete from
            tb_user
         where
            id=#{id}
     </delete>
</mapper>
2.2.4.3. UserService
package com.xxx.springboot.service;

import com.xxx.springboot.dao.UserMapper;
import com.xxx.springboot.po.User;
import com.xxx.springboot.utils.AssertUtil;
import org.apache.commons.lang3.StringUtils;
import org.springframework.stereotype.Service;

import javax.annotation.Resource;

@Service
public class UserService {

    @Resource
    private UserMapper userMapper;
    /**
     * 删除⽤户
     * @param id
     */
    public void deleteUser(Integer id){
        AssertUtil.isTrue(null == id || null == userMapper.queryUserById(id),"待删除记录不存在!");
        AssertUtil.isTrue(userMapper.deleteUserById(id)<1,"⽤户删除失败!");
    }
}
2.2.4.4. UserController
package com.xxx.springboot.controller;

import com.xxx.springboot.exceptions.ParamsException;
import com.xxx.springboot.po.User;
import com.xxx.springboot.po.vo.ResultInfo;
import com.xxx.springboot.service.UserService;
import org.springframework.web.bind.annotation.*;

import javax.annotation.Resource;

@RestController
public class UserController {

    @Resource
    private UserService userService;

    /**
     * 删除⽤户
     * @param userId
     * @return
     */
    @DeleteMapping("user/{userId}")
    public ResultInfo deleteUser(@PathVariable Integer userId){
        ResultInfo resultInfo = new ResultInfo();
        try {
            userService.deleteUser(userId);
        } catch (ParamsException e) {
            e.printStackTrace();
            resultInfo.setCode(e.getCode());
            resultInfo.setMsg(e.getMsg());
        }catch (Exception e) {
            e.printStackTrace();
            resultInfo.setCode(300);
            resultInfo.setMsg("记录删除失败!");
        }
        return resultInfo;
    }

}
2.2.5. 分页条件查询操作
2.2.5.1. UserQuery
package com.xxx.springboot.query;

/**
 *用户查询对象
 */
public class UserQuery {
    //分页参数
    private Integer pageNum = 1;  //当前页
    private Integer pageSize =10;  //每页显示数量

    //条件参数
    private String userName;

    public Integer getPageNum() {
        return pageNum;
    }

    public void setPageNum(Integer pageNum) {
        this.pageNum = pageNum;
    }

    public Integer getPageSize() {
        return pageSize;
    }

    public void setPageSize(Integer pageSize) {
        this.pageSize = pageSize;
    }

    public String getUserName() {
        return userName;
    }

    public void setUserName(String userName) {
        this.userName = userName;
    }
}
2.2.5.2. 接口方法定义
public interface UserMapper {
     // 通过条件,分⻚查询⽤户列表
     public List<User> selectByParams(UserQuery userQuery);
}
2.2.5.3. 映射文件配置
<?xml version="1.0" encoding="UTF-8" ?>
<!DOCTYPE mapper PUBLIC "-//mybatis.org//DTD Mapper 3.0//EN"
        "http://mybatis.org/dtd/mybatis-3-mapper.dtd">
<mapper namespace="com.xxx.springboot.dao.UserMapper">

    <select id="selectUserByParams" parameterType="com.xxx.springboot.query.UserQuery"
            resultType="com.xxx.springboot.po.User">
            select
                *
            from
                tb_user
            <where>
                <if test="null != userName and userName !=''">
                    and user_name like concat('%',#{userName},'%')
                </if>
            </where>
    </select>
</mapper>
2.2.5.4. UserService
package com.xxx.springboot.service;

import com.github.pagehelper.PageHelper;
import com.github.pagehelper.PageInfo;
import com.xxx.springboot.dao.UserMapper;
import com.xxx.springboot.po.User;
import com.xxx.springboot.query.UserQuery;
import com.xxx.springboot.utils.AssertUtil;
import org.apache.commons.lang3.StringUtils;
import org.springframework.stereotype.Service;

import javax.annotation.Resource;

@Service
public class UserService {

    @Resource
    private UserMapper userMapper;

    /**
     * 通过指定参数,分⻚查询⽤户列表
     * @param userQuery
     * @return
     */
    public PageInfo<User> queryUserByParams(UserQuery userQuery){
        PageHelper.startPage(userQuery.getPageNum(),userQuery.getPageSize());
        return new PageInfo<User>(userMapper.selectUserByParams(userQuery));
    }
}
2.2.5.5. UserController
package com.xxx.springboot.controller;

import com.github.pagehelper.PageInfo;
import com.xxx.springboot.exceptions.ParamsException;
import com.xxx.springboot.po.User;
import com.xxx.springboot.po.vo.ResultInfo;
import com.xxx.springboot.query.UserQuery;
import com.xxx.springboot.service.UserService;
import org.springframework.web.bind.annotation.*;

import javax.annotation.Resource;

@RestController
public class UserController {

    @Resource
    private UserService userService;

    /**
     * 通过指定参数,分⻚查询⽤户列表
     * @param userQuery
     * @return
     */
    @GetMapping("/user/list")
    public PageInfo<User> queryUserByParams(UserQuery userQuery){
        return userService.queryUserByParams(userQuery);
    }
}
2.3. PostMan 工具下载与使用
在企业 web 应用开发中,对服务器端接口进行测试,通常借助接口测试工具,这里使用 Postman 接口
测试工具来对后台 restful 接口进行测试。
Postman 工具下载地址 : https://www.getpostman.com/apps ,选中对应平台下载即可。
下载安装后,启动 Postman 根据后台接口地址发送响应请求即可对接口进行测试。
3.API 文档构建工具 - Swagger2
由于 Spring Boot 能够快速开发、便捷部署等特性,通常在使用 Spring Boot 构建 Restful 接口应用时考
虑到多终端的原因,这些终端会共用很多底层业务逻辑,因此我们会抽象出这样⼀层来同时服务于多个
移动端或者Web 前端。对于不同的终端公用⼀套接口 API 时,对于联调测试的时候就需要知道后端提供
的接口 API列表文档,对于服务端开发⼈员来说就需要编写接口文档,描述接口的调用地址、参数结果
等,这里借助第三方构建工具 Swagger2 来实现 API 文档生成功能。
3.1. 环境整合配置
pom.xml 依赖添加
	<!--swagger2-->
    <dependency>
      <groupId>io.springfox</groupId>
      <artifactId>springfox-swagger2</artifactId>
      <version>2.9.2</version>
    </dependency>
    <dependency>
      <groupId>io.springfox</groupId>
      <artifactId>springfox-swagger-ui</artifactId>
      <version>2.9.2</version>
    </dependency>
配置类添加
package com.xxx.springboot.config;

import org.springframework.context.annotation.Bean;
import org.springframework.context.annotation.Configuration;
import springfox.documentation.builders.ApiInfoBuilder;
import springfox.documentation.builders.PathSelectors;
import springfox.documentation.builders.RequestHandlerSelectors;
import springfox.documentation.service.ApiInfo;
import springfox.documentation.spi.DocumentationType;
import springfox.documentation.spring.web.plugins.Docket;
import springfox.documentation.swagger2.annotations.EnableSwagger2;

@Configuration
@EnableSwagger2
public class Swagger2 {
    @Bean
    public Docket createRestApi() {
        return new Docket(DocumentationType.SWAGGER_2)
                .apiInfo(apiInfo())
                .select()
                .apis(RequestHandlerSelectors.basePackage("com.xxx.springboot.controller"))
                .paths(PathSelectors.any())
                .build();
    }
    private ApiInfo apiInfo() {
        return new ApiInfoBuilder()
                .title("⽤户管理接⼝API⽂档")
                .version("1.0")
                .build();
    }
}
3.2. Swagger2 常用注解说明
3.2.1. @Api
@Api:⽤在请求的类上,说明该类的作⽤
tags="说明该类的作⽤"@Api(tags="APP⽤户注册Controller")3.2.2. @ApiOperation
@ApiOperation:"⽤在请求的⽅法上,说明⽅法的作⽤"
 	value="说明⽅法的作⽤"
notes="⽅法的备注说明"@ApiOperation(value="⽤户注册",notes="⼿机号、密码都是必填项,年龄是选填项,但必须是数字")3.2.3. @ApiImplicitParams
@ApiImplicitParams:⽤在请求的⽅法上,包含⼀组参数说明
     @ApiImplicitParam:⽤在 @ApiImplicitParams 注解中,指定⼀个请求参数的配置信息
         name:参数名
         value:参数的汉字说明、解释
         required:参数是否必须传
         paramType:参数放在哪个地⽅
             · header --> 请求参数的获取:@RequestHeader
             · query --> 请求参数的获取:@RequestParam
             · path(⽤于restful接⼝)--> 请求参数的获取:@PathVariable
             · body(不常⽤)
             · form(不常⽤)
         dataType:参数类型,默认String,其它值dataType="Integer"
         defaultValue:参数的默认值
@ApiImplicitParams({
@ApiImplicitParam(name="mobile",value="⼿机号",required=true,paramType="form"),
@ApiImplicitParam(name="password",value="密码",required=true,paramType="form"),
@ApiImplicitParam(name="age",value="龄",required=true,paramType="form",dataType="Integer")
})3.2.4. @ApiResponses
@ApiResponses:⽤于请求的⽅法上,表示⼀组响应
     @ApiResponse:⽤在@ApiResponses中,⼀般⽤于表达⼀个错误的响应信息
             code:数字,例如400
             message:信息,例如"请求参数没填好"
             response:抛出异常的类
@ApiOperation(value = "select请求", notes = "多个参数,多种的查询参数类型")
@ApiResponses({
@ApiResponse(code=400, message="请求参数没填好"),
@ApiResponse(code=404, message="请求路径没有或⻚⾯跳转路径不对")
})3.2.5. @ApiModel
@ApiModel:⽤于响应类上,表示⼀个返回响应数据的信息
     (这种⼀般⽤在post创建的时候,使⽤@RequestBody这样的场景,
     请求参数⽆法使⽤@ApiImplicitParam注解进⾏描述的时候)
     @ApiModelProperty:⽤在属性上,描述响应类的属性
@ApiModel(description= "返回响应数据")
public class RestMessage implements Serializable{
@ApiModelProperty(value = "是否成功")
private boolean success=true;
@ApiModelProperty(value = "返回对象")
private Object data;
@ApiModelProperty(value = "错误编号")
private Integer errCode;
@ApiModelProperty(value = "错误信息")
private String message;
/* getter/setter */
}
3.3. 用户模块注解配置
3.3.1. Controller使用注解
package com.xxx.springboot.controller;
import com.github.pagehelper.PageInfo;
import com.xxx.springboot.exceptions.ParamsException;
import com.xxx.springboot.po.User;
import com.xxx.springboot.po.vo.ResultInfo;
import com.xxx.springboot.query.UserQuery;
import com.xxx.springboot.service.UserService;
import io.swagger.annotations.Api;
import io.swagger.annotations.ApiImplicitParam;
import io.swagger.annotations.ApiOperation;
import io.swagger.annotations.ApiResponse;
import org.springframework.web.bind.annotation.*;
import javax.annotation.Resource;
/**
* Swagger2的使用
* @Api:⽤在请求的类上,说明该类的作⽤
* tags="说明该类的作⽤"
* @ApiOperation:"⽤在请求的⽅法上,说明⽅法的作⽤"
* value="说明⽅法的作⽤"
* notes="⽅法的备注说明"
* @ApiImplicitParams:⽤在请求的⽅法上,包含⼀组参数说明
* @ApiImplicitParam:⽤在 @ApiImplicitParams 注解中,指定⼀个请求参数的配置信息
* name:参数名
* value:参数的汉字说明、解释
* required:参数是否必须传
* paramType:参数放在哪个地⽅
* header --> 请求参数的获取:@RequestHeader
* query --> 请求参数的获取:@RequestParam
* path(⽤于restful接⼝)--> 请求参数的获取:@PathVariable
* body(不常⽤)
* form(不常⽤)
* dataType:参数类型,默认String,其它值dataType="Integer"
* defaultValue:参数的默认值
*
* @ApiResponses:⽤于请求的⽅法上,表示⼀组响应
* @ApiResponse:⽤在@ApiResponses中,⼀般⽤于表达⼀个错误的响应信息
* code:数字,例如400
* message:信息,例如"请求参数没填好"
* response:抛出异常的类
* @ApiModel:⽤于响应类上,表示⼀个返回响应数据的信息
* (这种⼀般⽤在post创建的时候,使⽤@RequestBody这样的场景,
* 请求参数⽆法使⽤@ApiImplicitParam注解进⾏描述的时候)
* @ApiModelProperty:⽤在属性上,描述响应类的属性
*/
@Api(tags = "用户模块 UserController")
@RestController
public class UserController {
@Resource
private UserService userService;
/**
* 根据用户名查询用户对象
* @param userName
* @return
*/
@ApiOperation(value = "根据用户名查询用户对象",notes = "用户名不能为空")
@ApiImplicitParam(name = "userName",value = "用户名称",required = true,paramType = "path")
@ApiResponse(code =404,message = "路径不正确或访问资源未找到")
@GetMapping("/user/{userName}")
public User queryUserByUserName(@PathVariable String userName){
return userService.queryUserByUserName(userName);
}
/**
* 根据⽤户ID查询⽤户对象
* @param userId
* @return
*/
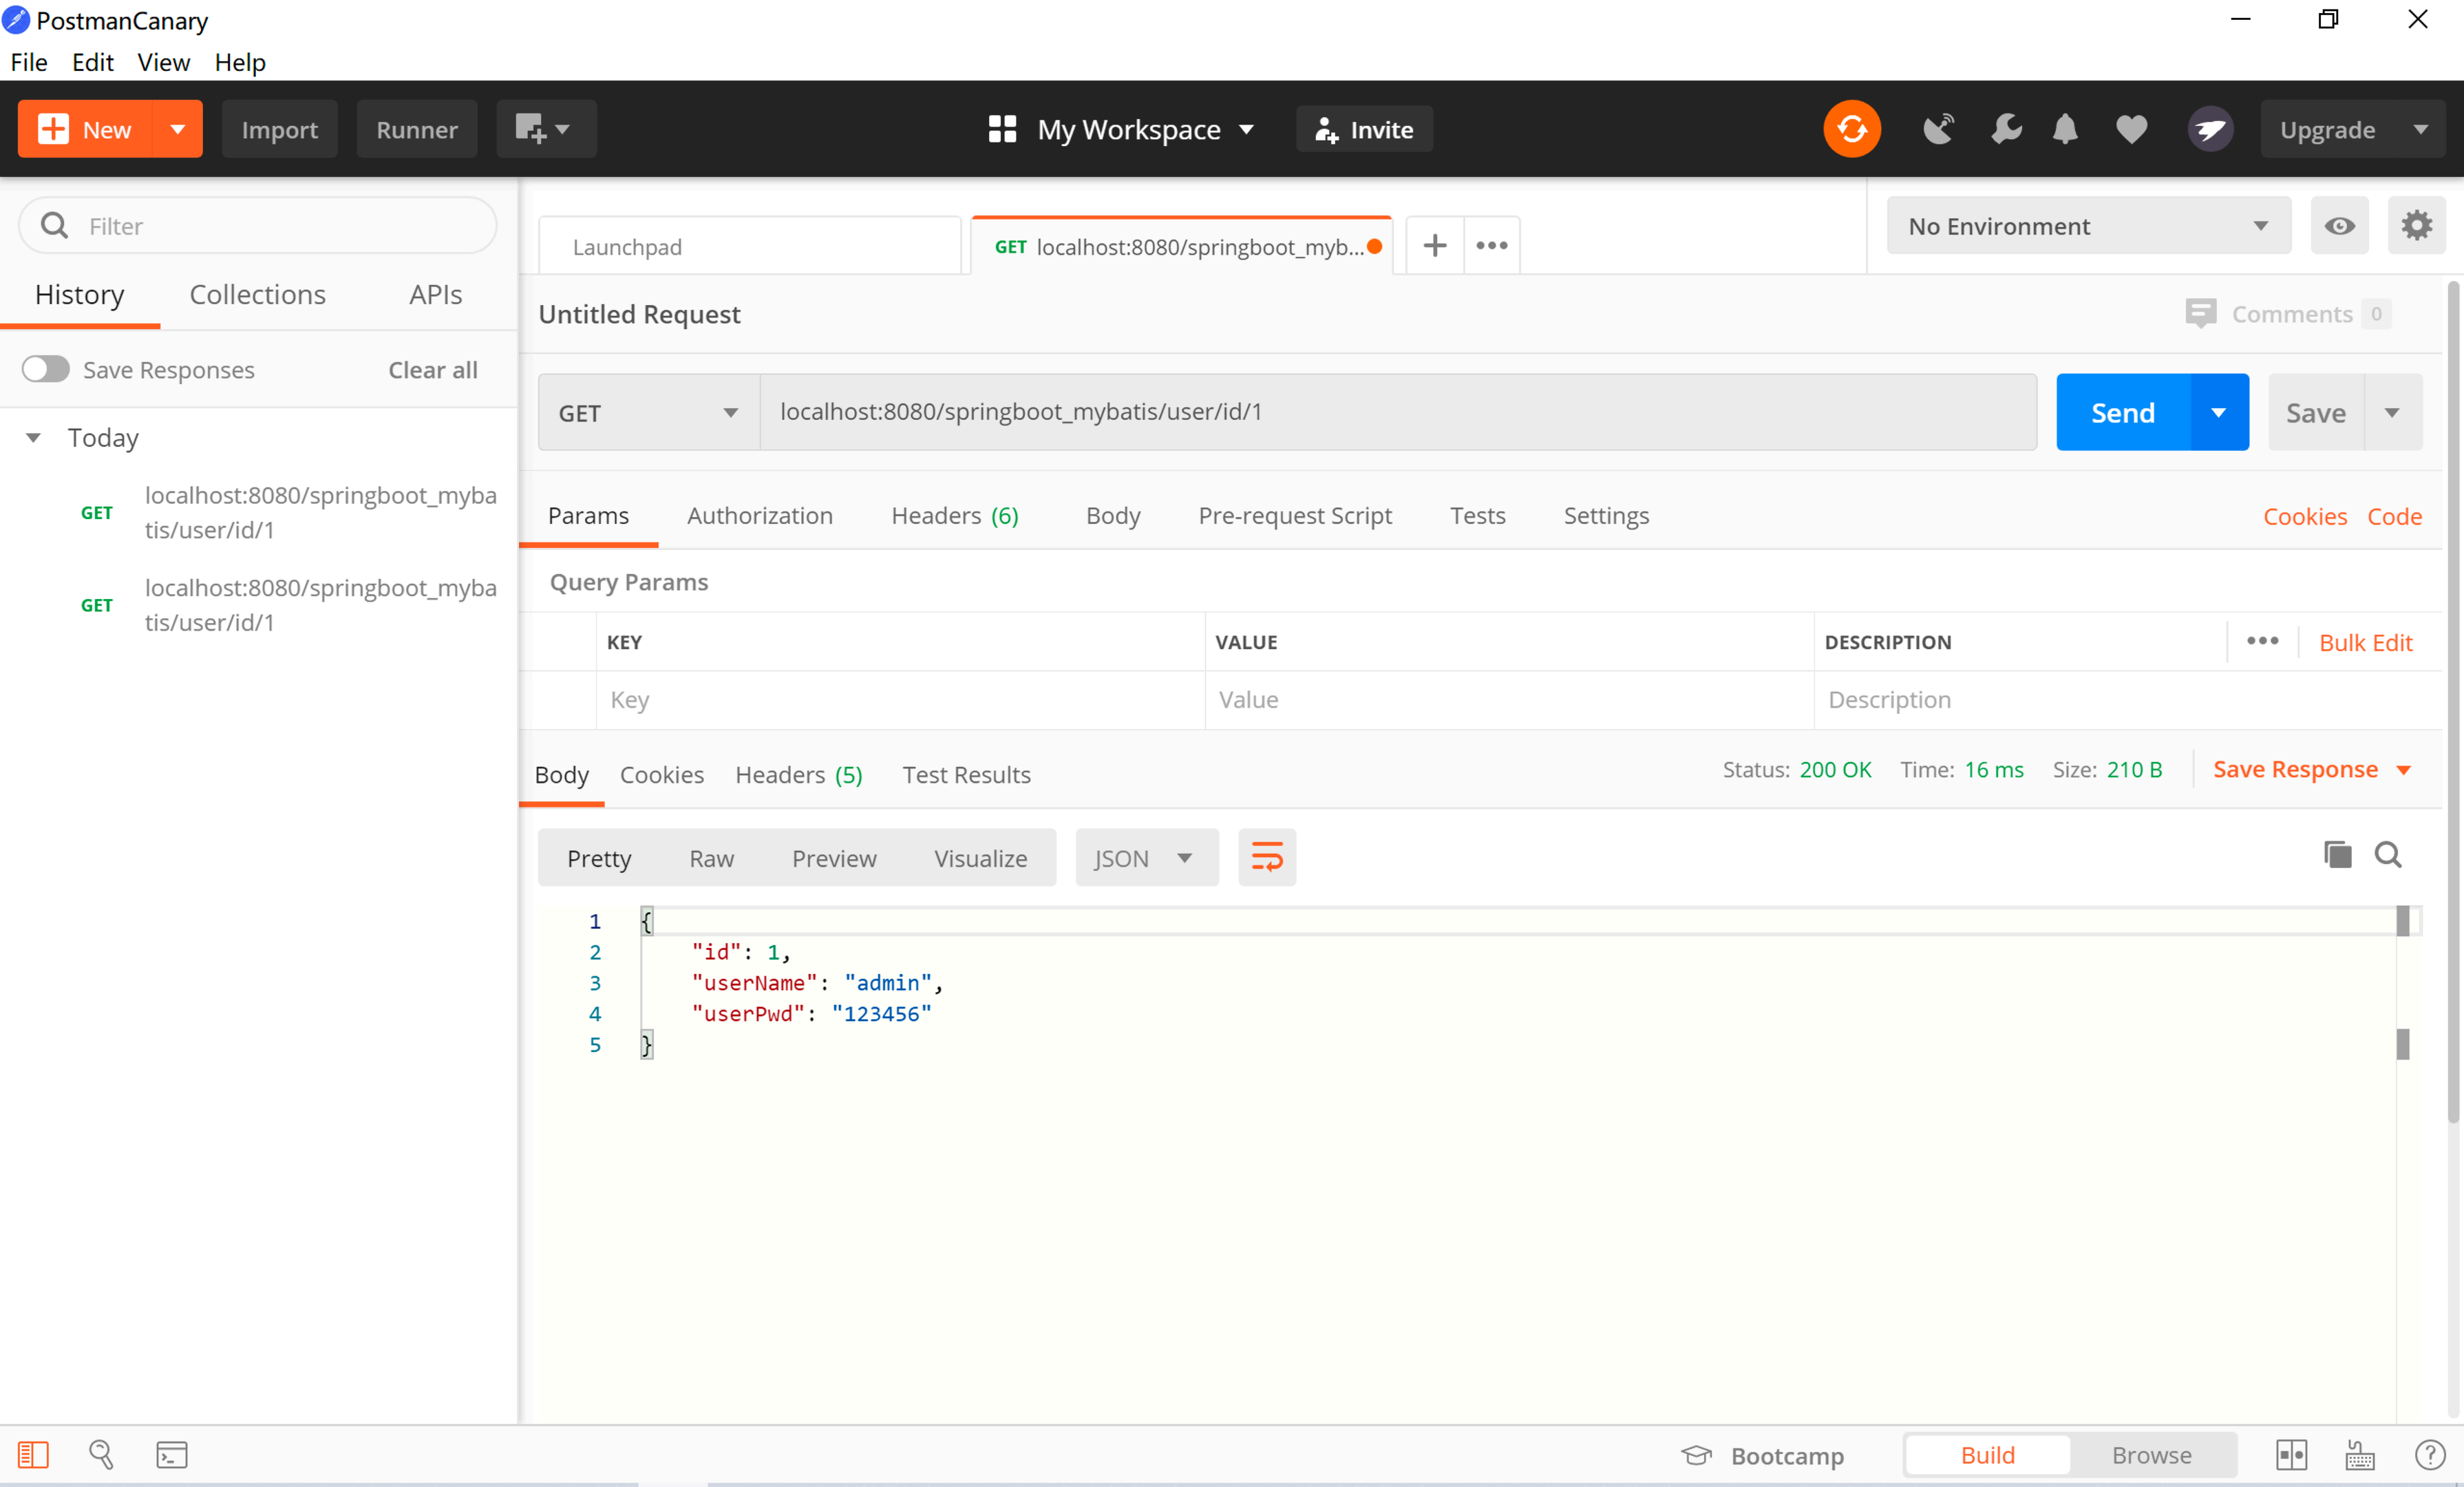
@ApiOperation(value = "根据用户id查询用户对象")
@ApiImplicitParam(name = "userId",value = "用户Id",required = true,paramType = "path")
@GetMapping("/user/id/{userId}")
public User queryUserByUserId(@PathVariable Integer userId){
return userService.queryUserById(userId);
}
/**
* 添加⽤户
* @param user
* @return
*/
@ApiOperation(value = "添加用户")
@ApiImplicitParam(name = "user",value = "用户实体类")
@PutMapping("/user")
public ResultInfo saveUser(@RequestBody User user){
ResultInfo resultInfo = new ResultInfo();
try {
userService.saveUser(user);
} catch (ParamsException e) {
resultInfo.setCode(e.getCode());
resultInfo.setMsg(e.getMsg());
e.printStackTrace();
}catch (Exception e) {
resultInfo.setCode(300);
resultInfo.setMsg("记录添加失败!");
e.printStackTrace();
}
return resultInfo;
}
/**
* 修改⽤户
* @param user
* @return
*/
@ApiOperation(value = "修改用户")
@ApiImplicitParam(name = "user",value = "用户实体类")
@PostMapping("/user")
public ResultInfo updateUser(@RequestBody User user){
ResultInfo resultInfo = new ResultInfo();
try {
userService.updateUser(user);
} catch (ParamsException e) {
e.printStackTrace();
resultInfo.setCode(e.getCode());
resultInfo.setMsg(e.getMsg());
}catch (Exception e) {
e.printStackTrace();
resultInfo.setCode(300);
resultInfo.setMsg("记录更新失败!");
}
return resultInfo;
}
/**
* 删除⽤户
* @param userId
* @return
*/
@ApiOperation(value = "删除用户")
@ApiImplicitParam(name = "userId",value = "用户Id",required = true,paramType = "path")
@DeleteMapping("user/{userId}")
public ResultInfo deleteUser(@PathVariable Integer userId){
ResultInfo resultInfo = new ResultInfo();
try {
userService.deleteUser(userId);
} catch (ParamsException e) {
e.printStackTrace();
resultInfo.setCode(e.getCode());
resultInfo.setMsg(e.getMsg());
}catch (Exception e) {
e.printStackTrace();
resultInfo.setCode(300);
resultInfo.setMsg("记录删除失败!");
}
return resultInfo;
}
/**
* 通过指定参数,分⻚查询⽤户列表
* @param userQuery
* @return
*/
@ApiOperation(value = "多条件分页查询用户列表")
@GetMapping("/user/list")
@ApiImplicitParam(name = "userQuery",value = "用户查询对象")
public PageInfo<User> queryUserByParams(UserQuery userQuery){
return userService.queryUserByParams(userQuery);
}
}3.3.2. JavaBean 使用注解
User.java
package com.xxx.springboot.po;

import io.swagger.annotations.ApiModel;
import io.swagger.annotations.ApiModelProperty;

@ApiModel(description = "用户实体类")
public class User {
    @ApiModelProperty(value = "用户Id",example = "0")
    private Integer id;
    @ApiModelProperty(value = "用户名称")
    private String userName;
    @ApiModelProperty(value = "用户密码")
    private String userPwd;

    public Integer getId() {
        return id;
    }

    public void setId(Integer id) {
        this.id = id;
    }

    public String getUserName() {
        return userName;
    }

    public void setUserName(String userName) {
        this.userName = userName;
    }

    public String getUserPwd() {
        return userPwd;
    }

    public void setUserPwd(String userPwd) {
        this.userPwd = userPwd;
    }
}
UserQuery.java
package com.xxx.springboot.query;

import io.swagger.annotations.ApiModel;
import io.swagger.annotations.ApiModelProperty;

/**
 *用户查询对象
 */
@ApiModel(description = "用户模块条件查询对象")
public class UserQuery {
    //分页参数
    @ApiModelProperty(value = "当前页码数",example = "1")
    private Integer pageNum = 1;  //当前页
    @ApiModelProperty(value = "每页显示的数量",example = "10")
    private Integer pageSize =10;  //每页显示数量

    //条件参数
    @ApiModelProperty(value = "用户名")
    private String userName;

    public Integer getPageNum() {
        return pageNum;
    }

    public void setPageNum(Integer pageNum) {
        this.pageNum = pageNum;
    }

    public Integer getPageSize() {
        return pageSize;
    }

    public void setPageSize(Integer pageSize) {
        this.pageSize = pageSize;
    }

    public String getUserName() {
        return userName;
    }

    public void setUserName(String userName) {
        this.userName = userName;
    }
}
ResultInfo.java
package com.xxx.springboot.po.vo;


import io.swagger.annotations.ApiModel;
import io.swagger.annotations.ApiModelProperty;

@ApiModel(description = "响应结果对象")
public class ResultInfo {

    @ApiModelProperty(value = "响应状态码",example = "200")
    private Integer code = 200;
    @ApiModelProperty(value = "响应消息")
    private String msg = "操作成功";
    @ApiModelProperty(value = "响应结果对象")
    private Object result;

    public Integer getCode() {
        return code;
    }
    public void setCode(Integer code) {
        this.code = code;
    }
    public String getMsg() {
        return msg;
    }
    public void setMsg(String msg) {
        this.msg = msg;
    }
    public Object getResult() {
        return result;
    }
    public void setResult(Object result) {
        this.result = result;
    }
}
3.4. Swagger2 接口文档访问
启动工程,浏览器访问 :http://localhost:8080/springboot_mybatis/swagger-ui.html


4.SpringBoot 应用热部署
4.1. 什么是热部署?
热部署,就是在应用正在运行的时候升级软件(增加业务/修改bug),却不需要重新启动应用。
大家都知道在项目开发过程中,常常会改动页面数据或者修改数据结构,为了显示改动效果,往往需
要重启应用查看改变效果,其实就是重新编译生成了新的 Class 文件,这个文件里记录着和代码等对应
的各种信息,然后 Class 文件将被虚拟机的 ClassLoader 加载。
而热部署正是利用了这个特点,它监听到如果有 Class 文件改动了,就会创建⼀个新的 ClaassLoader
进行加载该文件,经过⼀系列的过程,最终将结果呈现在我们眼前,Spring Boot 通过配置 DevTools 工
具来达到热部署效果。
在原理上是使用了两个 ClassLoader,⼀个 ClassLoader 加载那些不会改变的类(第三⽅ Jar 包),另
⼀个ClassLoader 加载会更改的类,称为 restart ClassLoader,这样在有代码更改的时候,原来的 restart
ClassLoader 被丢弃,重新创建⼀个 restart ClassLoader,由于需要加载的类相比较少,所以实现了较快
的重启时间。
4.2. 热部署环境配置与测试
4.2.1. 配置 DevTools 环境
修改 Pom 文件,添加 DevTools 依赖
<!-- DevTools 的坐标 -->
    <dependency>
      <groupId>org.springframework.boot</groupId>
      <artifactId>spring-boot-devtools</artifactId>
      <!--当前这个项⽬被继承之后,这个不向下传递-->
      <optional>true</optional>
    </dependency>
同时在 plugin 中添加 devtools 生效标志
<plugin>
        <groupId>org.springframework.boot</groupId>
        <artifactId>spring-boot-maven-plugin</artifactId>
        <configuration>
          <fork>true</fork><!--如果没有改配置,热部署的devtools不生效-->
        </configuration>
</plugin>
devtools 可以实现页面热部署(即页面修改后会立即生效,这个可以直接在 application.properties 文
件中配置 spring.thymeleaf.cache=false 来实现),实现类文件热部署(类文件修改后不会立即生效),
实现对属性文件的热部署。即 devtools 会监听 classpath 下的文件变动,并且会立即重启应用(发生在
保存时机),注意:因为其采用的虚拟机机制,该项重启是很快的。配置了后在修改 java 文件后也就支
持了热启动,不过这种方式是属于项目重启(速度比较快的项目重启),会清空 session 中的值,也就
是如果有用户登陆的话,项目重启后需要重新登陆。
默认情况下,/META-INF/maven,/META-INF/resources,/resources,/static,/templates,/public 这些
文件夹下的文件修改不会使应用重启,但是会重新加载( devtools 内嵌了⼀个 LiveReload server,当资
源发生改变时,浏览器刷新)
4.2.2. 全局配置文件配置
在 application.yml 中配置 spring.devtools.restart.enabled=false,此时 restart 类加载器还会初始化,但
不会监视文件更新。
spring:
  ##热部署配置
  devtools:
    restart:
      enabled: true
      #设置重启的⽬录,添加⽬录的⽂件需要restart
      additional-paths: src/main/java
      #解决项⽬⾃动重新编译后接⼝报404的问题
      poll-interval: 3000
      quiet-period: 1000
4.2.3. IDEA 配置
当我们修改了 Java 类后,IDEA 默认是不自动编译的,而 spring-boot-devtools 又是监测 classpath 下的
文件发生变化才会重启应用,所以需要设置 IDEA 的自动编译。
-
自动编译配置
File -> Settings -> Compiler -> Build Project automatically

-
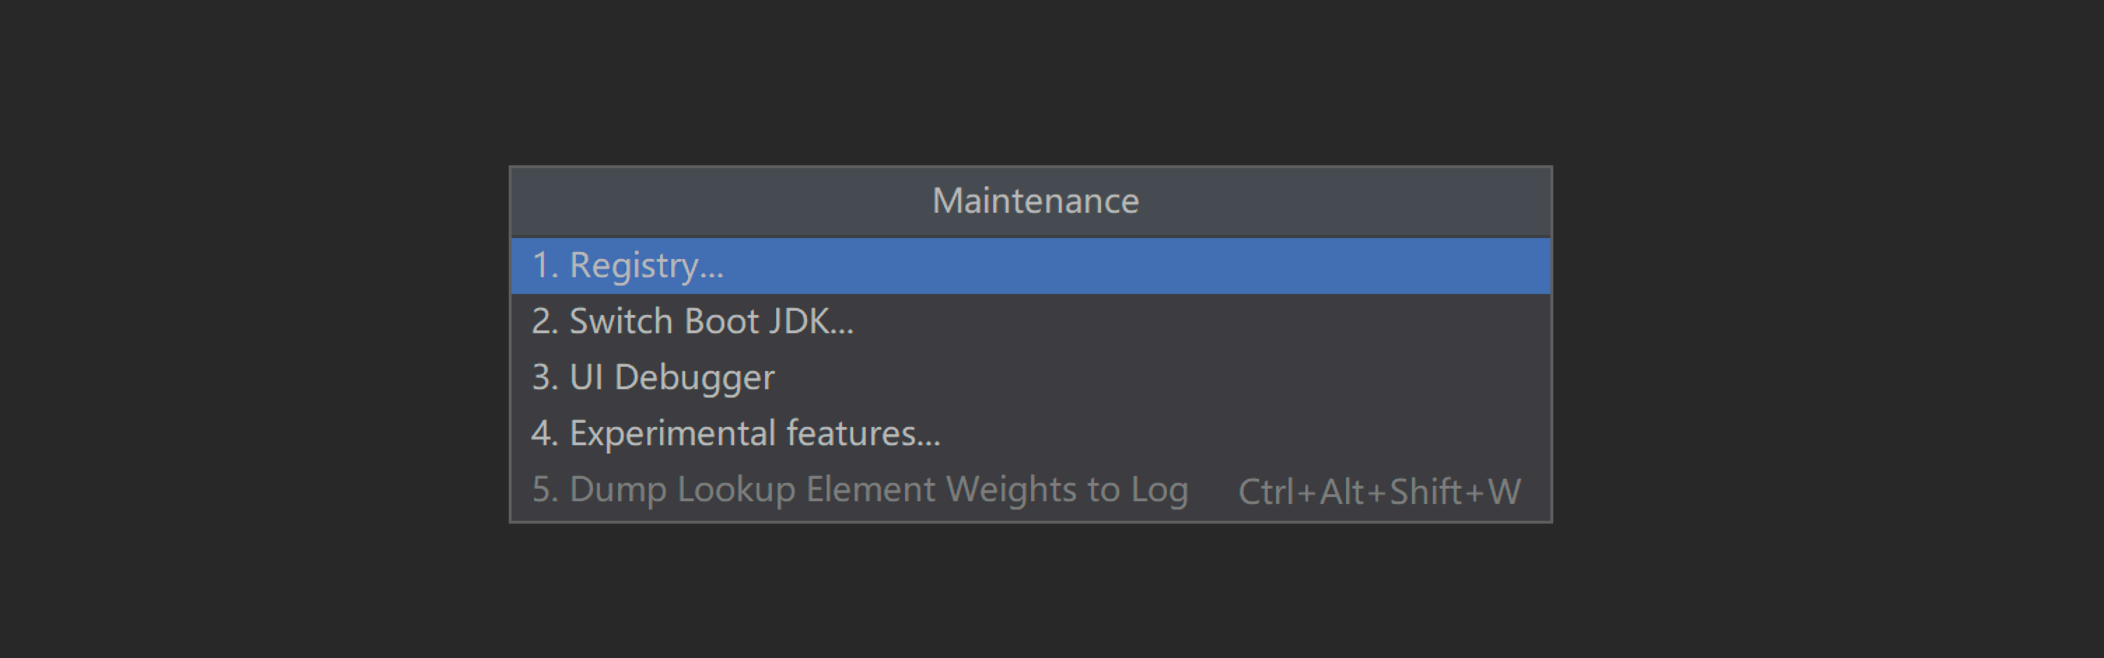
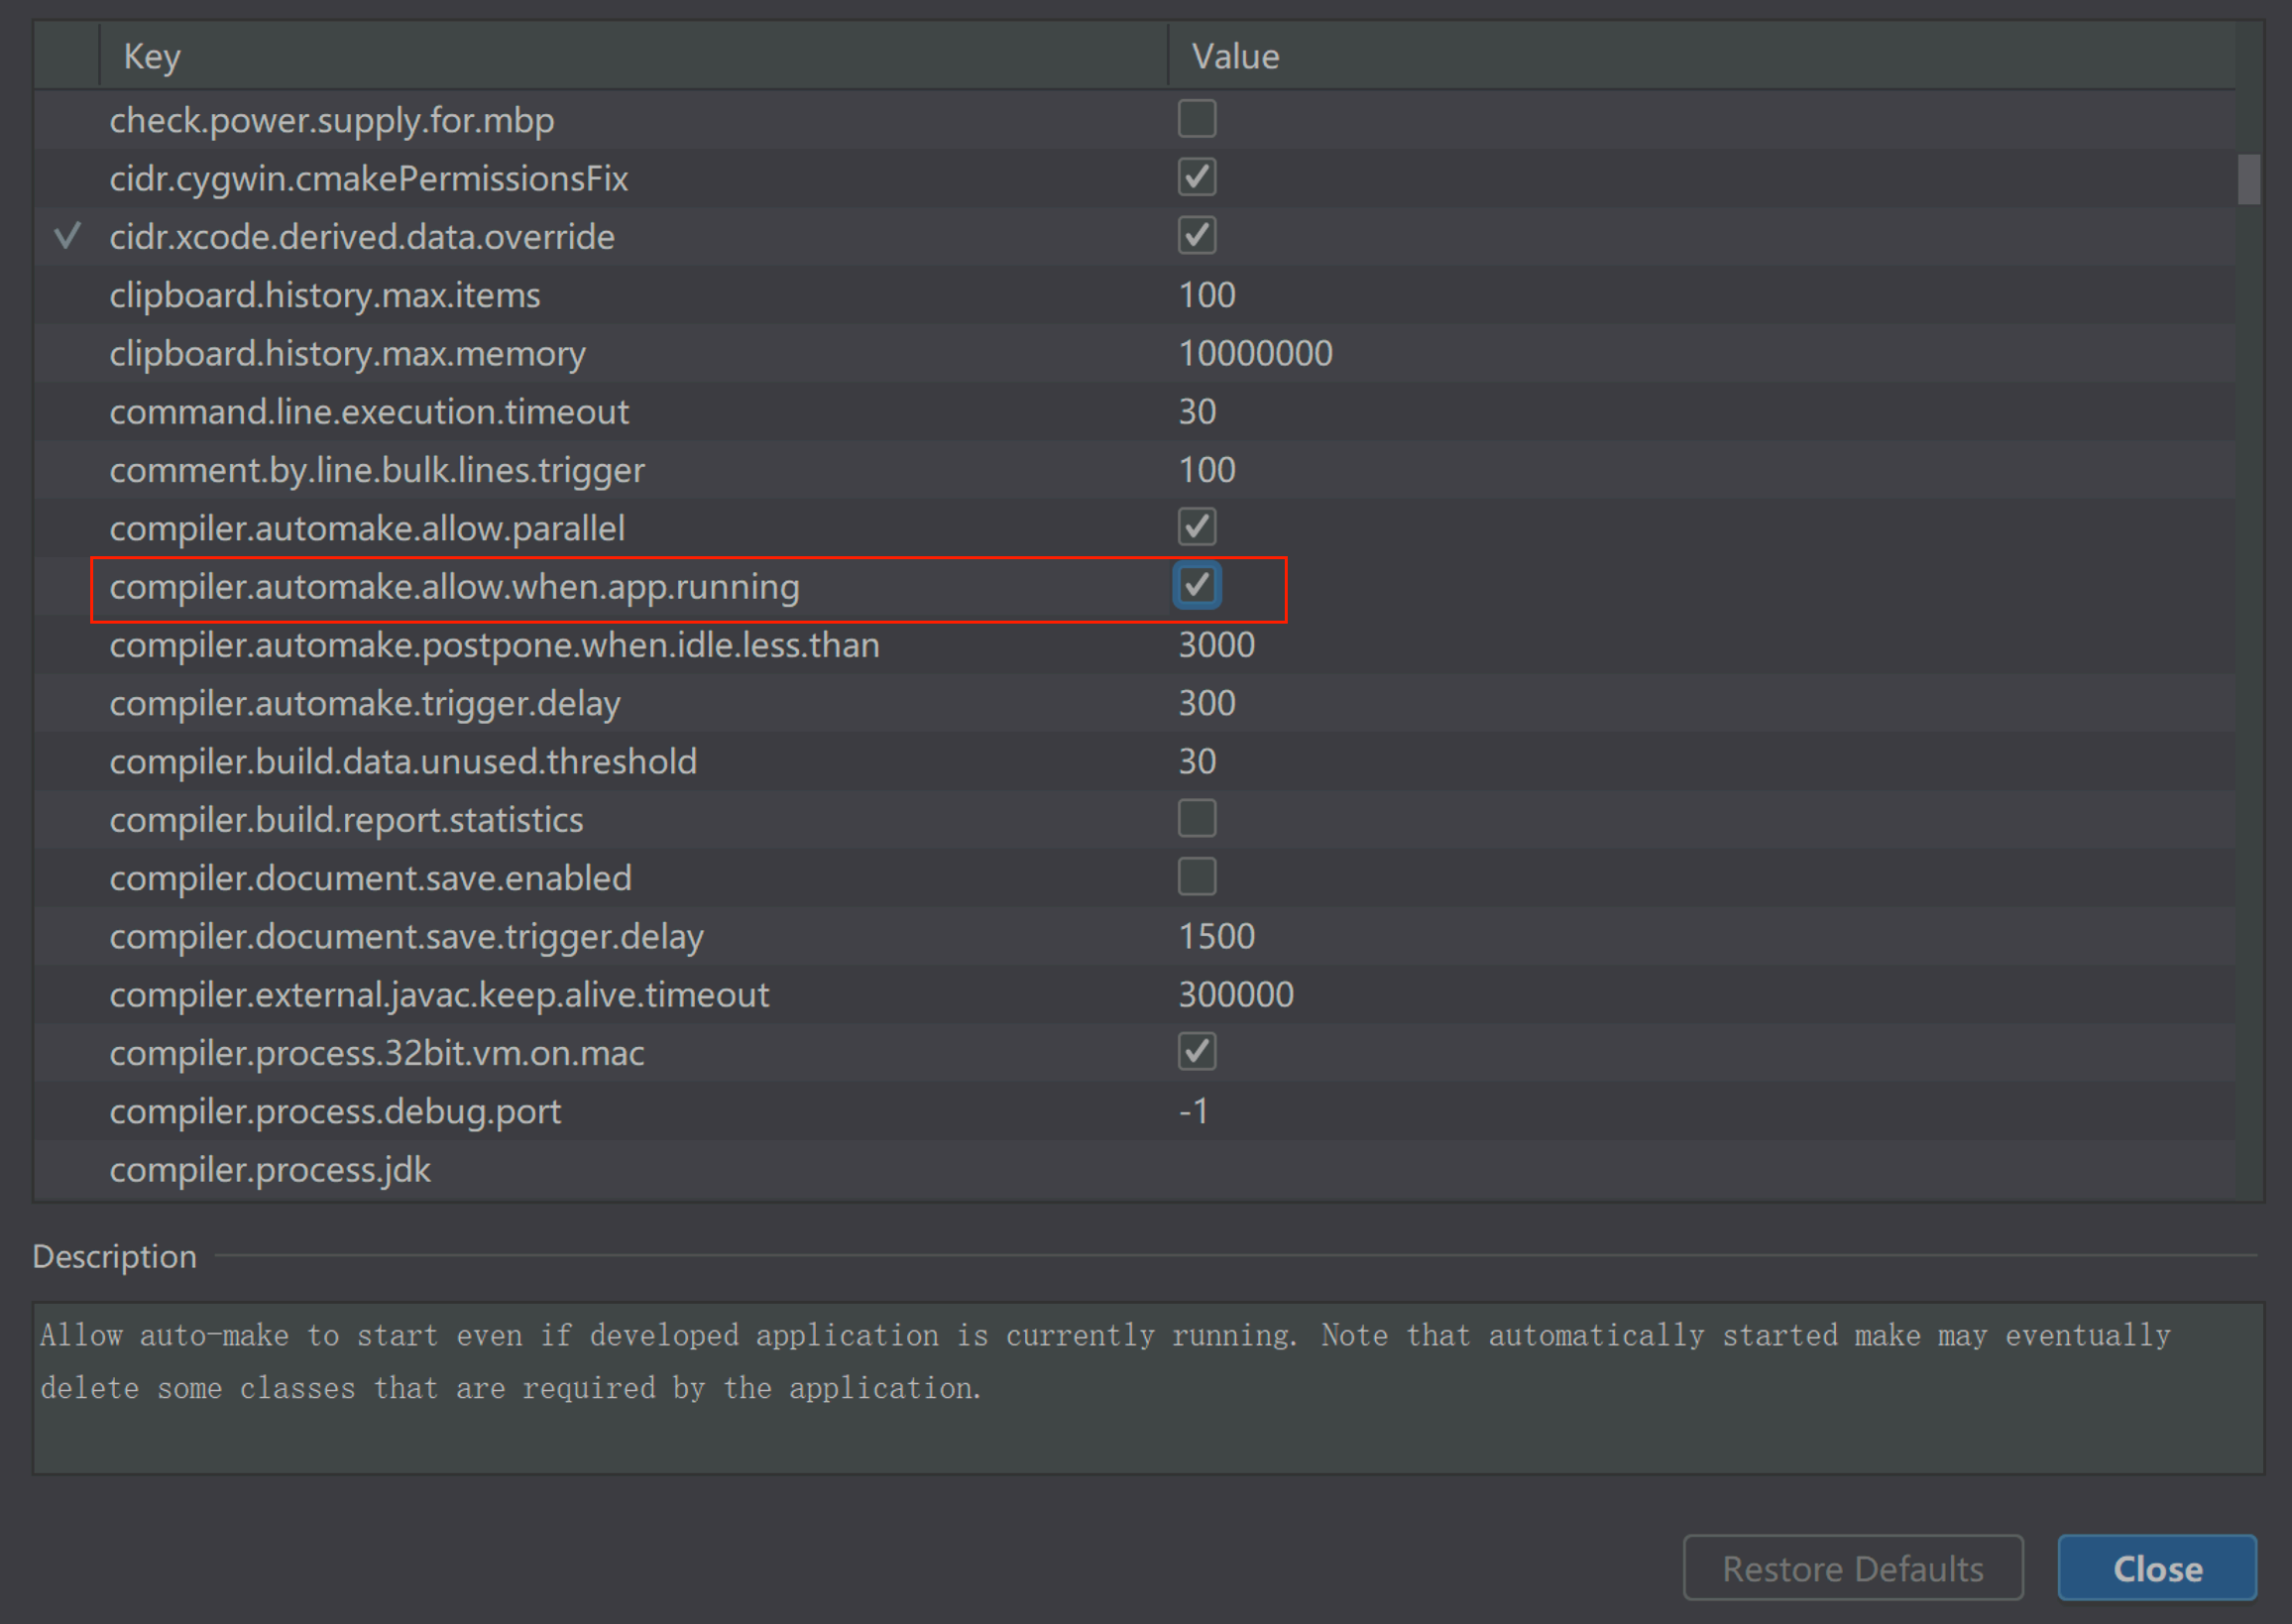
Registry 属性修改
ctrl + shift + alt + /,选择Registry,勾上 Compiler autoMake allow when app running
4.2.4. 热部署效果测试
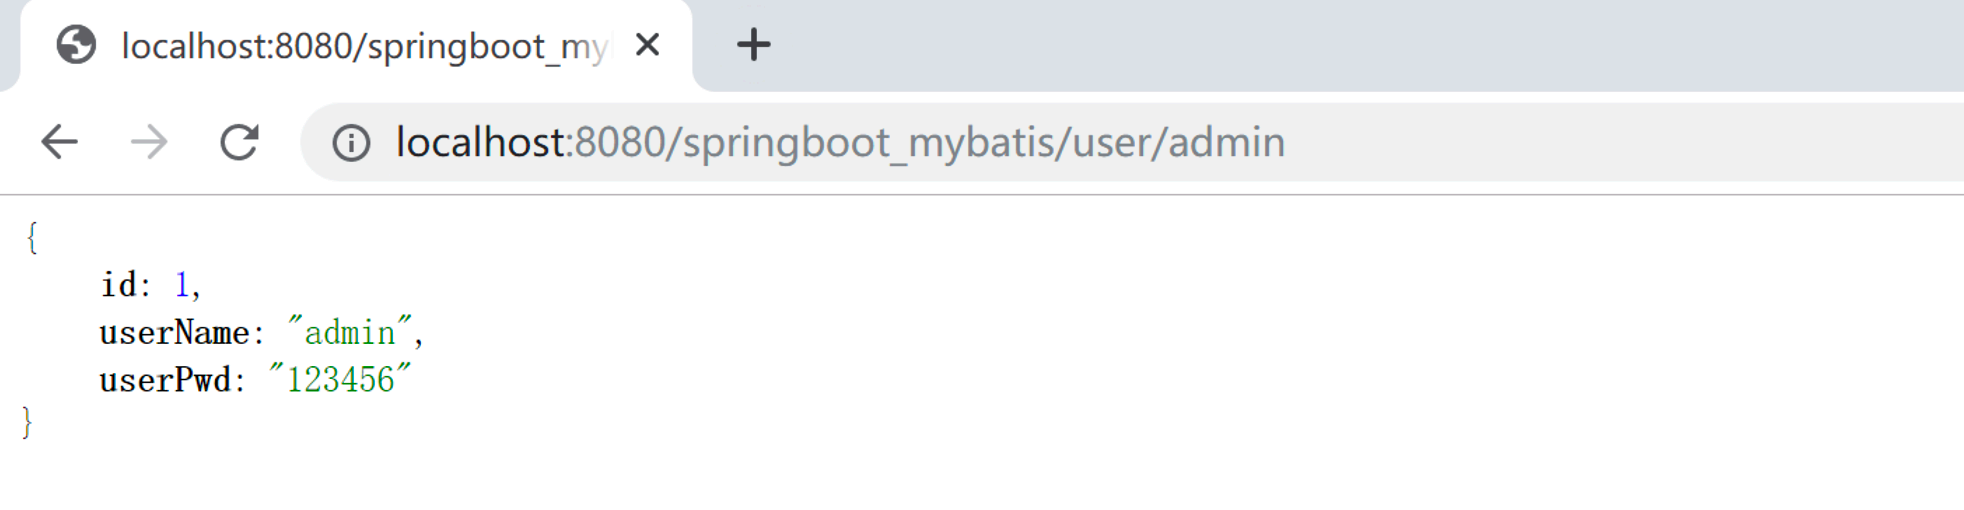
第⼀次访问 user/{userName} 接口
 @Resource
    private UserService userService;

    /**
     * 根据用户名查询用户对象
     * @param userName
     * @return
     */
    @ApiOperation(value = "根据用户名查询用户对象",notes = "用户名不能为空")
    @ApiImplicitParam(name = "userName",value = "用户名称",required = true,paramType = "path")
    @ApiResponse(code =404,message = "路径不正确或访问资源未找到")
    @GetMapping("/user/{userName}")
    public User queryUserByUserName(@PathVariable String userName){
        return userService.queryUserByUserName(userName);
    }

-
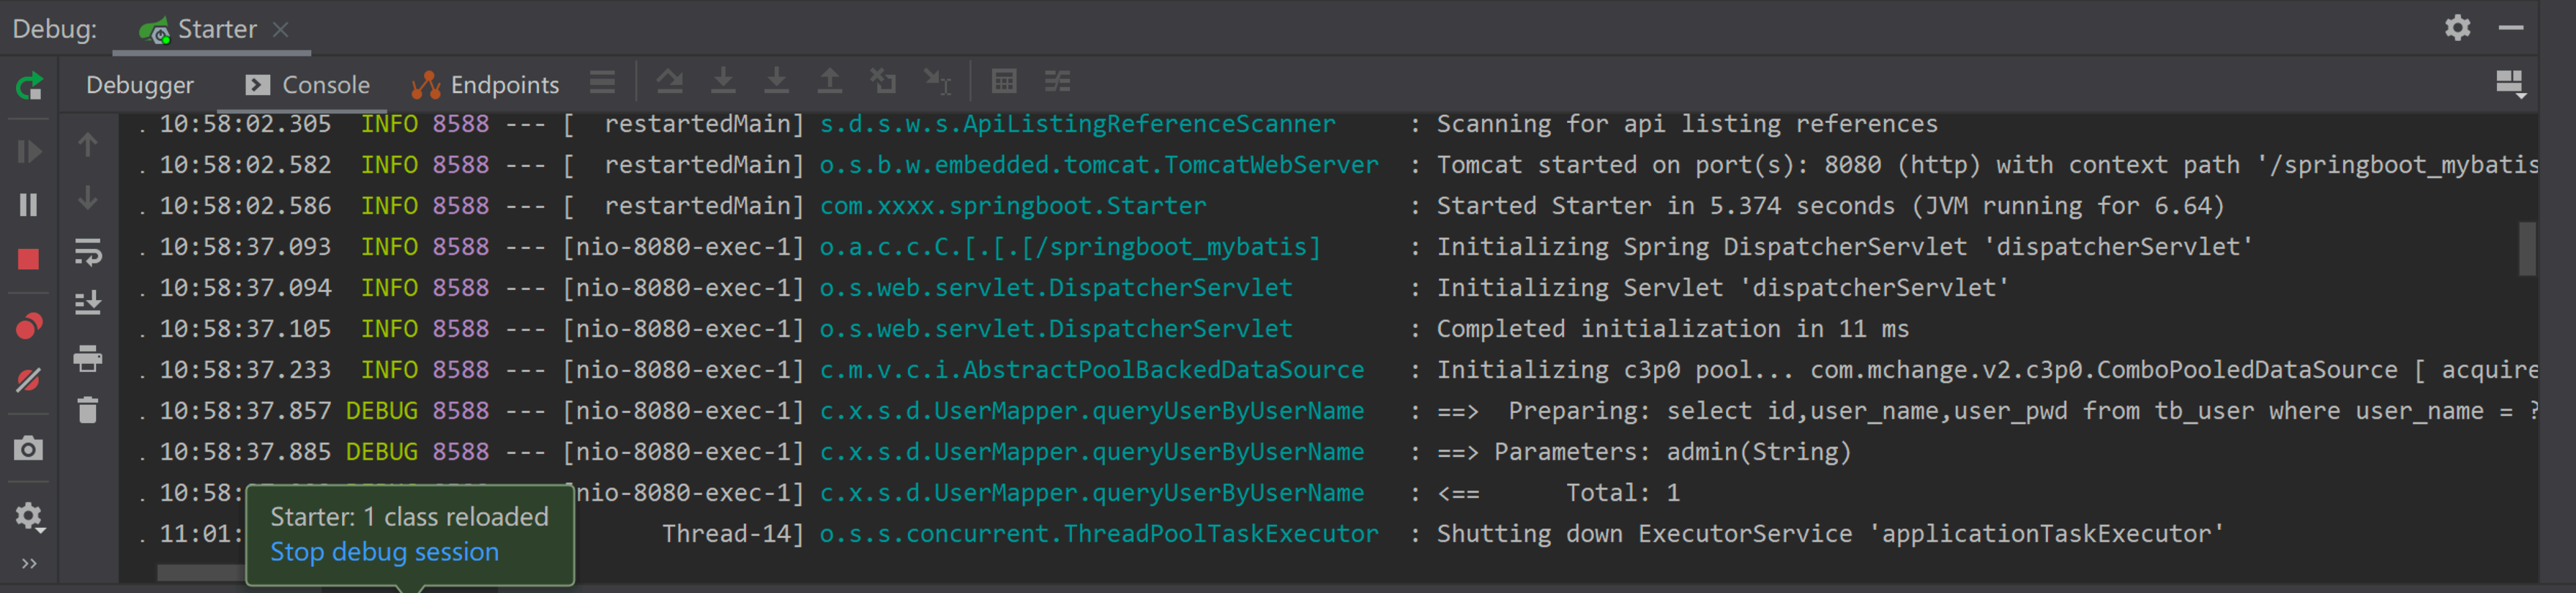
修改接口代码
控制台打印接收的 userName 参数,ctrl+f9 键重新编译,浏览器访问
@GetMapping("user/{userName}")
@ApiOperation(value = "根据⽤户名查询⽤户记录")
@ApiImplicitParam(name = "userName",value = "查询参数",required = true,paramType ="path")
public User queryUserByUserName(@PathVariable String userName){
     System.out.println("查询参数 --> userName:"+userName);
     return userService.queryUserByUserName(userName);
}
5.SpringBoot 单元测试
做过 web 项目开发的对于单元测试都并不陌生了,通过它能够快速检测业务代码功能的正确与否,
SpringBoot 框架对单元测试也提供了良好的支持,来看 SpringBoot 应用中单元测试的使用。
5.1. pom.xml 测试依赖添加
<!--单元测试-->
    <dependency>
      <groupId>org.springframework.boot</groupId>
      <artifactId>spring-boot-starter-test</artifactId>
    </dependency>
5.2. Service业务方法测试
这里以 UserService 为例,src/test/java 目录下添加测试包 com.xxxx.sprinboot.service 定义测试类代码如下 :
package com.xxx.springboot.service;

import com.github.pagehelper.PageInfo;
import com.xxx.springboot.Starter;
import com.xxx.springboot.po.User;
import com.xxx.springboot.query.UserQuery;
import org.junit.After;
import org.junit.Before;
import org.junit.Test;
import org.junit.runner.RunWith;
import org.slf4j.Logger;
import org.slf4j.LoggerFactory;
import org.springframework.boot.test.context.SpringBootTest;
import org.springframework.test.context.junit4.SpringRunner;

import javax.annotation.Resource;
import java.util.List;


@RunWith(SpringRunner.class)
@SpringBootTest(classes = {Starter.class})
public class TestUserService {

    private Logger logger = LoggerFactory.getLogger(TestUserService.class);

    @Resource
    private UserService userService;

    @Before
    public void before(){
        logger.info("单元测试开始...");
    }
    @Test
    public void test01(){
        User user = userService.queryUserById(1);
        logger.info("⽤户记录:{}", user.toString());
    }

    @Test
    public void test02(){
        UserQuery userQuery = new UserQuery();
        PageInfo<User> pageInfo = userService.queryUserByParams(userQuery);
        logger.info(pageInfo.toString());
    }

    @After
    public void after(){
        logger.info("单元测试结束...");
    }
}
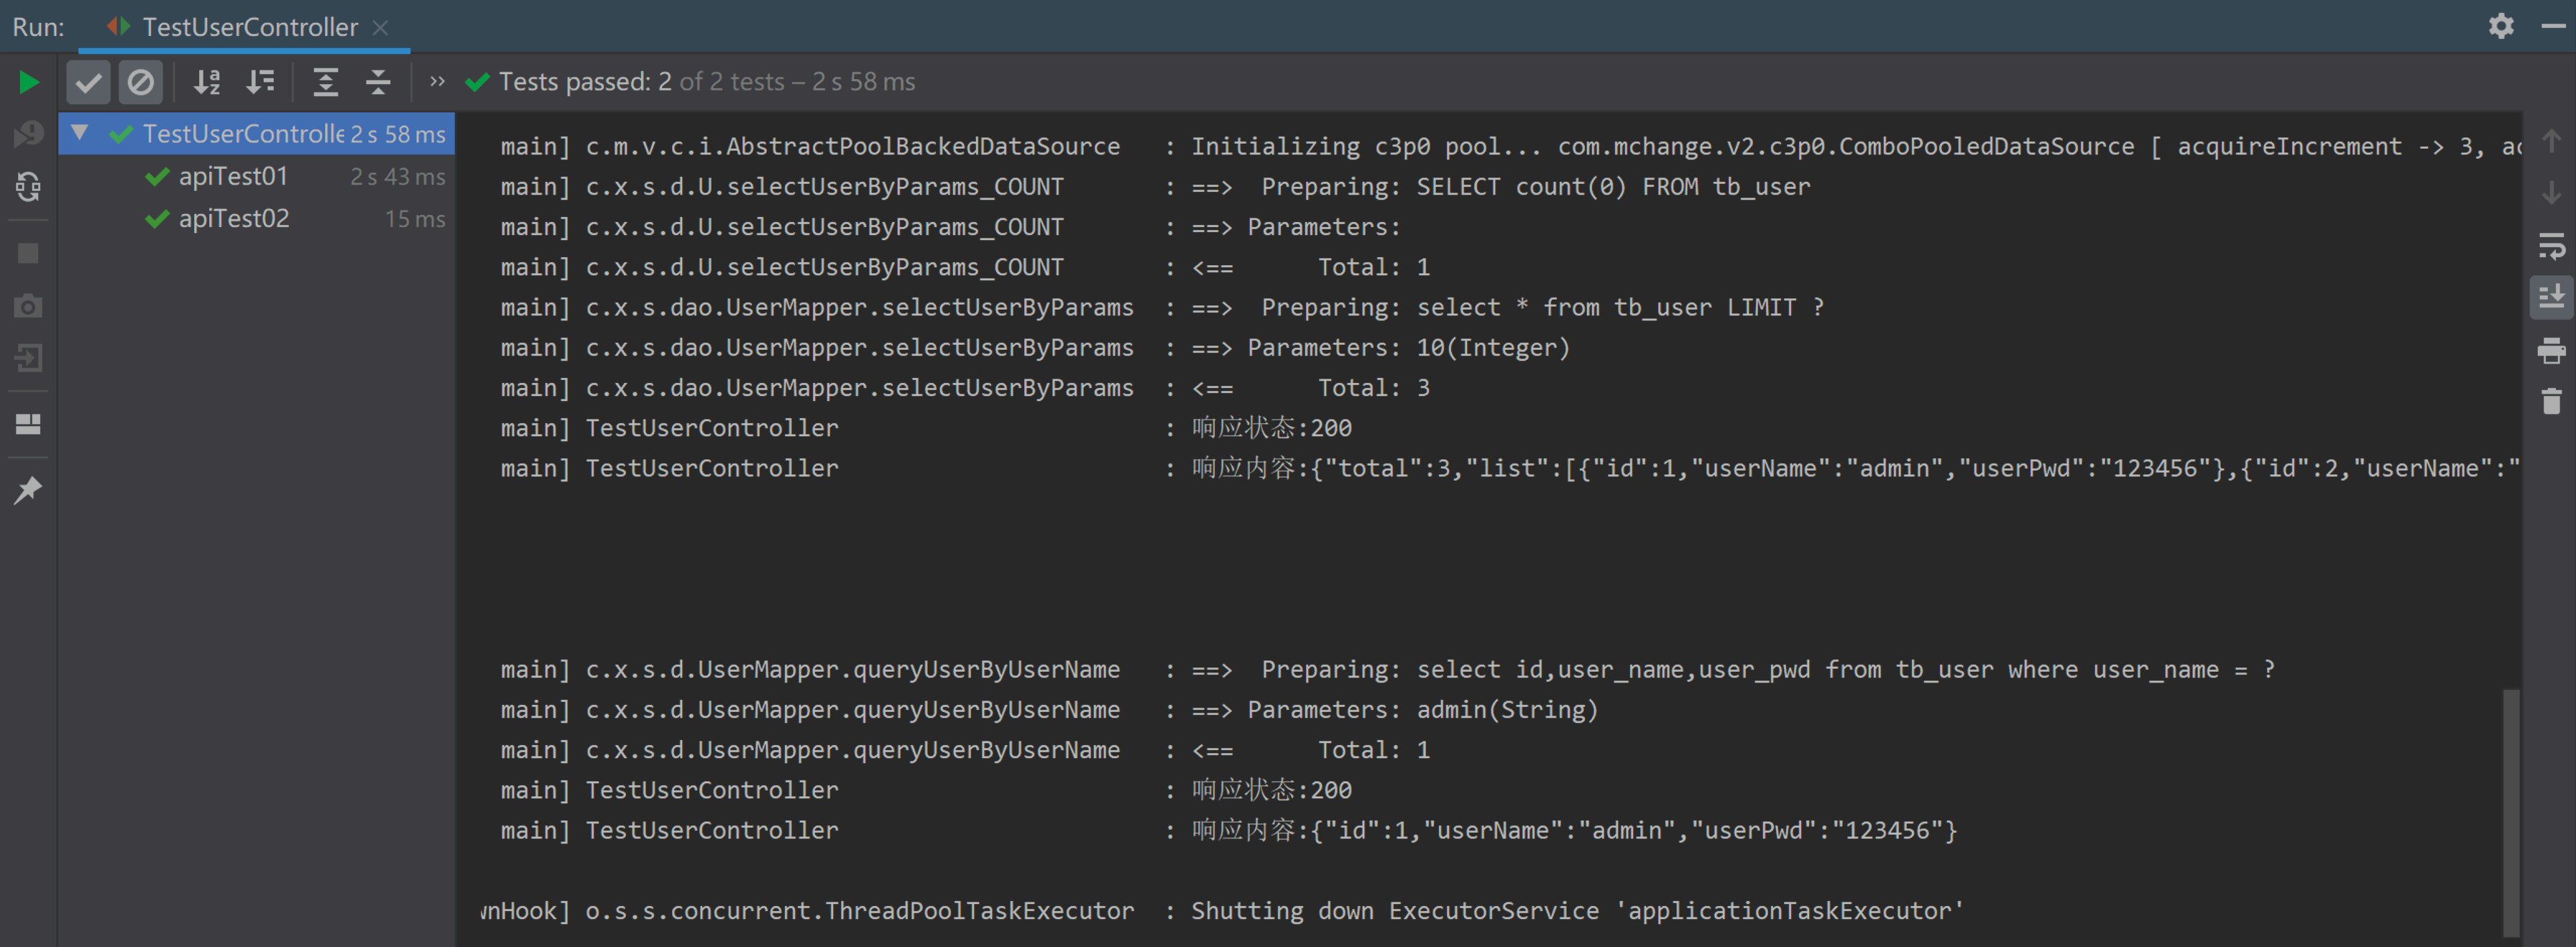
5.3. 控制层接口方法测试
视图层代码使用 MockMvc 进⾏测试,这里以 UserCntroller 为例,src/test/java 目录下添加测试包
com.xxxx.sprinboot.controller 定义测试类代码如下:
package com.xxx.springboot.controller;
import com.xxx.springboot.Starter;
import org.junit.Test;
import org.junit.runner.RunWith;
import org.slf4j.Logger;
import org.slf4j.LoggerFactory;
import org.springframework.beans.factory.annotation.Autowired;
import org.springframework.boot.test.autoconfigure.web.servlet.AutoConfigureMockMvc;
import org.springframework.boot.test.context.SpringBootTest;
import org.springframework.http.MediaType;
import org.springframework.mock.web.MockHttpServletResponse;
import org.springframework.test.context.junit4.SpringRunner;
import org.springframework.test.web.servlet.MockMvc;
import org.springframework.test.web.servlet.MvcResult;
import org.springframework.test.web.servlet.ResultActions;
import org.springframework.test.web.servlet.request.MockHttpServletRequestBuilder;
import org.springframework.test.web.servlet.request.MockMvcRequestBuilders;
import org.springframework.test.web.servlet.result.MockMvcResultHandlers;
import org.springframework.test.web.servlet.result.MockMvcResultMatchers;
@RunWith(SpringRunner.class)
@SpringBootTest(classes = {Starter.class})
@AutoConfigureMockMvc
public class TestUserController {
//使用日志
private Logger log = LoggerFactory.getLogger(TestUserController.class);
@Autowired
private MockMvc mockMvc;
/**
*用户列表查询
*/
@Test
public void apitest01() throws Exception {
//构建请求
MockHttpServletRequestBuilder request = MockMvcRequestBuilders.get("/user/list")
.contentType("text/html")//设置请求信息
.accept(MediaType.APPLICATION_JSON); //设置请求Accect头信息
//发送请求,得到请求结果
ResultActions perform = mockMvc.perform(request);
//校验请求结果
perform.andExpect(MockMvcResultMatchers.status().isOk());
//获取执行完成后返回的结果
MvcResult mvcResult = perform.andReturn();
//得到执行后的响应
MockHttpServletResponse response = mvcResult.getResponse();
//打印结果
log.info("响应状态:{}",response.getStatus());
log.info("用户信息:{}",response.getContentAsString());
}
@Test
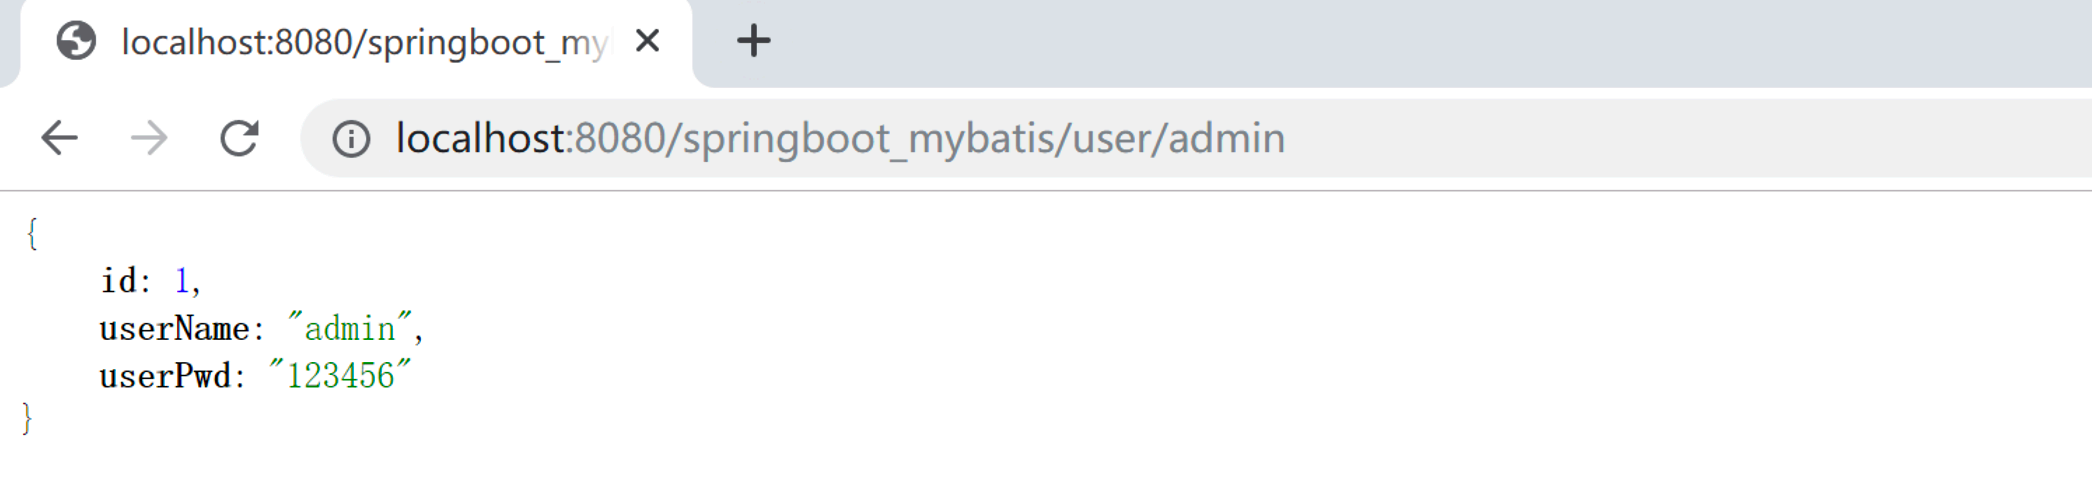
public void apitest02() throws Exception {
MvcResult mvcResult = mockMvc.perform(MockMvcRequestBuilders.get("/user/admin"))
.andExpect(MockMvcResultMatchers.status().isOk()).andReturn();
//打印结果
log.info("响应状态:{}",mvcResult.getResponse().getStatus());
log.info("用户信息:{}",mvcResult.getResponse().getContentAsString());
}
}
6.分布式缓存 Ehcache 整合
EhCache 是⼀个比较成熟的 Java 缓存框架,最早从 hibernate 发展而来, 是进程中的缓存系统,它提
供了用内存,磁盘文件存储,以及分布式存储⽅式等多种灵活的 cache 管理方案,快速简单。
Spring Boot 对 Ehcache 的使用提供支持,所以在 Spring Boot 中只需简单配置即可使用 Ehcache 实现
数据缓存处理。
6.1. Spring Cache 相关注解说明
SpringBoot 缓存实现内部使⽤ SpringCache 实现缓存控制,这里集成 Ehcache 实际上是对 SpringCache
抽象的其中⼀种实现,这里在使用Ehcache 实现缓存控制时相关注解说明如下:
6.1.1. @CacheConfig
用于标注在类上,可以存放该类中所有缓存的公有属性,比如设置缓存的名字。
@CacheConfig(cacheNames = "users")
public interface UserService {。。。}
配置了该数据访问对象中返回的内容将存储于名为users的缓存对象中,我们也可以不使用该注解,直
接通过@Cacheable自己配置缓存集的名字来定义。
6.1.2. @Cacheable
应用到读取数据的方法上,即可缓存的方法,如查找方法,先从缓存中读取,如果没有再调用相应方法获取数据,然后把数据添加到缓存中。
该注解主要有下面几个参数:
-
value、cacheNames两个等同的参数( cacheNames 为 Spring 4 新增,作为 value 的别名),用
于指定缓存存储的集合名。由于 Spring 4 中新增了 @CacheConfig,因此在 Spring 3 中原本必须有的value 属性,
也成为非必需项了。
-
key:缓存对象存储在Map集合中的 key 值,非必需,缺省按照函数的所有参数组合作为 key 值,
若自己配置需使用 SpEL 表达式,比如:@Cacheable(key = "#p0"):使用函数第⼀个参数作为缓存的
key 值,更多关于SpEL 表达式的详细内容可参考官方文档。
-
condition:缓存对象的条件,非必需,也需使用SpEL表达式,只有满足表达式条件的内容才会被
缓存,比如:@Cacheable(key = "#p0", condition = "#p0.length() < 3"),表示只有当第⼀个参数的长
度小于3的时候才会被缓存。
-
unless:另外⼀个缓存条件参数,非必需,需使用 SpEL 表达式。它不同于 condition 参数的地方在
于它的判断时机,该条件是在函数被调用之后才做判断的,所以它可以通过对 result 进行判断。
-
keyGenerator:用于指定 key 生成器,非必需。若需要指定⼀个⾃定义的 key 生成器,我们需要去
实现org.springframework.cache.interceptor.KeyGenerator 接用,并使用该参数来指定。需要注意的
是:该参数与 key 是互斥的。
-
cacheManager:用于指定使用哪个缓存管理器,非必需。只有当有多个时才需要使用
-
cacheResolver:用于指定使用那个缓存解析器,非必需。需通过
org.springframework.cache.interceptor.CacheResolver 接⼝来实现⾃⼰的缓存解析器,并⽤该参数指
定。
@Cacheable(value = "user", key = "#id")
User selectUserById(final Integer id);
6.1.3. @CachePut
应用到写数据的方法上,如新增/修改方法,调用方法时会自动把相应的数据放入缓存,@CachePut 的
参数与 @Cacheable 类似,示例如下:
@CachePut(value = "user", key = "#user.id")
public User save(User user) {
     users.add(user);
     return user;
}
6.1.4. @CacheEvict
应用到移除数据的方法上,如删除方法,调用方法时会从缓存中移除相应的数据,示例如下:
@CacheEvict(value = "user", key = "#id")
void delete(final Integer id);
除了同 @Cacheable ⼀样的参数之外,@CacheEvict 还有下⾯两个参数:
-
allEntries:非必需,默认为 false。当为 true 时,会移除所有数据
-
beforeInvocation:非必需,默认为 false,会在调用方法之后移除数据。当为 true 时,会在调用方
法之前移除数据。
6.1.5. @Caching
组合多个 Cache 注解使用。示例:
@Caching(
     put = {
         @CachePut(value = "user", key = "#user.id"),
         @CachePut(value = "user", key = "#user.username"),
         @CachePut(value = "user", key = "#user.age")
     }
}
将 id ---> user;username ---> user;age ---> user 进行缓存。
6.2. 环境配置
6.2.1. pom.xml 依赖添加
<!-- Ehcache -->
<dependency>
     <groupId>org.springframework.boot</groupId>
     <artifactId>spring-boot-starter-cache</artifactId>
</dependency>
<dependency>
     <groupId>net.sf.ehcache</groupId>
     <artifactId>ehcache</artifactId>
</dependency>
6.2.2. ehcahe.xml 文件添加
src/main/resources 目录下添加 ehcache.xml 文件,内容如下:
<ehcache name="mycache">
    <!--
        如果不使⽤磁盘存储,只需要将diskStore注释掉即可;
        如果使⽤,需要在ehcache.xml⽂件中的ehcahce元素下的定义⼀个diskStore元素并指定其path属性。
    -->
    <diskStore path="C:\java\cache"/>
    <!--
         name:缓存名称。
         maxElementsInMemory:缓存最⼤数⽬
         maxElementsOnDisk:硬盘最⼤缓存个数。
         eternal:对象是否永久有效,⼀但设置了,timeout将不起作⽤。
         overflowToDisk:是否保存到磁盘,当系统宕机时
         timeToIdleSeconds:设置对象在失效前的允许闲置时间(单位:秒)。
         仅当eternal=false对象不是永久有效时使⽤,可选属性,默认值是0,表示可闲置时间⽆穷⼤。
         timeToLiveSeconds:设置对象在失效前允许存活时间(单位:秒)。
         最⼤时间介于创建时间和失效时间之间。
         仅当eternal=false对象不是永久有效时使⽤,默认是0,也就是对象存活时间⽆穷⼤。
         diskPersistent:是否缓存虚拟机重启期数据
         Whether the disk store persists between restarts of the Virtual Machine. The default value is false.
         diskSpoolBufferSizeMB:这个参数设置DiskStore(磁盘缓存)的缓存区⼤⼩。
         默认是30MB。每个Cache都应该有⾃⼰的⼀个缓冲区。
         diskExpiryThreadIntervalSeconds:磁盘失效线程运⾏时间间隔,默认是120秒。
         memoryStoreEvictionPolicy:当达到maxElementsInMemory限制时,会根据指定的策略去清理内存
         默认策略是LRU(最近最少使⽤)。你可以设置为FIFO(先进先出)或是LFU(较少使⽤)。
         clearOnFlush:内存数量最⼤时是否清除。
         memoryStoreEvictionPolicy:
         可选策略有:
         LRU(最近最少使⽤,默认策略)
         Less Frequently Used,就是例⼦中使⽤的策略,就是⼀直以来最少被使⽤的。
         FIFO(先进先出)
         first in first out,这个是⼤家最熟的,先进先出。
         LFU(最少访问次数)
         Least Recently Used,最近最少使⽤的。
         缓存的元素有⼀个时间戳,当缓存容量满了,⽽⼜需要腾出地⽅来缓存新的元素的时候,
         那么现有缓存元素中时间戳离当前时间最远的元素将被清出缓存。
     -->
    <defaultCache
            maxElementsInMemory="10000"
            eternal="false"
            timeToIdleSeconds="120"
            timeToLiveSeconds="120"
            maxElementsOnDisk="10000000"
            diskExpiryThreadIntervalSeconds="120"
            memoryStoreEvictionPolicy="LRU">
    </defaultCache>
    <cache
            name="users"
            eternal="false"
            maxElementsInMemory="100"
            overflowToDisk="false"
            diskPersistent="false"
            timeToIdleSeconds="0"
            timeToLiveSeconds="300"
            memoryStoreEvictionPolicy="LRU"/>
</ehcache>
6.2.3. application.yml 缓存配置
## Ehcache缓存配置
  cache:
    ehcache:
      config: classpath:ehcache.xml
6.2.4. 启动缓存
在 Starter 启动入口类中,添加 @EnableCaching 注解,启动缓存
package com.xxx.springboot;

import org.mybatis.spring.annotation.MapperScan;
import org.springframework.boot.SpringApplication;
import org.springframework.boot.autoconfigure.SpringBootApplication;
import org.springframework.cache.annotation.EnableCaching;


@SpringBootApplication
@EnableCaching
@MapperScan("com.xxx.springboot.dao")
public class Starter {
    public static void main(String[] args) {
        SpringApplication.run(Starter.class);
    }
}
6.2.5. JavaBean 对象实现序列化
package com.xxx.springboot.po;

import io.swagger.annotations.ApiModel;
import io.swagger.annotations.ApiModelProperty;

import java.io.Serializable;

@ApiModel(description = "用户实体类")
public class User implements Serializable {
    @ApiModelProperty(value = "用户Id",example = "0")
    private Integer id;
    @ApiModelProperty(value = "用户名称")
    private String userName;
    @ApiModelProperty(value = "用户密码")
    private String userPwd;

    public Integer getId() {
        return id;
    }

    public void setId(Integer id) {
        this.id = id;
    }

    public String getUserName() {
        return userName;
    }

    public void setUserName(String userName) {
        this.userName = userName;
    }

    public String getUserPwd() {
        return userPwd;
    }

    public void setUserPwd(String userPwd) {
        this.userPwd = userPwd;
    }

    @Override
    public String toString() {
        return "User{" +
                "id=" + id +
                ", userName='" + userName + '\'' +
                ", userPwd='" + userPwd + '\'' +
                '}';
    }
}
6.3. 缓存实现
这里以 UserService 的方法为例
6.3.1. 用户详情查询缓存
/**
     * 根据用户名查询用户对象
     */
    @Cacheable(value = "users",key = "#userName")
    public User queryUserByUserName(String userName){
        return userMapper.queryUserByUserName(userName);
    }
6.3.2. 用户列表查询缓存
@Cacheable(value = "users",key="#userQuery.userName+'-'+#userQuery.pageNum+'-
'+#userQuery.pageSize")
public PageInfo<User> queryUserByParams(UserQuery userQuery){
     PageHelper.startPage(userQuery.getPageNum(),userQuery.getPageSize());
     return new PageInfo<User>(userMapper.selectByParams(userQuery));
}
6.3.3. 用户更新删除缓存
@CacheEvict(value = "users",key="#user.id")
public void updateUser(User user) {
     AssertUtil.isTrue(StringUtils.isBlank(user.getUserName()), "⽤户名不能为空!");
     AssertUtil.isTrue(StringUtils.isBlank(user.getUserPwd()),"⽤户密码不能为空!");
     User temp = userMapper.queryUserByUserName(user.getUserName());
     AssertUtil.isTrue(null != temp && !(temp.getId().equals(user.getId())), "该⽤户已存在!");
     AssertUtil.isTrue(userMapper.update(user)<1,"⽤户记录添加失败!");
    }

    @CacheEvict(value = "users",allEntries=true)
    public void deleteUser(Integer userId){
         AssertUtil.isTrue(null == userId || null == userMapper.queryById(userId),"待删除记录
        不存在!");
         AssertUtil.isTrue(userMapper.delete(userId)<1,"⽤户删除失败!");
}
7.定时调度集成-Quartz
在日常项目运行中,我们总会有需求在某一时间段周期性的执行某个动作。比如每天在某个时间段导出报
表,或者每隔多久统计一次现在在线的用户量等。
在Spring Boot中有Java自带的java.util.Timer类,也有强大的调度器Quartz,还有SpringBoot自带的
Scheduled来实现。Scheduled 在Spring3.X 引入,默认SpringBoot自带该功能,使用起来也很简单,在启动类
级别添加@EnableScheduling注解即可引入定时任务环境。但遗憾的是Scheduled默认不支持分布式环境,这里
主要讲解Quartz时钟调度框架与Spring Boot集成。
7.1 环境整合配置
 <!-- Quartz -->
    <dependency>
      <groupId>org.springframework.boot</groupId>
      <artifactId>spring-boot-starter-quartz</artifactId>
    </dependency>
7.2 源代码添加
7.2.1 定义job
com.xxx.springboot下添加jobs包,定义待执行job任务。实现Job接口,并在excute方法中实现自己的业务逻辑
package com.xxx.springboot.jobs;

import org.quartz.Job;
import org.quartz.JobExecutionContext;
import org.quartz.JobExecutionException;
import org.quartz.TriggerKey;
import org.slf4j.Logger;
import org.slf4j.LoggerFactory;

import java.text.SimpleDateFormat;
import java.util.Date;
import java.util.logging.SimpleFormatter;

public class MyFirstJob implements Job {
    private Logger logger = LoggerFactory.getLogger(MyFirstJob.class);

    @Override
    public void execute(JobExecutionContext context) throws JobExecutionException {
        SimpleDateFormat sdf = new SimpleDateFormat("yyyy-MM-dd HH:mm:ss");

        TriggerKey triggerKey = context.getTrigger().getKey();
        logger.info("触发器:" + triggerKey.getName() + ",所属分组:" + triggerKey.getGroup() + "------" + sdf.format(new Date()) + "-->" + "Hello SpringBoot Quartz");
    }
}
7.2.2 构建调度配置类
创建JobDetail实例并定义Trigger注册到scheduler,启动scheduler开启调度
package com.xxx.springboot.config;

import com.xxx.springboot.jobs.MyFirstJob;
import org.quartz.*;
import org.springframework.context.annotation.Bean;
import org.springframework.context.annotation.Configuration;

@Configuration
public class QuartzConfig {

    @Bean
    public JobDetail jobDetail(){
        return JobBuilder.newJob(MyFirstJob.class).storeDurably().build();
    }

    @Bean
    public Trigger trigger1(){
        SimpleScheduleBuilder scheduleBuilder = SimpleScheduleBuilder.simpleSchedule()
                //每一秒执行一次
                .withIntervalInSeconds(1)
                //永久重复,一直执行下去
                .repeatForever();
        return TriggerBuilder.newTrigger()
                .withIdentity("trigger1","group1")
                .withSchedule(scheduleBuilder)
                .forJob(jobDetail())
                .build();
    }

    @Bean
    public Trigger trigger2(){
        SimpleScheduleBuilder scheduleBuilder = SimpleScheduleBuilder.simpleSchedule()
                //每5秒执行一次
                .withIntervalInSeconds(5)
                //永久重复,一直执行下去
                .repeatForever();
        return TriggerBuilder.newTrigger()
                .withIdentity("trigger1","group1")
                .withSchedule(scheduleBuilder)
                .forJob(jobDetail())
                .build();
    }
}
7.2.3 启动StarterApplication
查看控制台打印效果

8.全局异常与事务控制
8.1. Spring Boot 事务支持
在使用 Jdbc 作为数据库访问技术时,Spring Boot 框架定义了基于 jdbc 的 PlatformTransactionManager
接口的实现 DataSourceTransactionManager,并在 Spring Boot 应用启动时自动进行配置。如果使用 jpa
的话 Spring Boot 同样提供了对应实现。
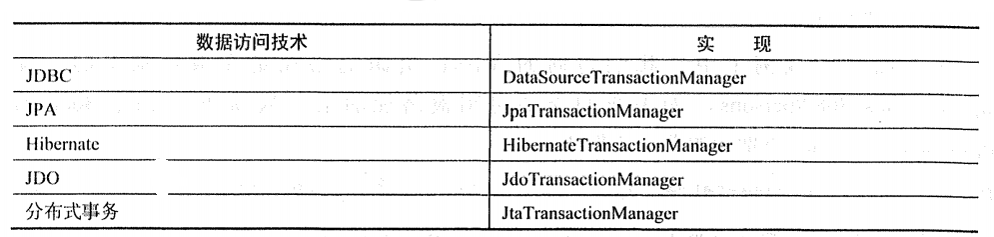
这里 Spring Boot 集成了 mybatis 框架,mybatis 底层数据访问层实现基于 jdbc 来实现,所以在 Spring
Boot 环境下对事务进行控制,事务实现由 Spring Boot 实现并⾃动配置,在使⽤时通过注解方式标注相
关方法加⼊事务控制即可。
声明式事务配置
@Transactional(propagation = Propagation.REQUIRED)
public void saveUser(User user) {
     AssertUtil.isTrue(StringUtils.isBlank(user.getUserName()), "⽤户名不能为空!");
     AssertUtil.isTrue(StringUtils.isBlank(user.getUserPwd()),"⽤户密码不能为空!");
     User temp = userMapper.queryUserByUserName(user.getUserName());
     AssertUtil.isTrue(null != temp, "该⽤户已存在!");
     AssertUtil.isTrue(userMapper.save(user)<1,"⽤户记录添加失败!");
}
@Transactional(propagation = Propagation.REQUIRED)
public void updateUser(User user) {
     AssertUtil.isTrue(StringUtils.isBlank(user.getUserName()), "⽤户名不能为空!");
     AssertUtil.isTrue(StringUtils.isBlank(user.getUserPwd()),"⽤户密码不能为空!");
     User temp = userMapper.queryUserByUserName(user.getUserName());
     AssertUtil.isTrue(null != temp && !(temp.getId().equals(user.getId())), "该⽤户已存
    在!");
     AssertUtil.isTrue(userMapper.update(user)<1,"⽤户记录添加失败!");
}
@Transactional(propagation = Propagation.REQUIRED)
public void deleteUser(Integer id){
     AssertUtil.isTrue(null == id || null ==userMapper.queryById(id),"待删除记录不存在!");
     AssertUtil.isTrue(userMapper.delete(id)<1,"⽤户删除失败!");
}
8.2. Spring Boot 全局异常处理
SpringMvc 中对异常统⼀处理提供了相应处理方式,推荐大家使用的是实现接口HandlerExceptionResolver的方式,对
代码侵入性较小。
在Spring Boot 应用中同样提供了对异常的全局性处理,相关注解如下:
8.2.1. @ControllerAdvice
该注解组合了 @Component 注解功能,最常用的就是作为全局异常处理的切面类,同时通过该注解可
以指定包扫描的范围。@ControllerAdvice 约定了及种可行的返回值,如果是直接返回 model 类的话,需
要使用@ResponseBody 进行json 转换
8.2.2. @ExceptionHandler
该注解在 Spring 3.X 版本引入,在处理异常时标注在方法级别,代表当前方法处理的异常类型有哪些
具体应⽤以 Restful 接口为例,测试保存用户接口。
8.2.3. 全局异常应用
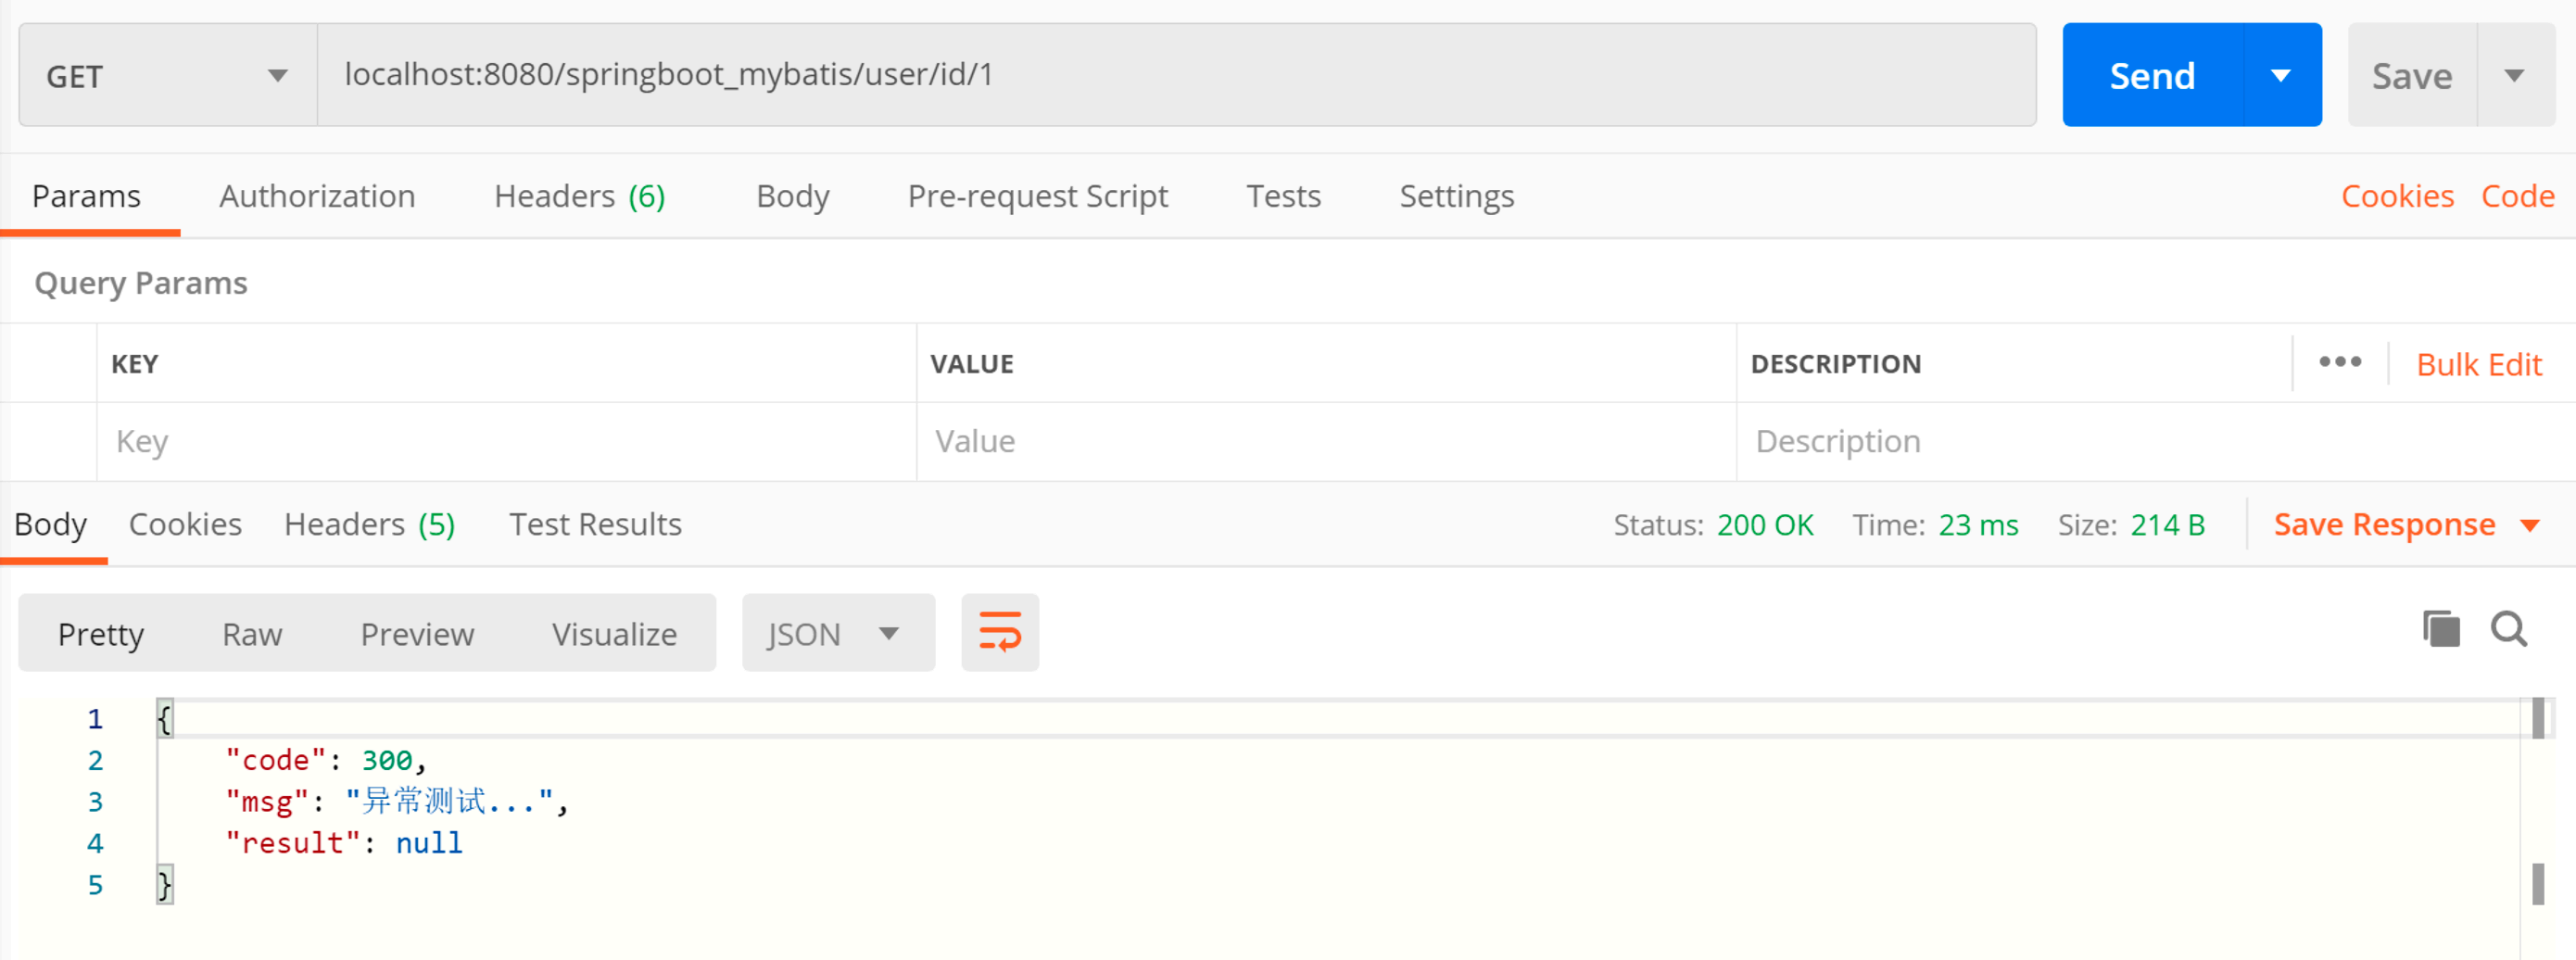
8.2.3.1. 异常抛出与全局异常捕获
UserController 查询接口
@ApiOperation(value = "根据⽤户id查询⽤户记录")
@ApiImplicitParam(name = "userId",value = "⽤户ID",required = true, paramType = "path")
@GetMapping("user/id/{userId}")
public User queryUserByUserId(@PathVariable Integer userId){
 	return userService.queryUserByUserId(userId);
}
UserService 查询业务方法,抛出 ParamExceptions 异常
public User queryUserByUserId(Integer userId){
 // 抛出异常
 AssertUtil.isTrue(true,"异常测试...");
 	return userMapper.queryById(userId);
}
全局异常处理类 GlobalExceptionHandler 定义
package com.xxx.springboot;

import com.xxx.springboot.exceptions.ParamsException;
import com.xxx.springboot.po.vo.ResultInfo;
import org.springframework.web.bind.annotation.ControllerAdvice;
import org.springframework.web.bind.annotation.ExceptionHandler;
import org.springframework.web.bind.annotation.ResponseBody;

@ControllerAdvice
public class GlobalExceptionHandler {
    /**
     * 参数异常处理,返回json
     * @return
     */
    @ResponseBody
    @ExceptionHandler(value = ParamsException.class)
    public ResultInfo paramsExceptionHandler(ParamsException p){
        ResultInfo resultInfo = new ResultInfo();
        resultInfo.setCode(p.getCode());
        resultInfo.setMsg(p.getMsg());

        return resultInfo;
    }

    /**
     * 全局异常处理,返回json
     * @return
     */
    @ResponseBody
    @ExceptionHandler(value = Exception.class)
    public ResultInfo exceptionHandler(Exception e){
        ResultInfo resultInfo = new ResultInfo();
        resultInfo.setCode(300);
        resultInfo.setMsg("操作异常");


        /*//判断异常类型
        if(e instanceof ParamsException){
            ParamsException p = (ParamsException) e;

            resultInfo.setCode(p.getCode());
            resultInfo.setMsg(p.getMsg());
            return resultInfo;
        }*/
        return resultInfo;
    }
}
Postman 执行测试效果
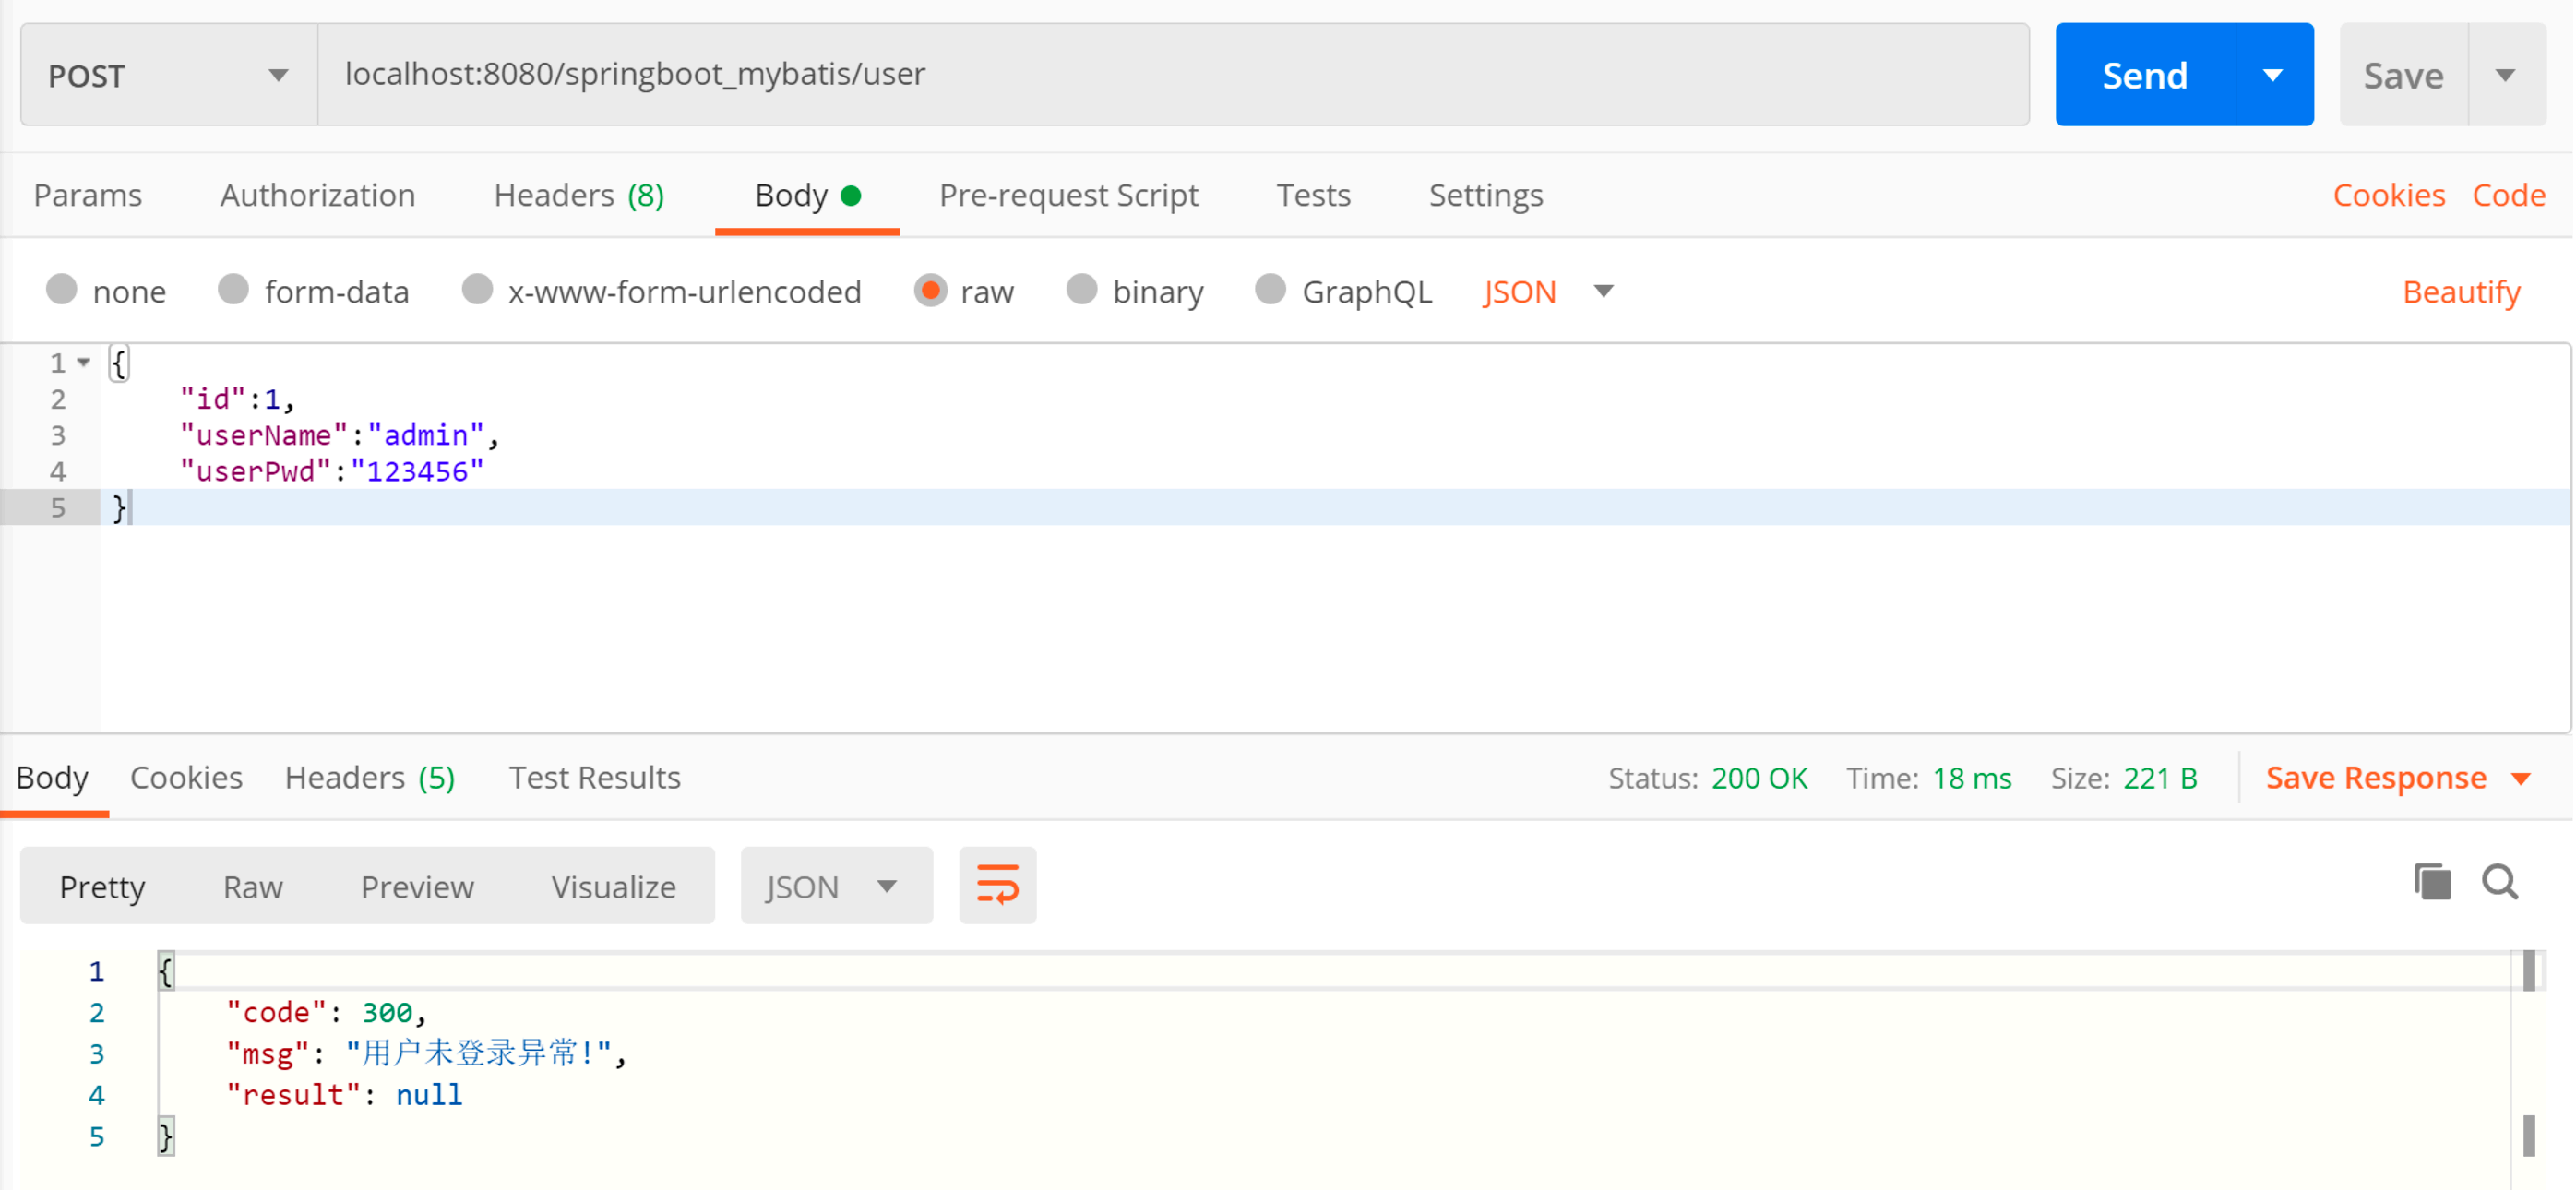
8.2.3.2. 特定异常处理
通过 @ExceptionHandler 标注⽅法处理特定异常,这里以用户未登录异常为例,通过全局异常进行
统⼀处理
/**
 * ⽤户未登录异常特殊处理 返回json
 * @param authExceptions
 * @return
 */
@ExceptionHandler(value = NoLoginException.class)
@ResponseBody
public ResultInfo userNotLoginHandler(NoLoginException authExceptions){
     System.out.println("⽤户未登录异常处理。。。");
     ResultInfo resultInfo = new ResultInfo();
     resultInfo.setCode(authExceptions.getCode());
     resultInfo.setMsg(authExceptions.getMsg());
     return resultInfo;
}
在用户修改接口中抛出未登录异常为例进行测试
/**
 * 修改⽤户
 * @param user
 * @return
 */
@ApiOperation(value = "更新⽤户")
@ApiImplicitParam(name = "user", value = "⽤户对象")
@PostMapping("/user")
public ResultInfo updateUser(@RequestBody User user) {
     if(1 == 1){
     throw new NoLoginException();
 }
 ResultInfo resultInfo = new ResultInfo();
    userService.updateUser(user);
 	return resultInfo;
}
Postman 执行测试效果
9.SpringBoot 数据校验 - Validation
日常项目开发中,对于前端提交的表单,后台接口接收到表单数据后,为了程序的严谨性,通常后端
会加⼊业务参数的合法校验操作来避免程序的非技术性 bug,这里对于客户端提交的数据校验,
SpringBoot 通过 spring-boot-starter-validation 模块包含了数据校验的工作。
这里主要介绍 Spring Boot 中对请求数据进行校验,相关概念如下
JSR303 :JSR303 是⼀项标准,只提供规范不提供实现,规定⼀些校验规范即校验注解,如
@Null,@NotNull,@Pattern,位于 javax.validation.constraints 包下。JSR-349 是其升级版本,添加
了⼀些新特性。
Hibernate Validation :Hibernate Validation 是对这个规范的实现,并增加了⼀些其他校验注解,如
@Email,@Length,@Range 等等。
Spring Validation :Spring Validation 对 Hibernate Validation 进行了⼆次封装,在 Spring MVC 模块中
添加了自动校验,并将校验信息封装进了特定的类中。
9.1. 环境配置
实现参数校验,程序必须引⼊ spring-boot-starter-validation 依赖,只是在引⼊ spring-boot-starter-web
依赖时,该模块会⾃动依赖 spring-boot-starter-validation,所以程序中引⼊ spring-boot-starter-web 会⼀
并依赖spring-boot-starter-validation 到项⽬中。
9.2. 校验相关注解

9.3. 校验注解使用
User 实体类参数校验注解
public class User implements Serializable {

 private Integer id;

 @NotBlank(message = "⽤户名不能为空!")
 private String userName;
 @NotBlank(message = "⽤户密码不能为空!")
 @Length(min = 6, max = 10,message = "密码⻓度⾄少6位但不超过10位!")
 private String userPwd;

 @Email
 private String email;

 /*
 省略get set ⽅法
 */
}
接口方法形参 @Valid 注解添加
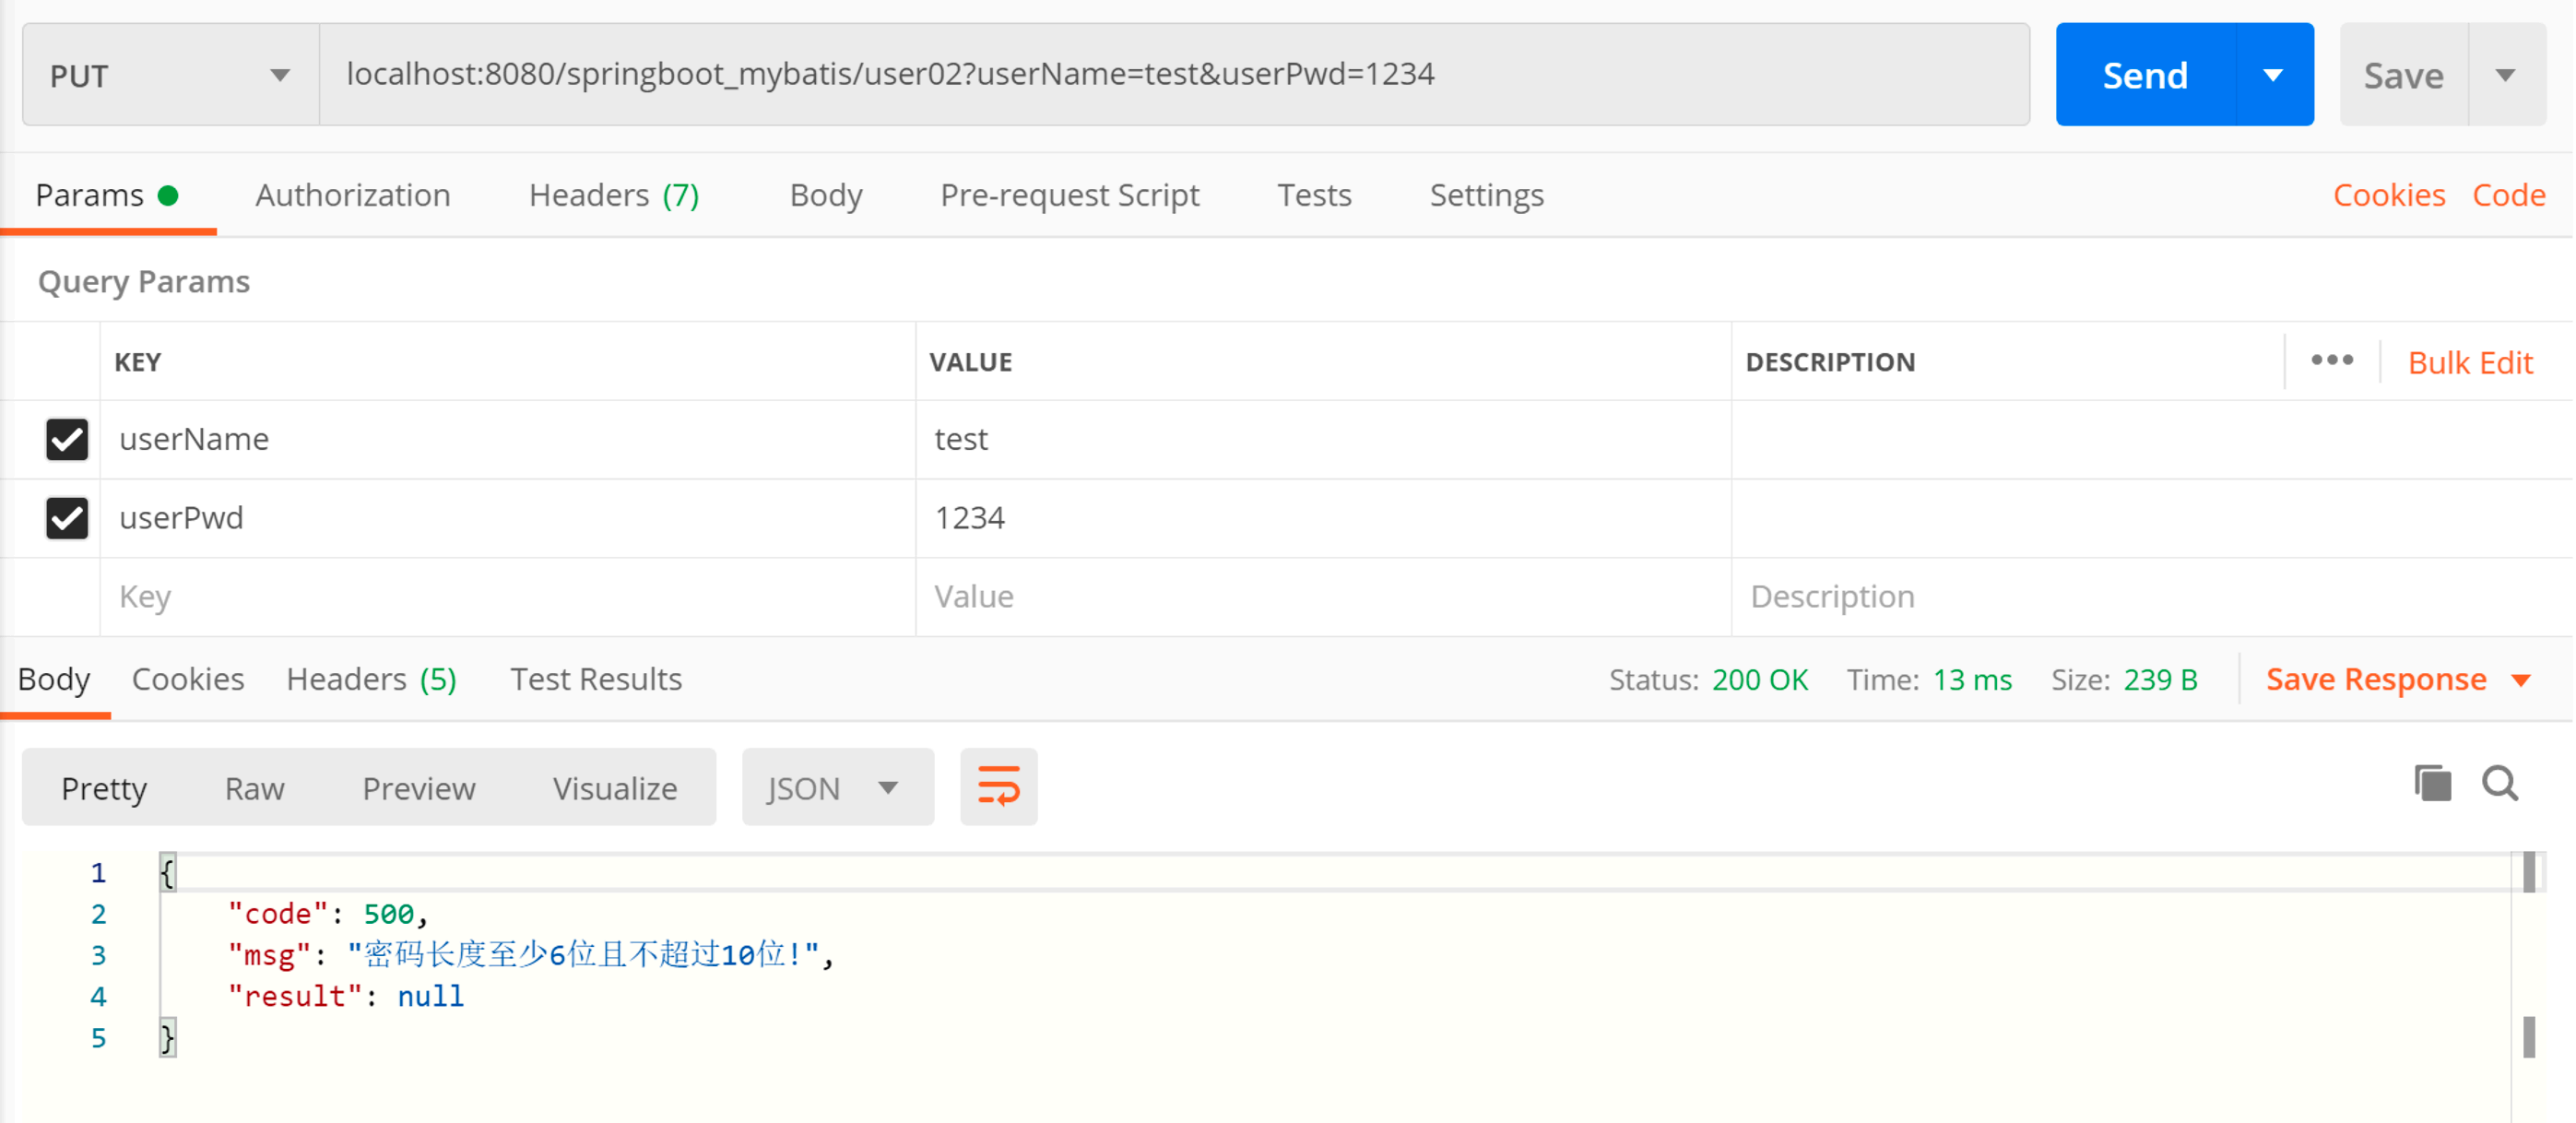
@PostMapping("user")
@ApiOperation(value = "⽤户添加")
@ApiImplicitParam(name = "user",value = "⽤户实体类",dataType = "User")
public ResultInfo saveUser02(@Valid User user){
     ResultInfo resultInfo = new ResultInfo();
     // userService.saveUser(user);
     return resultInfo;
}
全局异常错误信息捕捉
/**
* 全局异常处理 返回json
* @param e
* @return
*/
@ExceptionHandler(value = Exception.class)
@ResponseBody
public ResultInfo exceptionHandler(Exception e){
     ResultInfo resultInfo = new ResultInfo();
     resultInfo.setCode(300);
     resultInfo.setMsg("操作失败!");
     if(e instanceof ParamsException){
         ParamsException pe = (ParamsException) e;
         resultInfo.setMsg(pe.getMsg());
         resultInfo.setCode(pe.getCode());
     } else if(e instanceof BindException){
     	BindException be = (BindException) e;
    	resultInfo.setResult(be.getBindingResult().getFieldError().getDefaultMessage());
     }
    return resultInfo;
}
PostMan 接口测试