前言
云的实现一般有三种思路:Volume体积云、billboard公告牌、Particle粒子,对于风格化来说体渲染的实现过于真实(但光遇的风格化云貌似是使用体渲染实现的,后面有空会考虑尝试还原还原),而Particle消耗太大了!因此本文将着重展现如何使用公告牌技术实现一个不错的风格化云效果
Youtube上有位大佬讲解了如何使用houdini和ue快速实现一个吉卜力风的卡通云,虽然效果还是ok,但个人认为,这种方法容易露馅。不过,这其中的制作云的思路可以参考,无需再用PS来频繁上色。本篇将在此基础上,添加实现其他的功能(主要思路来自Tyler Smith)
光照计算
-
为了方便,这里使用BlinnPhong光照,效果还不错。后续若有其他需求,可以自行添加修改
-
实现
half4 CalcBlinnPhong(Light light, half3 diffuseColor, float NoL, float NoH, half gloss, half opacity) { half3 diffuse = diffuseColor * NoL * light.color * light.shadowAttenuation * light.distanceAttenuation; half3 specular = light.color * pow(NoH, gloss); half3 ambient = _GlossyEnvironmentColor.rgb; half3 resultColor = diffuse + specular + ambient; return half4(resultColor, opacity); } -
效果

不透明度
-
因为云是一种半透明物体,不能简单地使用diffuse Texture的A通道(为了方便调节美术效果,需要控制它的opacity),所以我用到了DepthFade(弱化半透明物体和不透明物体间相交时产生的硬线)
-
实现
-
DepthFade
// UE中的实现 float DepthFade(in half opacity = 1, in float sceneDepth = 1, in float pixelDepth = 1, in half depthFade = 100) { half depthDiff = sceneDepth - pixelDepth; return opacity * saturate(depthDiff / depthFade); } -
Scene Depth 和 Pixel Depth
struct Depth
{
    float raw;
    float linear01;
    float eye;
};

// 获取深度图,并提取深度
Depth SampleDepth(float4 positionSS)
{
    float4 positionSSNor = float4(positionSS.xyz / positionSS.w, positionSS.w);

    Depth depth = (Depth)0;

    depth.raw = SampleSceneDepth(positionSSNor.xy);
    depth.eye = LinearEyeDepth(depth.raw, _ZBufferParams);
    depth.linear01 = Linear01Depth(depth.raw, _ZBufferParams);

    return depth;
}

float GetRawDepth(Depth depth)
{
    return depth.raw;
}

float GetLinear01Depth(Depth depth)
{
    return depth.linear01;
}

float GetEyeDepth(Depth depth)
{
    return depth.eye;
}

// positionSS为未进行透视除法的屏幕空间
float GetPixelDepth(float4 positionSS)
{
    return positionSS.w;
}

// 计算得出片元的opacity
float CalcOpacity(in float4 positionSS, in DiffuseProperty diffuseProperty)
{
    // 计算scene depth 和 pixel depth
    MaterialHelper::Depth depth = MaterialHelper::SampleDepth(positionSS);
    float sceneEyeDepth = MaterialHelper::GetEyeDepth(depth);
    float pixelDepth = MaterialHelper::GetPixelDepth(positionSS);

    // 计算opacity
    float opacity = 1.f;
    diffuseProperty.opacityContrast = max(0.0001, diffuseProperty.opacityContrast);
    opacity = pow(diffuseProperty.diffuseOpacity, diffuseProperty.opacityContrast);
    opacity = MathHelper::Pow2(opacity);

    return MaterialHelper::DepthFade(opacity, sceneEyeDepth, pixelDepth, diffuseProperty.fadeDistance);
}
-
-
效果
现在可以通过调节Diffuse Opacity Contrast 和 Depth Fade Distance来控制云的不透明度
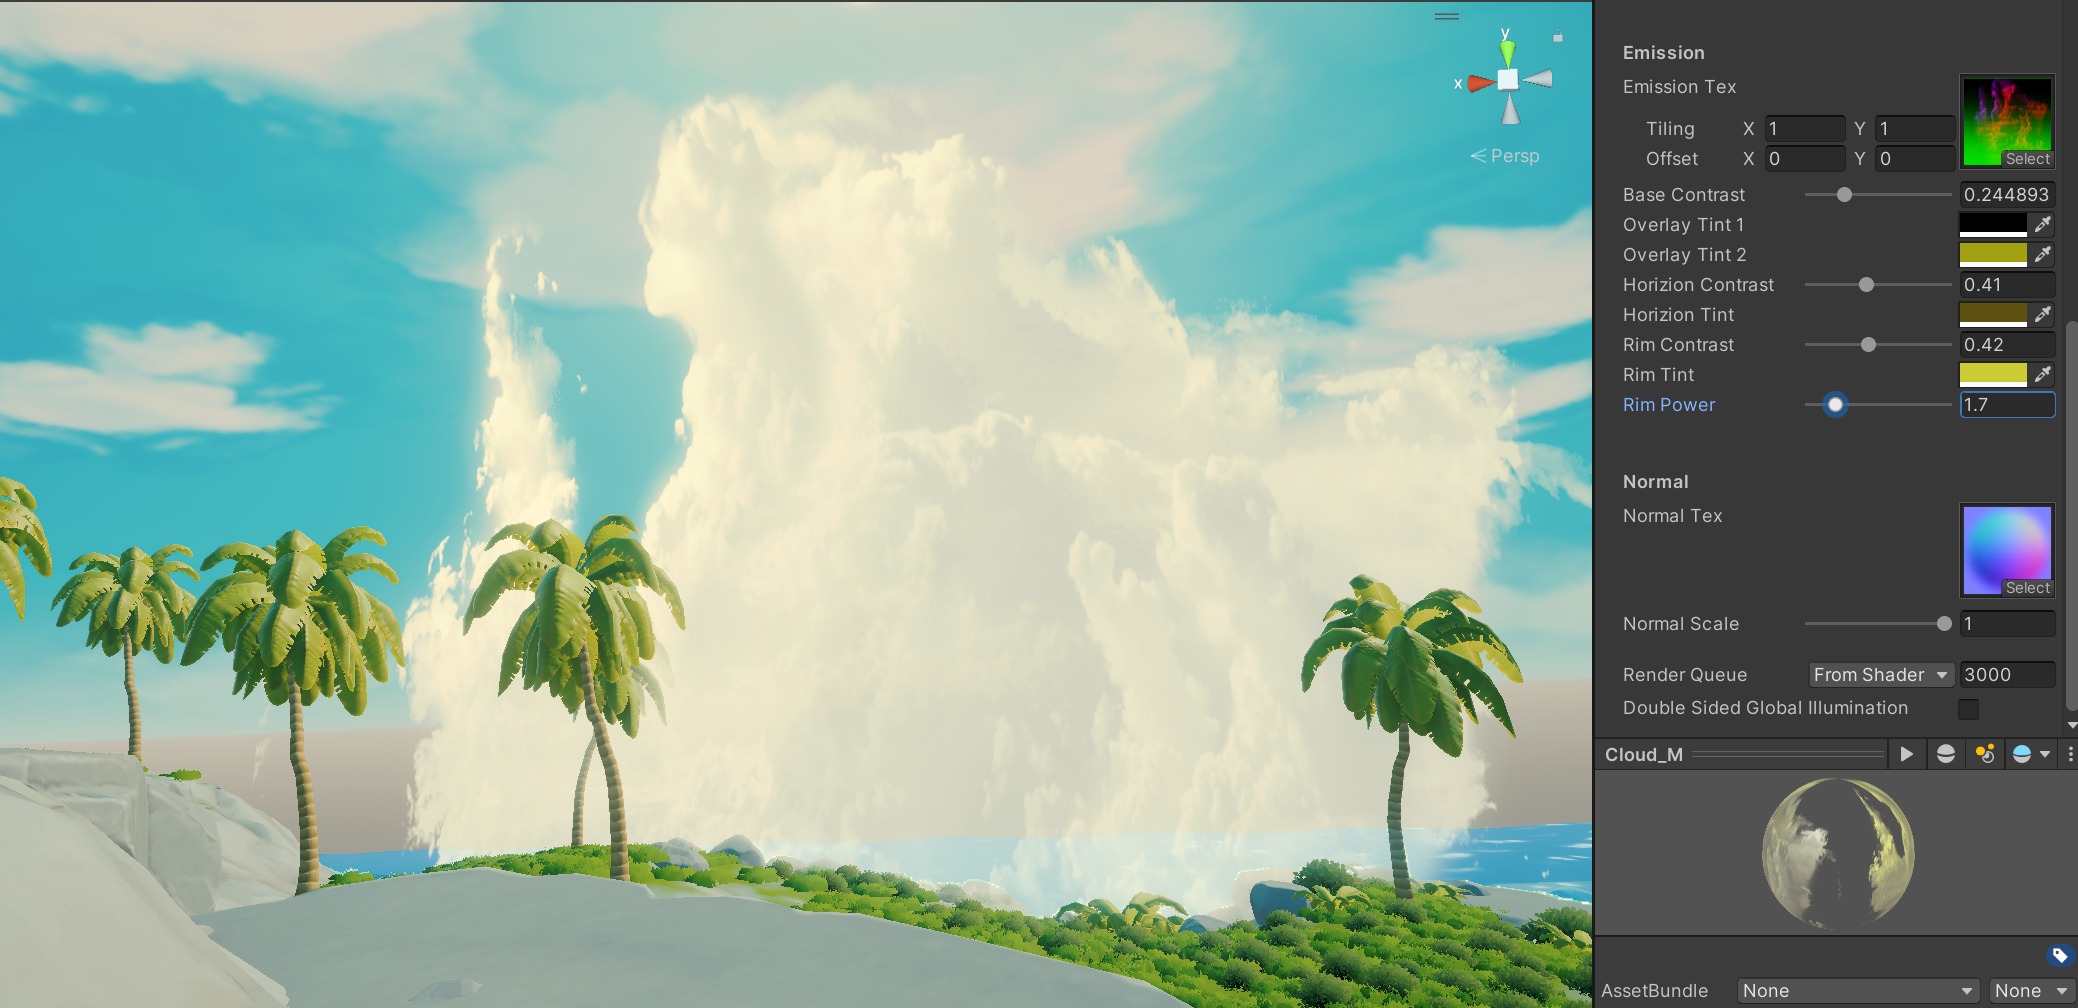
自发光
-
为了控制云的颜色,需要对云上色,分别是红绿蓝三种颜色,这三种颜色控制云的三个区域,随后采样在shader中提取对应通道进行lerp

-
纹理
-
R通道:基色

-
G通道:水平lerp
-
B通道:边缘

-
-
实现
half3 CalcEmission(in half3 emissiveColor, in EmissionProperty emissionProperty) { half3 o = half3(0, 0, 0); half RChannel = emissiveColor.r; RChannel = pow(RChannel, emissionProperty.baseContrast); half GChannel = emissiveColor.g; GChannel = pow(GChannel, emissionProperty.HorizionContrast); half BChannel = emissiveColor.b; BChannel = pow(BChannel, emissionProperty.RimContrast); o = lerp(emissionProperty.OverlayTint1, emissionProperty.OverlayTint2, RChannel); o = lerp(o, emissionProperty.HorizionTint, GChannel); o = lerp(o, emissionProperty.RimTint * emissionProperty.RimPower, BChannel); return o; } -
效果
Parallax Occlusion Mapping
-
目前实现的云已经有一定的体积感,但为了更好的视觉效果,这里还添加了Parallax Occlusion Mapping视差贴图
-
实现
// 采样高度图, 获取高度数据 float GetHeight(in float2 uv, in Texture2D heightTex, sampler sampler_heightTex) { return SAMPLE_TEXTURE2D_LOD(heightTex, sampler_heightTex, uv, 0).r; } // 优化采样效果,以更低的循环达到更好的效果 float RandomNoise(float2 uv) // uv : SV_POSITION { uv += 1 * float2(47.0, 17.0) * 0.695; const float3 magic = float3(0.06711056, 0.00583715, 52.9829189); return frac(magic.z * frac(dot(uv, magic.xy))); } float2 ParallaxOcclusionMapping(in Texture2D heightTex, sampler sampler_heightTex, in half heightRatio, in float numLayers, in float2 uv, in float4 positionCS, in float3 viewDirTSNor) { float2 o = float2(0.f, 0.f); float numLayersNoise = RandomNoise(positionCS.xy); numLayers = numLayers * 0.5 + numLayers * numLayersNoise; float layerHeight = 1 / numLayers; // 每层高度 float currentLayerHeight = 1.f; // 每层高度偏移量 float2 uvDelta = viewDirTSNor.xy / viewDirTSNor.z * heightRatio * layerHeight; float2 currentUV = uv; float currentHeightTexValue = GetHeight(uv, heightTex, sampler_heightTex); for(int i = 1; i < numLayers && currentLayerHeight > currentHeightTexValue; ++i) { o -= uvDelta; currentLayerHeight -= layerHeight; currentHeightTexValue = GetHeight(uv + o, heightTex, sampler_heightTex); } return o; } -
效果

动画
-
最后,为云加上动画,这里使用flowmap,和一个Noise 对floawmap进行扰动
-
纹理
-
Flowmap

-
Noise

-
-
实现
float2 CalcFlow(in float2 uv) { float2 o = float2(0.f, 0.f); float4 flowValue = SAMPLE_TEXTURE2D(_FlowTex, sampler_FlowTex, uv); float2 flowNoisePanner = MaterialHelper::panner(uv, _NoisePannerTime * _Time.y, _PannerSpeed); float flowNoiseValue = SAMPLE_TEXTURE2D(_FlowNoiseTex, sampler_FlowNoiseTex, flowNoisePanner).r; flowNoiseValue *= _FlowPower; float2 baseUV = 0.f; baseUV = lerp(uv, flowValue.rg, flowNoiseValue); o = MaterialHelper::panner(baseUV, _BasePannerTime * _Time.y, _PannerSpeed); return o; } -
效果
