Command Line

1. Navigate to your home directory
cd ~
2. Make a directory call "temp"
mkdir temp
3. Move into temp
cd temp
4. List the idrectory contents
ls -la temp
5. Make a file called "hello"
touch hello
6. List the directory contents
ls -la temp
7. Move out of temp
cd ../
8. Delet temp
rm -rf temp
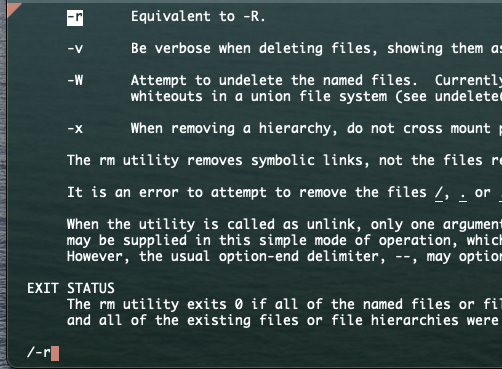
9. Using man to get help for `rm`
man rm
Search for flag
/ -r
Secuirty
Hashing: with just hashing, you can reverse the hash
openssl md5 foo
openssl sha1 foo
openssl sha256 foo
Hashing + salt: with hash + salt, it's really difficult to reverse it
VIM
- insert mode:
i - normal mode:
ESC - command mode:
:, for example, save and exit:wq
- Exit and don't save
:q!
- Exit and don't save
Shell
- ~/.zshrc
- ~/.bash_profile
echo $0: tell which shell you are using
echo $USER
Server
Buying a VPS
https://www.digitalocean.com/
SSH into your remote server
// ssh into your server
ssh root@<your_IP>

// ssh into your server with private key
ssh -i ~/.ssh/fsfe root@<your_IP>

// Exit your server
exit
Modify ssh config:
# inside your .ssh folder
vi ~/.ssh/config

Host *
  AddKeysToAgent yes
  UseKeychain yes
ssh-add --apple-use-ketchain <name_of_ssh_private_key>Now you should be able to ssh into remote server by omit to speicifing the key:
ssh root@<public_ip_address>
The Internet
# Check status of a network host
ping google.com
# Follow the path of your request
traceroute google.com
# Show network status
netstat -lt | less
DNS
# Lookup the nameservers for an domain
nslookup frontendmasters.com
# Lookup the DNS records for a domain
dig frontendmasters.com
Server
SSH into your server:
ssh root@<IP_ADDRESSS>
Update the server:
apt update
apt upgrade
Restart the server:
shutdown now -r
Create a user
1. Create a new user
adduser <YOU_NAME>
2. Add user to "sudo" group
usermod -aG sudo <YOU_NAME>
3. Switch User
su <YOU_NAME>
4. Check sudo access
sudo cat /var/log/auth.log
Enable login as new user
1. Create authorized_keys file
mkdir .ssh
cd .ssh/
vi authorized_key
2. Paste your SSH public key
3. Exit: you need to exit twice
exit
exit
4. Login with new user
ssh <YOU_NAME>@<IP_ADDRESS>
File Permissions
1. Change file permission
sudo cat /var/log/auth.log # check the auth log for any actions
chmod 644 ~/.ssh/authorized_keys # -rw-rw-r--
2. Disable root login
sudo vi /etc/ssh/sshd_config
Change to PermitRootLogin no
Save and quite
3. Restart ssh daemon
sudo service sshd restart
Now the root login should be disabled.
Server
1. Install nginx
sudo apt install nginx
2. Start nginx
sudo service nginx start
3. Navigate to your server in the browser
View default nginx configuration
less /etc/nginx/sites-available/default
Defautl value locates:
/var/www/html/
Install tooling
1. Link to newest node.js source
curl https://deb.nodesource.com/setup_19.x | sudo -E bash -
2. Install node.js
sudo apt-get install nodejs
3. Install git
sudo apt install git
Application setup
1. Chnage ownership of /www
cd /var/www
sudo chown -R $USER:$USER /var/www # no need to sudo everytime
2. Make an application directory
mkdir /var/www/app
cd app
3. Initialize empty git repo in /app
git init
4. Start your application
npm init -y
let app listen on prot 3000
Proxy pass
Connect nginx to our web server
1. Create a new nginx server and proxy requests
sudo vi /etc/nginx/sites-enabled/mycompany
server {
  listen 80 default_server;
  listen [::]:80 default_server;

  root /var/www/html;
  index index.html;

  server_name <your_domain>;

  location / {
    proxy_pass http://127.0.0.1:3000/;
  }
}
2. Point nginx to new server
sudo vi /etc/nginx/nginx.conf
##
# Virtual Host Configus
##

- include /etc/nginx/sites-enabled/*;
+ include /etc/nginx/sites-enabled/<YOUR_COMPANY>;
3. Double check configuration is working
sudo nginx -t
4. Restart nginx server
sudo service nginx restart
PM 2
1. Install PM 2
sudo npm i -g pm2
2. Start PM2
pm2 start app.js --watch
3. Setup auto restart
pm2 list
pm2 save
pm2 startup
Git
1. Ensure git uses your new ssh key
vi ~/.ssh/config
Host github.com
 Hostname github.com
 IdentityFile ~/.ssh/gh_key
2. Change permission of config to 600
cmod 600 ~/.ssh/config
3. Change permission of gh_key to 600
chmod 600 ~/.ssh/gh_key
In case you get stuck
Stop a running process
pkill <process>
Test your ssh connection
ssh -vT git@github.com
Save a readonly file in vim
:w !sudo tee %
View permissions as numbers
stat -c %a <file_name>
Seucirty
check the well known prots
less /etc/services
nmap
1. Install nmap
sudo apt install nmap
2. Run nmap
nmap <your_service_ip>
3. Extra service/version information
nmap -sV <your_server_ip>
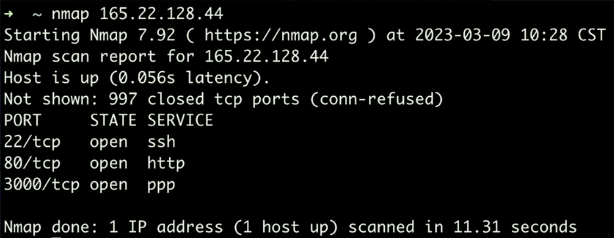
Port 3000 is open by Node.js, but we don't want it open. NGINX handle the connection.
Firewall
ufw - uncomplicated firewall
ufw <allow|deny|reject> <http|https|ssh>
1. Check firewall status
sudo ufw status
2. Allow SSH & http
sudo ufw allow ssh
sudo ufw allow http
3. Enable firewall
sudo ufw enable
Permission
Application Updates
1. Instal unattended upgrades
sudo apt install unattended-upgrades
2. Enabled upgrades
sudo dpkg-reconfigure --poriority=low unattended-upgrades
Create a cron job
crontab -e
*/2 * * * * sh /var/www/app/github.sh 2>&1 | logger -t github.sh# github.sh
#! /sur/bin/bash
cd /var/www/app/
git pull origin main --ff-only
Logs
- tail: Output the last part of a file
- head: Output the first part of a file
- less: Output one page at time
- cat: Output entire file
Example: follow the output of a file
tail -f
Normally on server, we have
- syslog
- auth.log
- nginx/access.log
Redirection
- | : read from stdout
- > : write stdout to file
- >> : append stdout to file
- < : read from stdin
- 2>&1 : redirect both stderr and stdout
Finding things
- find : search file names
1. Find all log files in /var/log
find /var/log -type f -name "*.log"
You might get permission issue
sudo !!
Wil help to run last cammnd with sudo
2. Find all directories with the name log
sudo find / -type d -name log

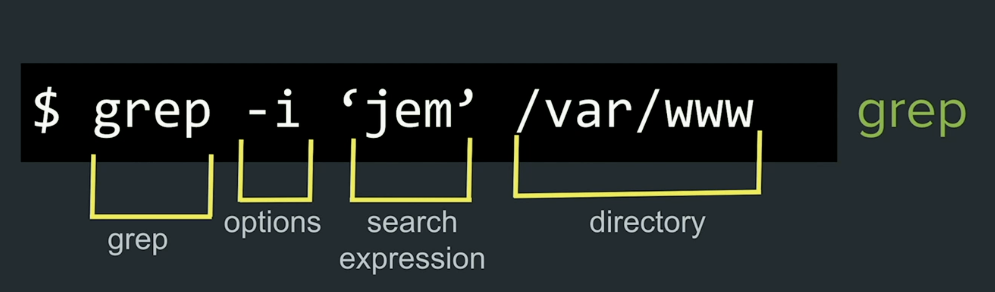
- grep: search file contents
zgrep FILE : search inside gzip file
FInd running node processes
ps aux | grep node
Nginx redirection
// redirect /help to https://developer.mozilla.org/en-US/

location /help {
   return 301 https://developer.mozilla.org/en-US/
}
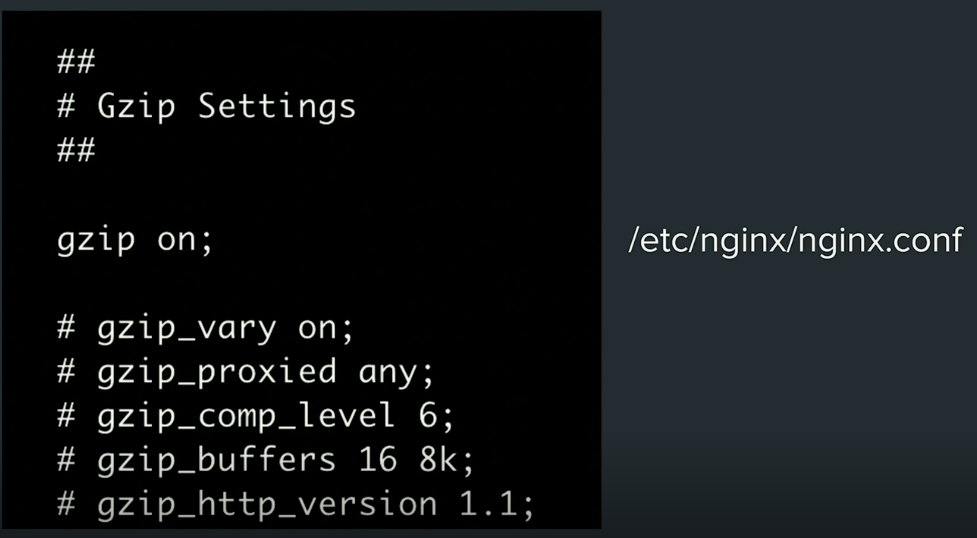
Gzip
Subdomain
vi /etc/nginx/sites-enabled/blog.<YOUR_COMPANY>
server {
    listen 80;
    listen [::]:80;
    server_name blog.<your_domian>;

    location / {
        proxy_pass http://localhost:3000;
    }
}
sudo vi /etc/nginx/nginx.conf
include /etc/nginx/sites/enabled/blog.<YOUR-COMPANY>;sudo service nginx restart
sudo nginx -t
WebSockets
vi /etc/nginx/site-enabled/<YOU_COMPANY>
location / {
    proxy_set_header Upgrade $http_upgrade;
    proxy_set_header Cpnnection "upgrade";

    proxy_pass http://127.0.0.1:3000;
}
check the configuration
sudo nginx -t
restart nginx
sudo service nginx restart
Database
SQLITE 3
1. Install sqlite 3
npm install sqlite3
2. Setup a database
- Create a table name "vistors"
- Create a column named "count"
- Create a column named "time"
3. On connection, save current visitor count
const sqlite = rquire('split3')
const db = new sqlite.Database(":memory:")

db.serialize(() => {
    db.run(`
        CREATE TABLE IF NOT EXISTS visitors (
            id INTEGER PRIMARY KEY AUTOINCREMENT,
            count INTEGER,
            time TEXT
        )
    `)
})

function getCounts() {
    db.each("SELECT * FROM visitors", (err, row) => {
        console.log(row)
    })
}

function shutdownDB() {
    getCounts()
    wss.clients.forEach((client) => {
        client.close()
    })
    console.log("Closing DB")
    db.close()
}

// express server
process.on('SIGINT', () => {
    server.close(() => {
        shutdownDB()
    })
})

// add data to the table
db.run("INSERT INTO visitors (count, time) VALUES (1, datetime('now'))")
HTTPS
Certbot: https://certbot.eff.org/instructions?ws=nginx&os=osx
For http2:
Modify the nginx config file to add http2

Container
Dockerfile:
FROM node:19-apline3.16
RUN mkdir -p /home/node/app/node_modules && chown -R node:node /home/node/app
WORKDIR /home/node/app

COPY --chown=node:node package*.json ./
USER node
RUN npm install

COPY --chown=node . .
EXPOSE 3000
CMD ["node", "app.js"]
Build docker container:
sudo docker build -t node-fsfe .
Run:
docker run -d -p 3000:3000 node-fsfe
Load balancer
sudo vi /etc/nginx/nginx.conf
...
http {
  upstream nodebackend {
    server localhost:3000;
    server localhost:3001;
  }
  log_foramt upstreamlog '[$time_local] $remote_addr - $remoate_user - $server_name $host to: $upstream_attr: $request $status upstream_response_time $upstream_response_time msec $msec request_time $request_time';
  ...
}
sudo vi /etc/nginx/sites-enabled/<YOUR_COMPANY>
access_log /var/log/nginx/access.log upstreamlog;
location / {
  ...
  proxy_pass http://nodebackend;
}
sudo nginx -t
sudo service nginx restart
sudo service nginx restart
Check the logs:
sudo tail - /var/log/nginx/access.log